
Making Notch-Friendly Apps For Android…
How to make your app support edge-to-edge screens with notches
As we all know, following the release of the iPhone X, a lot of Android phones followed suit as well by going edge-to-edge and having cutouts at the top for the camera and other sensors.
There are 16 devices as of August 2018 that have cutout displays, with more on the way later this year.
This has resulted in devices with:
- Smaller bezels
- Larger aspect ratios
- A more immersive experience
This can make gaming, video playing, photo/gallery apps and many more apps fun to use!
But with notched phones, there comes a problem:
The notch takes up a lot of height at the top of the display and hence blacks out the areas on either of its sides, leaving those parts of the screen unusable.
Thankfully, Android Pie has APIs that lets developers manage how they can let their app display the window contents to make use of the screen real estate on either sides of the notch. You even check for the position of the notch, so you can render your views accordingly.
The Problem
Let’s take a deeper look into this issue with the help of a Nexus 5X with a simulated notch, running Android Pie 9.0.
For the purpose of this article, all the app does for now is that it shows a Fullscreen Activity, and becomes immersive when you click on the text at the center as you can see in the demo below; and toggles back and forth when you click on it again.
The source code for this demo app can be found here:
Let’s take a look at the default behaviour of our app:
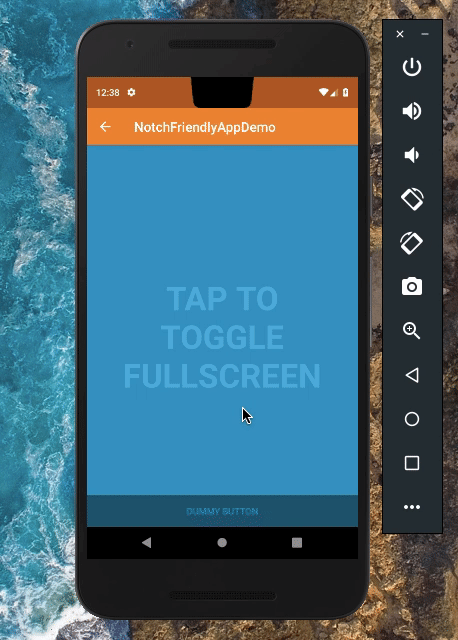
Simulated notched Nexus 5X (Portrait)
The status bar gets resized to a larger size because of the notch at the top center of the phone’s display. So the areas on either part of the notch are unused by the app’s window and make the app feel less immersive.
Additionally, when we make the app fullscreen, both the areas on either side of the notch turn black, and are hence, unused again. This is called letterboxing , and it is a waste of screen real estate.
This is the default behaviour , and it is undesirable to both developers and users.
The Solution
Luckily enough, there’s a simple fix to this, provided by the APIs in Android Pie 9.0.
Step 1:
Create a new values-v28 folder in your res directory and copy the default styles.xml file into it.

Copy styles.xml from values to values-v28
Step 2:
In the values-28 variant of the styles.xml file, go to your Activity’s theme or create a new one if you’ve been using the default one, and set this attribute:
<style name="ActivityTheme">
  <item name="android:windowLayoutInDisplayCutoutMode">
    shortEdges
  </item>
</style>
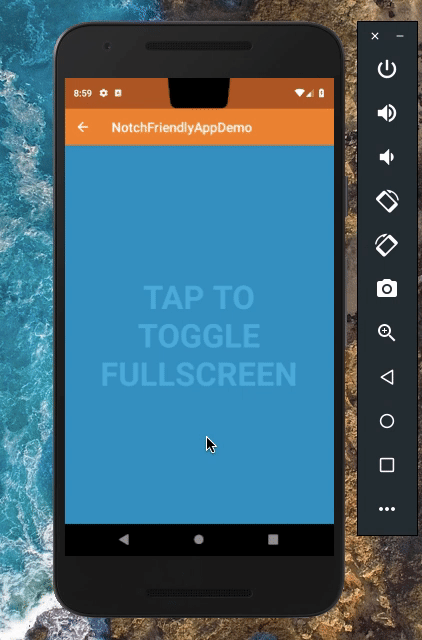
…and voilà! That’s all you have to do to get a more immersive experience in your app and avoid letterboxing by making the app’s window render on either side areas of the notch.
Here’s the result:
More about the different display cutout behaviours…
Note that the windowLayoutInDisplayCutoutMode can have 3 possible values:
default(orLAYOUT_IN_DISPLAY_CUTOUT_MODE_DEFAULT)shortEdges(orLAYOUT_IN_DISPLAY_CUTOUT_MODE_SHORT_EDGES)never(orLAYOUT_IN_DISPLAY_CUTOUT_MODE_NEVER)
The default value is selected by default (obviously) and we’ve seen the demo for this above. It makes:
- the status bar resize to the height of the notch, and
- causes letterboxing in both portrait and landscape mode.
The default mode
The shortEdges value makes your app’s window draw on either sides of the notch, hence making the app more immersive in fullscreen. It leaves out the notch area, which is unusable. No screen real estate wasted! This works perfectly in both landscape and portrait.
The shortEdges mode
The never value makes sure that the app’s window always gets drawn below the notch, both in landscape and portrait mode, and suffers from letterboxing and completely blacks out the areas on both sides of the notch.

The never mode
If you want to drawing elements in the cutout area, you can use getDisplayCutout() provided by WindowInsets class. This lets you check if the contents inside your app’s window overlap with the notch on your display, and if they do, you can reposition elements as required.
How do I test this if my device doesn’t have a notch?
You can only test your notch-friendly app on a device running Android Pie 9.0. So I’d recommend using the Android Emulator, if you aren’t using a phone from the Pixel family.
Enable Developer Options in your phone and click on Simulate a display with a cutout to choose among 4 options:
- None
- **Corner display cutout ** — This simulates a cutout at the top-right corner of the screen.
- **Double display cutout ** — This simulates 2 cutouts; one at the top-center of the screen and the other at the bottom-center of the screen.
- **Tall display cutout ** — This simulates a cutout at the top-center of the screen.
I encourage you to take advantage of the notch-friendly APIs supported by Android Pie and start making your apps more notch-friendly. That’s it for this article and thanks for reading!
You can also find me and all my socials here: