
A Simple Calculator App Using React and Node
About 5 months ago, I found myself in a situation where I needed to write a web based application, which I have chosen not to mention, using JavaScript as the programming language — React for the front-end and Node for the back-end. There was a time constraint, so I had to ramp up and learn as fast as I could about React in the shortest time possible.
I decided to document this experience because I feel like I could help someone in a similar situation by documenting what I was able to learn in the short period of time through writing a simple calculator application.
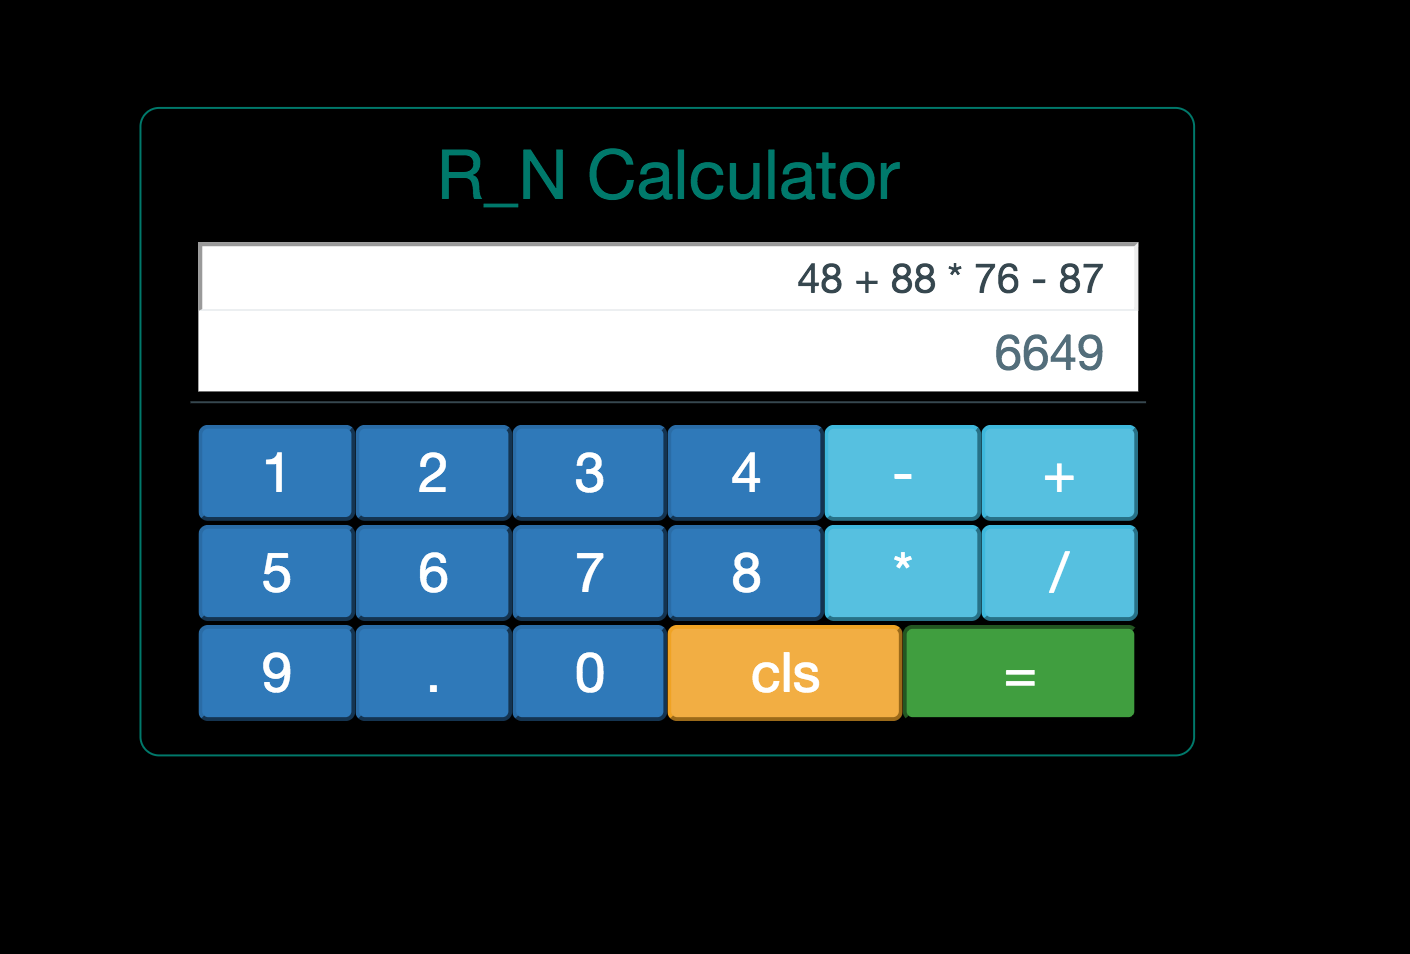
Project Output — Simple Calculator
Let’s talk briefly about the libraries/frameworks and tools we will be using and how they all tie together.
- React: React is a JavaScript library for building user interfaces. It’s similar to Angular. If you are familiar with writing JavaScript then you should be good with React. With that said, _ note that with React, you will be writing HTML and CSS right inside your JavaScript_.
- Node: Node is a server side JavaScript runtime environment. The client side JavaScript runtime environment lives on the browser, but Node allows you write your server side code using JavaScript.
- Git: Git is a version control tool. Git allows you to keep track of the changes you made to files by taking snapshots of these files at different points in time. It allows you to check the state of your files at different points in time.
- Github: Github allows you to host/keep your source code safe somewhere on the web using Git. So, you can keep track of your files using Git and you can save the folder/directory containing all your source files on Github.
- Babel: Babel is a JavaScript library that allows you to write next generation JavaScript (ES2015/ES6 and beyond) and transpiles/converts your next generation JavaScript code down to the version that Node and your browser understand. We would also be using Babel to convert our React code into plain JavaScript understood by the browser.
- [Webpack: Webpack is another JavaScript tool that helps you bundle all resources needed which you would reference in your html file.
Simple!
That might be a lot to swallow, so let’s summarize. We are writing a simple calculator application that would be accessible to us on our browser. Our language of choice will be some variations of JavaScript (JSX and ES6), which would be used on both the server and client side. These variations of JavaScript will be converted to the usual JavaScript understood by the browser and Node using Babel. We will keep track of our progress using Git and save our project files on Github.
Yes, that should be all we would need to get this project to work. Let’s get to the coding part! Before we begin coding, please note that it would be better for you to type in any command that’s necessary instead of just copying and pasting them into the terminal. That would help you avoid problems. Also, the $ symbol is just a prompt from my terminal/shell and is not a part of the commands.
That said, fire up your code editor, I will be using VSCode (it has an integrated terminal from which I can enter commands).
On your terminal, type in the following command to create our react-calculator directory and navigate into the created directory.
$ mkdir react-calculator && cd react-calculator
Next, we’ll initialize our directory for Git (Note that you must have properly installed Git) by running the command below. (Note that all other commands will be entered with the assumption that you are in the root directory of your project, if you don’t close the current tab on your terminal, you should be just fine).
$ git init
Next, we’ll create our package.json file in this directory (our projects root directory) by running the command below.
$ touch package.json
Yep, that creates the file! Now open it up in your favorite editor (I am using VSCode as it has an integrated terminal you can toggle on/off on a Mac by pressing the Control and ~ together).
Our package.json file is used to describe meta-data about our project. Open it in the editor and type in the following:
{
  "name": "react-calculator",
  "version": "0.1.0",
  "author": {
    "name": "Azeez Olaniran"
  },
  "scripts": {
    "start": "babel-node ./server/server.js"
  },
  "dependencies": {
    "babel-cli": "^6.24.1"
  },
  "devDependencies": {
    "babel-preset-es2015": "^6.24.1",
    "babel-preset-react": "^6.24.1",
    "webpack": "^2.4.1"
  }
}
Yes, now we have a brief metadata for our app. I will briefly explain the different nodes you see (though they are quite self explanatory).
-
namedescribes the name of the app. -
versiondescribes the version of the app. -
authordescribes information about the author of the app. -
scriptslets us describe scripts to be executed by theirnameusing npm (Node package manager) on the command line (npm comes bundled with Node). Thestartcommand will be used to start our app server using babel-node, which is a part of the babel-cli package, by converting our ES6 written server.js file in to regular JavaScript in memory and using Node to execute the file. -
dependenciesdescribe/list other modules our app will depend on. -
dev-dependenciesdescribe/list other modules/tools that will be needed during development. Thebabel-preset-es2015andbabel-preset-reactdev-dependencies are Babel plugins used when converting our code which hasES6and/orjsxsyntax.
More metadata can be added to our app. If you’re interested, you could do a bit more research on that.
Alright! Now we need to setup a configuration file that tells Babel what it would need to convert our code. This file is called the .babel.rc file, and it is placed in the root directory of our project. Let’s create this file:
$ echo '{"presets": ["es2015", "react"]}' >> .babelrc
The command above creates our .babelrc configuration file and lists our Babel presets/plugins — es2015 and react. This tells babel, the plugins, what to use when converting our JavaScript code, which contains ES6 and React jsx syntax. Remember we listed these plugin modules in our dev-dependencies section of our package.json file.
You may have noticed that from our start command, we do not have a server folder containing a server.js file just yet, so let’s create that. Go back to your terminal (navigate into our project directory) and run the following command:
$ mkdir server && touch .server/server.js
The above command creates the server directory and creates the server.js file inside the server directory. Next, open the server.js file in your editor and enter the following code:
import http from 'http';
import fs from 'fs';
import url from 'url';
import path from 'path';

/**
 * Function to be used as a callback to our http.createServer method
 * It handles incoming requests and sends the response
 */
function requestHandler(request, response) {
  // resolve the path to the requested resource and assign it to a variable
  let requestedResource = path.join(
    __dirname, // current directory where server.js is found
    '../public', // step out of this directory into the public directory
    url.parse(request.url).pathname // path to resource requested by client
  );

  // use the exists method of the fs module to check if the requestedResource
  // exists.
  fs.exists(requestedResource, function(exists) {
    // check if file does't exist and return a 404 status (File not found)
    if(!exists) {
      response.writeHead(404, {"Content-Type": "text/plain"});
      response.write("404 Not Found\n");
      response.end();
      return;
    }

    // Check if the reqested resource is a directory. If it is, just set our
    // index.html page as the requested resource.
    if (fs.statSync(requestedResource).isDirectory()) {
      requestedResource += '/index.html';
    }

    // Finally, we read the requested file (asynchronously) and send it's
    // content to the client
    fs.readFile(
      requestedResource, // path to requested resource
      "binary", // read the requested resource as a binary file
      function(err, file) { // call back function to handle end of file reading

      // If an error occured while reading the file, send the error message
      // with a status code of 500 (Internal server error)
      if (err) {
        response.writeHead(500, {"Content-Type": "text/plain"});
        response.write(err + "\n");
        response.end();
        return;
      }

      // Helper object to map requested content types (extension) to response
      // mime types
      const contentTypesByExtension = {
        '.html': "text/html",
        '.css':  "text/css",
        '.js':   "text/javascript"
      };

      // Helper object to hold our headers
      const headers = {};
      // get the content type using the requested resource file extension
      const contentType = contentTypesByExtension[
        path.extname(requestedResource)
      ];

      // if the requested resource maps to any of our content type extension,
      // then set the Content-Type field for our response headers.
      if (contentType) {
        headers["Content-Type"] = contentType;
      }

      response.writeHead(200, headers); // write response header (if any)
      response.write(file, "binary"); // write content of read file (binary format)
      response.end(); // send response and close request
    });

  });
}

// create an instance of our httpServer and passing in our request handler callback
const server = http.createServer(requestHandler);
// declare our port noumber
const portNumber = 3030;
// setup our server to start listening on the port we specified
server.listen(portNumber, function () {
  // log to our console, so we know our server is up and running.
  console.log(`Server listening on port ${portNumber}`);
});
Explanation for the code in the server.js file follows below:
Lines 1–4 import our dependency modules from the Node core package.
1. http: To create a http based server/client. In this case we would be using it to create a server.
2. fs: FileSystem module to help us with file/folders related operations
3. url: Uniform Resource Locator module to help us with URL related operations
4. path: File system paths module to help us with path related operations.
Lines 10–73 declares our function, which will be used as a callback for handling client requests on the http server. The code has been heavily commented and I advice that you read the comments to better understand what we are doing.
Lines 80–88 create our http server, pass in our callback to handle client requests, and finally start our server to listen on a specified port.
So, if you carefully went through the code, you would have noticed that we declared a public folder and an index.html file which we want served if the client requests our root folder. We haven’t created our public folder or index.html file yet. Let’s do that now;
$ mkdir public && touch public/index.html
The above command creates our public directory in the root of our project folder and creates our index.html file in the public directory.
Let’s put some minimal HTML in our index.html file now and test our server to see if it’s working.
Open the index.html file in your editor and enter the following HTML code:
<!doctype>
<html>
  <head>
  </head>
  <body>
    <p>Welcome to react calculator</p>
  </body>
</html>
Yes, it’s time to try out our server. Type the following command in your terminal/shell
$ npm start
You should see server started on port 3030 printed out to your console/terminal. Next, open your browser and visit http://localhost:3030 and you should see Welcome to react calculator printed on the screen.
So we have our basic server set up, yay! This is a good time to use Git to take a snapshot of our project so we have a version of this stage of our app.
On your terminal, type in the following Git command:
$ git status
This would print out the status of all files in our project directory. We’d need to track all files by staging them.
The truth is that we have our node_modules folder amongst untracked files and we really do not need to track files in our node_modules folder since it only contains our projects dependencies & dev-dependencies, both of which we can always get by running npm install on the terminal.
So, we need to tell Git to ignore this folder. Open your terminal and enter the command:
$ echo node_modules >> .gitignore
This creates a .gitignore file (since it doesn’t yet exist) and writes the text node_modules to the .gitignore file. Try running git status again in your command line, you would notice that our node_modules folder is no longer available in our list of untracked files.
To stage all files (add files to staging,) type this command into your terminal:
$ git add .
This would stage all your files, making them ready to be committed (snapshotted). To verify that the files have been staged, you can type in git status again into your terminal.
Let’s commit the staged files and add a commit message. Do this with this command:
$ git commit -m 'Set up basic server and index.html page'
To view our snapshot/commit in the log of all our commits, just type this command into your terminal:
git log
You should now see your very first commit message, yea!
Finally, it’s time for us to create the view of our calculator using React.
First, what we are going to do is to set up our configuration for Webpack (remember Webpack right). The configuration is a simple JavaScript object with different properties that make it highly configurable. There are four major configurable properties for the object —
- entry: This describes the entry point for Webpack in to our application. For this we will have our index.js file in the root directory of our client folder. This will be the starting point of the front-end of our application.
- output: This describes our output directory and the name of our output JavaScript file. After Webpack is done bundling, it will spit out the bundled files into this directory along with a single bundled JavaScript file, which we would give a name.
- loaders: Webpack on it’s own only understands plain JavaScript. But the files we would be bundling would include; .jsx files written in ES6. This is where loaders come in, Webpack allows us to specify specific loaders for different file types. Since we will be writing ES6 syntax mixed with jsx, we will include a loader to handle the ES6 syntax and another loader to handle the jsx syntax.
- plugins: Plugins are similar to loaders. We won’t be using them in this tutorial, but if you want to learn more about them you can check the Webpack documentation on their website.
Alright, now that we know what all of this does, let’s create our Webpack config file in the root of our project. Open your terminal and enter the following command to create the webpack.config.js file.
$ touch webpack.config.js
After creating the Webpack config file, open it in your editor and enter the following:
const path = require('path'); // import Node.js path module for path related operations
// create our config object
const config = {
  entry: path.join(__dirname, '/client/index.js'), // Abosolute path to our entry file
  output: { // our output configuration
    path: path.join(__dirname, './public/'), // output path (directory/folder)
    filename: 'bundle.js' // output bundled file name
  },
  module: { // define our loaders here
    rules: [ // array of rules to handle different file types
      {
        test: /\.(js|jsx)$/, // check for .js and .jsx files (uses Regex)
        loader: 'babel-loader' // use these loaders for .js and .jsx files found
      }
    ]
  }
};

// export our config object.
// You may have noticed we are using es5 syntax here. This is because Webpack, which would be using this
// file, expects es5 syntax
module.exports = config;
So there we have our webpack.config.js file, which basically defines and exports a JavaScript object. It is intentionally heavily commented so you can easily understand what is going on in there.
Notice that we stated a loader (line 13) to handle our .js and .jsx files. This loader is an external module, which Webpack will try to look for when trying to bundle our file. We will add it to our dev-dependencies in our package.json file. To do this, just open the terminal and enter the command
$ npm install --save-dev babel-loader. to install the loader and update the dependency section of our package.json file.
Also notice that we mentioned a client folder (line 4) in our config file. This folder will hold our jsx files for our calculator client. Let’s create this folder along with our index.js file.
$ mkdir client && touch client/index.js
The above command will create our client directory in the root folder of our project and also create our index.js file inside our just created client directory. Next we shall write our first jsx file.
In order to write React components and mount them into the DOM, we will be depending on some React packages:
- React: This is the core React package and will contain many of the modules we need.
- ReactDOM: This package contains DOM specific methods that will help us mount our React application component into the DOM.
To use thess two packages, we will need to install them and add them to our project dependencies (in our package.json file). Enter the command below to install and save both packages to our project dependencies.
$ npm install -save react react-dom
Now that we have both packages installed, we can open our index.js file (in our client folder) and write and mount our first React component.
Open up the index.js file and paste the following code into it. I will try to give a detailed explanation both in comments in the file and here.
import React from 'react'; // import React package
import ReactDOM from 'react-dom'; // import ReactDOM package

// using the render method, we will mount this node into our DOM (html file) on the element with
// id of 'app'
ReactDOM.render(
  <div> Hello World</div>,
  document.getElementById('app')
);
So basically, what this file does is it pulls in our React related modules. This file would be bundled using Webpack and the resulting bundled file will be placed in our public folder, which already contains our index.html file.
Lines 1 and 2 import react and react-dom modules which we don’t yet have available. We will add them to our project dev-dependencies as well as pull them into our project. Just enter this command into your terminal to update our package.json dev-dependency section and download the modules:
$ npm install --save-dev react react-dom
Lines 4–7 we are using the ReactDOM package render method to mount a node into our DOM.
The node to be mounted is the <div>Hello World</div> found on line 5.
On line 6, we are referring to the element into which we want ReactDOM to insert our React component. The element id is app. If you remember, we do not have any element with and id of ‘ app ’ in our index.html file (in our public directory). We need to add that now, along with a script tag pointing to our bundle.js file. Just update your index.html file with what you have below:
<!doctype>
<html>
  <head>
  </head>
  <body>
    <div id="app"></div>
  </body>
  <script src="./bundle.js"></script>
</html>
Yea, that’s it. We need to add a command to the scripts section of our package.json file which will allow us to invoke Webpack to bundle our files using the webpack.config.js file. Open your package.json file and add:
"webpack": “webpack --config=webpack.config.js just below the start command in the scripts section (don’t forget to add a comma after the script command and before the webpack command).
This adds the Webpack command as part of our available scripts command. We’ll use the command to invoke Webpack and pass it the config file.
Your package.json file should now look like the one below:
{
  "name": "react-calculator",
  "version": "0.1.0",
  "author": {
    "name": "Azeez Olaniran"
  },
  "scripts": {
    "start": "babel-node ./server/server.js",
    "webpack": "webpack --config=webpack.config.js"
  },
  "dependencies": {
    "babel-cli": "^6.24.1"
  },
  "devDependencies": {
    "babel-loader": "^7.0.0",
    "babel-preset-es2015": "^6.24.1",
    "babel-preset-react": "^6.24.1",
    "react": "^15.5.4",
    "react-dom": "^15.5.4",
    "webpack": "^2.4.1"
  }
}
Yes, now that we have Webpack set up, we can generate our first bundle.jsand test it out on our server.
Open your terminal and enter the command below to invoke Webpack to generate our bundle.js file in the public directory:
$ npm run webpack
After running the above command, you can check our public folder and our bundle.js file should have been generated.
Also, on the command line, let’s start our server with the command below:
$ npm start
Our server should be up and running. Open up your browser and visit http://localhost:3030 and you should see our Hello world message displayed in the browser. Yay, we have set up Webpack and hooked it up with React and Babel. Let’s make our second commit:
First we will ignore our bundle.js file in the public folder because it is always generated by Webpack (this is my preference). Open the terminal and enter the command below to append our bundle.js file to the list of our Git ignored files/folders:
$ echo '\npublic/bundle.js' >> .gitignore
Followed by -
$ git add .
to add/stage all our changed files and
$ git commit -m 'set up webpack and test bundle.js file'
to make our second commit along with its descriptive message.
Yay, we have successfully wired up Webpack with Babel.
For this app we will be using external style sheets (you can write inline style sheets in react components) , so we’ll have to revisit our Webpack config and tell it how to handle our style files (.css files). Also, within our client folder, we will create a subfolder called styles and create a main.css file there.
Let’s create our style file, open up the terminal and enter the following command to create our style file:
$ mkdir client/styles && touch client/styles/main.css
That should create our main.css file in our styles folder within our client folder. Open up the main.css file and let’s set the background of our page to black by entering the code below:
body {
  background-color: black;
}
Next, we will import our main.css file into our index.js file (entry point of Webpack into our app), and your index.js file should be updated with the code below:
import React from 'react'; // import React package
import ReactDOM from 'react-dom'; // import ReactDOM package
import './styles/main.css'; // import our external css file

// using the render method, we will mount this node into our DOM (html file) on the element with
// id of 'app'
ReactDOM.render(
  <div> Hello World</div>,
  document.getElementById('app')
);
You can see the import of our main.css file on line 3. Now that we have CSS files in our project, we need to add a css-loader and a style-loader to the modules section of our webpack.config.jsfile, our updated webpack.config.js file is shown below:
const path = require('path'); // import Node.js path module for path related operations
// create our config object
const config = {
  entry: path.join(__dirname, '/client/index.js'), // Abosolute path to our entry file
  output: { // our output configuration
    path: path.join(__dirname, './public/'), // output path (directory/folder)
    filename: 'bundle.js' // output bundled file name
  },
  module: { // define our loaders here
    // array of rules to handle different file types
    rules: [
      {
        test: /\.(js|jsx)$/, // check for .js and .jsx files (uses Regex)
        loader: 'babel-loader' // use this loader for .js and .jsx files found
      },
      {
        // check for files ending with  .css (uses Regex)
        test: /\.css$/,
         // use these loaders of .css files. 'css-loader gets run first and is
         // used to handle the imports of our css files inside our jsx files.
         // The style loader then mounts our css in to the DOM
        loaders: ['style-loader', 'css-loader']
      }
    ]
  },
  // set the file extensions we want webpack to resolve
  resolve: {
    extensions: ['.js', '.jsx']
  }
};

// export our config object.
// You may have noticed we are using es5 syntax here. This is because Webpack, which would be using this
// file, expects es5 syntax
module.exports = config;
Lines 15–18 show our addition of a css loader , while in line 26–29, we configure what types of files should be resolved by Webpack (with this, we don’t need to specify the extension when importing .js & .jsx files). Next, let’s install this loader using npm and also update our dev-dependency section of our package.json file to contain our css-loader module.
Enter the command below in your terminal:
$ npm install --save-dev style-loader css-loader
Let’s bundle our file again and start up our server to see our style settings reflect:
$ npm run webpack && npm start
The above command will create our bundle.js file and start our server. Next, we should navigate to http://localhost:3030 to see our changes reflected.
Alright, now that we’ve set up our Webpack config file, we can focus on writing our React components and wiring up our calculator!
Let’s create our third commit. Run the commands below in your terminal to stage our changed files and commit them:
$ git add .
To add all changed files to the staging area, and
$ git commit -m 'Setup Webpack loaders configuration'
to commit all our changes with a short commit message. You can view you commit history by typing $ git log in your terminal.
Up next, we will be writing and wiring up our calculator components using React.
The Calculator
Since React allows us to write using components, we will look at our simple Calculator and identify the components it would be composed of.
- Frame: This would be the frame of our calculator and it would hold other parts listed below together.
- Screen: We’re sure that we want the user to see their inputs/outputs so that’s what our screen is going to do for us — display user input and output.
- Screen Row: Our screen is going to be made up of 2 rows. One on top to show user input and another on the bottom to show calculation output. Note that this means our screen should be capable of holding two screen rows.
- Buttons: We will have 2 main types of buttons — numeric input buttons (0, 1,2 3, 4, 5, 6, 7, 8, 9) and our action buttons ( +, — , x, /, =). They would allow our users to enter their inputs/actions.
So, we have been able to identify the basic components for our app. Next we will create our frame component which is supposed to hold other components and style it appropriately. I won’t be going into details of the styling, just know that to update the style, we would have to tweak the main.css file we created earlier.
Create the frame component file within a component folder in our client folder using the command below:
$ mkdir client/components && touch client/components/frame.jsx
Open the new created frame.jsx file and enter the following into it:
import React from 'react'; // import react module

// create a class which extends react component
class Frame extends React.Component {

  // Render function to creat component to be rendered on the DOM.
  // This method must return a single parent element as you can see here.
  // The component is wrapped around () to make it a single expression.
  render() {
    return (
      <div className="frame">
        <div className="calculator-title">
          R_N Calculator
        </div>
      </div>
    );
  }
}

// export our frame component. To be used in our client/index.js file
export default Frame;
So the class above creates a React component by extending the Component class from the React module. The render components describe what should be displayed on the screen when this component is loaded into the DOM. The className attribute found on elements refer to class attributes on regular HTML elements. We will be using them when styling our application. Finally, we export our frame component. We shall be using it in our index.js file in the root of our client folder.
Open up our index.js file in the root of our client folder and update with the contents below:
import React from 'react'; // import React package
import ReactDOM from 'react-dom'; // import ReactDOM package
import Frame from './components/frame'; // import our frame component
import './styles/main.css'; // import our external css file

// using the render method, we will mount this node into our DOM (html file)
// on the element with id of 'app'
ReactDOM.render(
  <Frame />, // mount our frame component
  document.getElementById('app')
);
Major changes here are line 3, where we import our newly created frame component, and line 9, where we mount our frame component like a regular DOM element.
Next, we are creating our screen-row component. Create the file to hold contents of our screen-row component by entering the command below into the terminal:
$ touch client/components/screenRow.jsx
Open the created screenRow.jsx file in the editor and update it to contain the contents below:
import React from 'react';

// Screen row component is written as a functional component
// it receives and displays (in an input field) a props (property) of value from
// it's parent component
const ScreenRow = (props) => {
  return (
    <div className="screen-row">
      <input type="text" readOnly value={props.value}/>
    </div>
  )
}

// we describe the props (property) that the parent element is required to pass
// into this component
ScreenRow.propTypes = {
  value: React.PropTypes.string.isRequired
}

export default ScreenRow;
There, we have our screen row component above. Unlike our frame component, it’s a functional component and we would be using it to display information to our users (input and output (answers)).
Next let’s create our Button component for entering inputs/actions.
Open the terminal, and create the button component file with the command below:
$ touch client/components/button.jsx
Open the created button.jsx file in the editor and update it to contain as below:
import React from 'react'; // import react module

// create our Button component as a functional component
const Button = (props) => {
  return (
    <input
      type="button"
      className={props.type === 'action' ? 'button action-button' : 'button input-button'}
      onClick={props.handleClick}
      value={props.label}
    />
  );
}

// describe our expected props types
Button.propTypes = {
  type: React.PropTypes.string.isRequired,
  handleClick: React.PropTypes.func.isRequired,
  label: React.PropTypes.string.isRequired
}

// export our button component.
export default Button;
Finally, let’s create our screen component. Its job is to help us hold both screen rows (one showing the user input and the other for output).
Open the terminal and enter the command below:
$ touch client/components/screen.jsx
That will create our screen component. Open the screen component and update it as below:
import React from 'react'; // Import react module
import ScreenRow from './screenRow';

// Create our screen component as a functional component.
// It would display two screen rows, 1 for questions and the other for the answer
// The value would be passed down from it's parent component as a prop
const Screen = (props) => {
  return (
    <div className="screen">
      <ScreenRow value={props.question}/>
      <ScreenRow value={props.answer}/>
    </div>
  );
}

// Define our props expected from the parent component
Screen.propTypes = {
  question: React.PropTypes.string.isRequired,
  answer: React.PropTypes.string.isRequired
}

// export our component
export default Screen;
This component is a bit different from our other components, because it holds 2 other components — top screenRow to show the question the user types in and the bottom screenRow to show the answer to the question when the user presses the equal button.
Now it’s time to wire up all our components together in our frame. I will update the code for the frame component and then spend time on explaining the code as much as possible through comments both in the code and here. Here is the update frame component code:
import React from 'react'; // import react module
import Screen from './screen'; // Import our screen component from this directory
import Button from './button'; // Import our button component from this directory

// create a class which extends react component
class Frame extends React.Component {
  constructor() {
    super();
    // set our default state
    this.state = {
      question: '',
      answer: ''
    }
    // Bind our handleClick method (sets 'this' explicitly to refer to this componenent)
    // We did this because 'this' would refer to the source of the click events
    this.handleClick = this.handleClick.bind(this);
  }

  // Render function to creat component to be rendered on the DOM.
  // This method must return a single parent element as you can see here.
  // The component is wrapped around () to make it a single expression.
  render() {
    return (
      <div className="frame">
        <div className="calculator-title">
          R_N Calculator
        </div>
        <Screen question={this.state.question} answer={this.state.answer}/>
        <div className="button-row">
          <Button label={'1'} handleClick={this.handleClick} type='input' />
          <Button label={'2'} handleClick={this.handleClick} type='input' />
          <Button label={'3'} handleClick={this.handleClick} type='input' />
          <Button label={'4'} handleClick={this.handleClick} type='input' />
          <Button label={'-'} handleClick={this.handleClick} type='action' />
          <Button label={'+'} handleClick={this.handleClick} type='action' />
        </div>
        <div className="button-row">
          <Button label={'5'} handleClick={this.handleClick} type='input' />
          <Button label={'6'} handleClick={this.handleClick} type='input' />
          <Button label={'7'} handleClick={this.handleClick} type='input' />
          <Button label={'8'} handleClick={this.handleClick} type='input' />
          <Button label={'*'} handleClick={this.handleClick} type='action' />
          <Button label={'/'} handleClick={this.handleClick} type='action' />
        </div>
        <div className="button-row">
          <Button label={'9'} handleClick={this.handleClick} type='input' />
          <Button label={'.'} handleClick={this.handleClick} type='input' />
          <Button label={'0'} handleClick={this.handleClick} type='input' />
          <Button label={'Cls'} handleClick={this.handleClick} type='action' />
          <Button label={'='} handleClick={this.handleClick} type='action' />
        </div>
      </div>
    );
  }
  // our method to handle all click events from our buttons
  handleClick(event){
    const value = event.target.value; // get the value from the target element (button)
    switch (value) {
      case '=': { // if it's an equal sign, use the eval module to evaluate the question
        // convert the answer (in number) to String
        const answer = eval(this.state.question).toString();
        // update answer in our state.
        this.setState({ answer });
        break;
      }
      case 'Cls': {
        // if it's the Cls sign, just clean our question and answer in the state
        this.setState({ question: '', answer: '' });
        break;
      }
      default: {
        // for every other commmand, update the answer in the state
        this.setState({ question: this.state.question += value})
        break;
      }
    }
  }
}

// export our frame component. To be used in our client/index.js file
export default Frame;
In line 1, we import our react module. In lines 2–3 we imported our custom components which we will need in our frame.
In line 7 to 17, we defined our constructor for this component.
In line 8 we called to super method so that our parent component is properly initialized since our components extends from React Component.
In line 10–13 we set the initial state of our component. The question property will hold the current question based on the user inputs, and the answer property will hold the answer to the question once the user clicks on the equal sign.
In line 16, we set the explicitly set the this value of the handleClick method. Since this method will be called as a result of an event, this in that context will refer to the event that invokes the function.
**Lines 22–56 ** contain our render method. This method contains what we want drawn on the screen.
In line 28 we have our screen component. If you check the screen component file, you will remember that it receives two props — questionand answer and passes those props down to the ScreenRow components. Notice that the question and answer props are from the state of our Frame component — as a result, anytime the values are updated in the state, they reflect on any component that uses them.
Lines 21–51 contains several of our Button components. For each of them, we pass the handleClick method defined in this component (our Frame component) down as a props. You can also check the props required for the Button component by checking the button.jsx file in our components folder. So anytime any of our Button component are pressed, the handleClick method gets invoked. We also pass other necessary props to our Button components — its label determines the value on the buttons and a type property discerns between regular question input buttons and action buttons and style them accordingly.
Finally, we have our handleClick method from line 59–80.
On line 60, we get the value from the element that fired the event.
On line 61, we check the value and use it to execute different blocks of code.
From line 62–68, we check if the value is an = sign. If it is, we use the eval function on the browser to execute the question fetched from the state as-is. This returns a value on which we invoke the toString method so it’s converted to a String
The answer received is then used to update the state. Updating this answer in the state causes every component using it as a props to reflect the new answer.
From line 69–73, we check if the value is a Cls sign, if it is, we just reset the question and answer in the state to it’s default values.
From line 74–78, we handle every other value as question inputs and use them to update the question property in the state.
That basically explains our frame component. I intentionally added className in all the components for anyone who would love to go a step further and style our calculator so it looks better. Just remember, class in regular HTML & CSS = className in react components.
Now, we can add the changed files to the staging area and commit them. Open the terminal and enter the commands below:
$ git add . && git commit -m 'Wire up frame component'
You can also run the app again by entering the following command in the command line:
$ npm run webpack && npm start
Bonus
We are going to create a Github repository and put our project there. Github is basically an online platform for keeping your project repositories. Go to Github and create an account.
After creating an account, just click on the + button next to your profile image at the top right and select create repository. Enter react-calculator as the repository name and click the green Create Repository just at the bottom of the page.
That takes you to the next page with several options, we will use the second option labelled …or push an existing repository from the command line. You will see the necessary commands that we need to add our react-calculator project to Github. Enter those commands in your terminal. I will list them below:
The first command sets up project to track the Github repository, while the second command pushes your latest code to Github.
You should now see your repository on Github.
You can also find this complete project here on Github.
The project you should have right now would not look as fancy as the image in the post. I intentionally left out the styling of the calculator to save time and also as a challenge for readers. You can find the styled project on this Github branch.
Summary
To summarize, we were able to build a simple calculator using React library to build our front-end and Node to build our server. We have used Webpack to bundle our .jsx files to regular .js file and bundled them into the public folder of our project. Since we are writing ES6 and React based**.jsx** syntax, we configured Babel to convert from those syntax to regular JavaScript understood by the browser.
Thanks for sticking with me through this tutorial. If you have any questions you can always leave a comment here.
This post was originally published by the author here. This version has been edited for clarity and may appear different from the original post.
I followed all your steps in this tutorial, all I get is a white screen even after I add all the HTML buttons and components. I’ve recompiled webpack numerous times, same result.Actually I’ve just fixed my issue. I deleted everything within node_modules, and simply ran npm install, as per your original package.json file contents. The key to making it run was babel-loader needs to be exactly at 7.0.0. Afterwards, I ran ‘$ npm install --save-dev style-loader css-loader --no-bin-links’ which helped with the CSS files. Finally, I ran webpack again and started the server, all the buttons were there. Took several tries before I finally got it. I’m gonna add to it more functionality and its a nice way to finally learn React & Node.‘npm start’ gives a whole load of errors. One of them being ‘Couldn’t find preset “es2015” relative to directory’. Can you help me to build a vorici calc ?
I followed all your steps in this tutorial, all I get is a white screen even after I add all the HTML buttons and components. I’ve recompiled webpack numerous times, same result.
Hi Karim. Are there any errors in the browser console?
Actually I’ve just fixed my issue. I deleted everything within node_modules, and simply ran npm install, as per your original package.json file contents. The key to making it run was babel-loader needs to be exactly at 7.0.0. Afterwards, I ran ‘$ npm install --save-dev style-loader css-loader --no-bin-links’ which helped with the CSS files. Finally, I ran webpack again and started the server, all the buttons were there. Took several tries before I finally got it. I’m gonna add to it more functionality and its a nice way to finally learn React & Node.
Glad you figured it out!
‘npm start’ gives a whole load of errors. One of them being ‘Couldn’t find preset “es2015” relative to directory’. If you ever get these errors, I’ve found a solution/fix here: https://ourcodeworld.com/articles/read/324/couldn-t-find-preset-es2015-and-react-relative-to-directory