
How to Build A Task Notification Bot for Slack with Python (Part 1)
“Slack bot background on a chatbotslife article” by Vic Yankoff marked as “reusable” on Google.
I built a Slack bot that automates the process of notifying members of tasks assigned to them in a group or team. These tasks should be listed on a Google spreadsheet.
The Slack bot gets data from a Google spreadsheet, analyzes it and notifies the group’s channel of tasks to be checked in, or submitted on a certain date. I added a feature that enables a member of the team to use Slack Slash commands (e.g/ranti show-task today) to request the task for a specific day or their personal task(s).
There’s quite a bit to understand for all the pieces to come together, so I thought I would document the process and share my experience to help out other slackers and developers, especially those looking to create custom Slack bots with the above mentioned features.
Bots are handy little assistants that hang out in your app, wait for commands, and then find or create the things you need. They are another way to use your favorite apps without needing to open them, running automated tasks for you. They’re the big new thing, a core part of Slack, Facebook Messenger, and Telegram’s newest features and yet they’re often too complicated to build and use. — Matthew Guay
At the end of this tutorial, we would have created a slack bot webhook and a slash command /ranti , that allows users to receive notifications of tasks on a channel and request tasks for themselves or specific days respectively. This article will also teach you the basics of interacting with a Google spreadsheet using the gspread python package.
Requirements
To follow along, the following requirements need to be met:
Tools/Packages
- A Slack Team (for development/testing)
- The slack API console (It will be of great help to read through the slack api documentation here)
- Python 3.x (It may not work properly on Python 2.x)
- VirtualEnv (to install python packages locally for a project without conflicting with global packages)
- Flask (a microframework for Python based on Werkzeug, Jinja 2 and good intentions)
- A text editor (I used Visual Studio Code, but I am starting to love my PyCharm)
- Heroku (for testing our application)
- Google spreadsheet (you can make a copy of this spreadsheet)
- Google API console (to get a Google service account and OAuth2 credentials)
Skills
- Familiarity with basic CLI commands
- Basic python skills (package installation and basic syntax)
Setting up our App Repository.
Let’s start our workflow by creating our file structure and setting up the basics for writing our bot. Follow the steps listed in this Github Gist.
Our File Structure
We will create four folders in our project folder earlier created. They include app , config , static , templates . In our app folder, let’s create an utils folder. This will hold all our application utilities.
.
├──project
│ ├── app
│ │ ├── __init__.py
│ │ ├── actions.py
│ │ └── utils
│ │ ├── gappshelper.py
│ │ └── slackhelper.py
│ ├── client_secret.json
│ ├── config
│ │ ├── __init__.py
│ │ └── env.py
│ ├── ranti.py
│ ├── requirements.txt
│ ├── static
│ ├── templates
│ ├── Procfile
│ ├── README.md
│ └── worker.py
│
└──renv
Creating A Flask App
Next step, we’ll create a simple flask application to serve our project so we can host it. Create a file called ranti.py inside the root of the projectfolder. This will be our application entry point. Insert the following code in it:
You have created a complete flask application. Our application will be served on port 5000 by default. To view our app, run the app with flask run then goto http://localhost:5000 in your browser and you should see “ Hello World ”.
App Configurations
Let’s setup our application configurations for different environments. Inside the config folder, create two files called the _init_.py and env.py .
We will initialize our config in the _init_.py . Copy and paste the following snippet in __init__.py file.
From the above we need our env.py that holds reference and configurations for different environments for our application. This data is then stored in our system environment variable and can be retrieved by calling the get_env method and passing in the desired key, in this case our app_env.
Copy and paste the below code snippet into env.py.
Slack “Bot User” Setup and API(Auth Key) configuration
Let’s create a new slack app so that we can obtain a slack API token and test our bot once we are done. Set a desired name for the app and pick your desired development workspace — a slack team you already belong to and have admin access. I will use “ Ranti Bot ” for mine and select the Proton slack team workspace.

slack app creation form. NB: keep the slack api dashboard open for the next few steps.
We then select “ Bot Users ” under the “ Features ” section. Set, the Display name and the Default username for our bot user. These gives our bot the ability to talk in channels, groups and have direct messages with users in the workspace. Click on the “ Add Bot User ” to save the changes. We should see a screen like the following:

bot user setup page.
Now, select the “ Install App ” menu under the “ Settings ” section. Click on the button to install the App in our Team Development Workspace. Once the App is installed, we should see the following screen:

Installed App settings page — Auth Details can be found here.
Copy and save both the “ OAuth Access Token ” and the “ Bot User OAuth Access Token ”. We will use them further down the line of the tutorial.
Google “Sheet” API(Auth Key) setup and configuration
Let’s all duplicate this sheet, so we can follow along with this tutorial. To programmatically read from your google sheet, a service account and OAuth2 credentials from the Google API Console is required.
We will be creating our service account and getting the necessary credentials by following this steps below:
- Visit the Google API Console.
- Create a new project. Name it “Proton Group Task”
- Click Enable API. Search for and enable the Google Drive API.
- Create credential_s_ for a Web Server to access Application Data.
- Name the service account and grant it a Project Role of “Editor”.
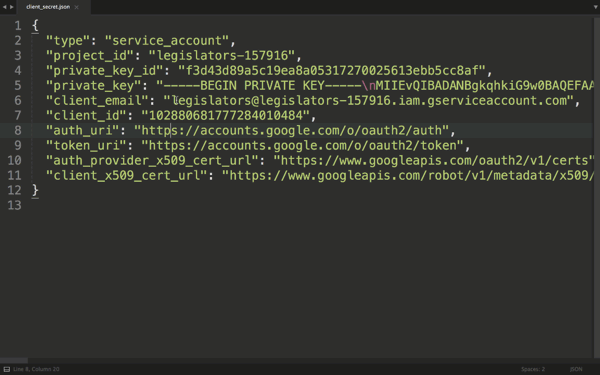
- Download the JSON file to your system.
- Copy the downloaded JSON file to your project directory and name it to
client_secret.json
Service Account creation. steps in GIF.
Then share the spreadsheet document with the client_email inside the client_secret.json file.
sharing the spreadsheet document with the client_email in the client_secret.json file. steps in GIF.
Now we are authorized to use both the slack API and the Google Spreadsheet API.
We will be using the following python packages to interface with our APIs,
slackclient- to interact with slack APIsgspread- to interact with Google Spreadsheets APIsoauth2client- to authorize the Google Drive API using oAuth2.0
It’s time to do some more coding…
Let’s start with creating our slack client helper - slackhelper.py and the Google spreadsheet helper - gappshelper.py files. These files will contain connections to our APIs and methods that will be used by our bot actions.
Create a file gappshelper.py in our app/utils folder. Inside this file, let’s copy the following snippet into it.
import gspread
from os import path
from config import get_env
from oauth2client.service_account import ServiceAccountCredentials
Now that we have imported all the necessary packages and dependencies for this file, we can then create our GappsHelper class which will contain properties and methods needed to interact with our Google Spreadsheet.
In the code above, we created an __init__ method to initialize an instance of the GappsHelperclass whenever we need it, with properties necessary for the class instance to function well as specified in the google drive API documentation.
We also created a method called open_sheet which would be used to open a sheet and return all the records in that particular sheet. This serves as a get request to our database-google spreadsheet.
We now have access to our Google sheet and can fetch data from it. How will we pass this data to users on slack who have requested for them using our slash commands?
Well think no further, we shall be creating a slackhelper.py file in app/utils folder to hold all our properties and methods required to interact with Slack. In the file, we will require a package known as SlackClien, which is a python wrapper for the Slack API and our get_env method inside our config module.
from slackclient import SlackClient
from config import get_env
Now, let’s create our SlackHelper class and commence creating our slack helper methods.
class SlackHelper:

   def __init__ (self):
      self.slack_token = get_env('SLACK_TOKEN')
      self.slack_client = SlackClient(self.slack_token)
      self.slack_channel = get_env('SLACK_CHANNEL')
We create our constructor and define properties such as the slack_token , slack_channel from our environment variables and slack_client — an instance of SlackClient.
Next we create the other methods required for us to interact with Slack from our application. Copy and paste the code snippet below in the SlackHelper file.
We created post_message , post_message_to_channel , file_upload and user_info methods. Here we can have many other methods used to interact with Slack, from dialog method, etc.
Let’s make a little change to our app entry point ranti.py . We will abstract some of the functionality here into our app folder.
Replace the content of ranti.py with the above code snippet. We are importing our create_app method from theapp folder in __init__.py and then passing in the app_env . We then call the run method on our app to start our flask server.
In our app folder, let’s create an __init__.py file. Here we will create our app and also write our main app entry route. Copy and paste the code snippet below in it.
Hurray, now we can start our server and we should see Hello World when we visit the url in the browser.
We will continue our implementation of our webhook and our application interaction with our slash commands in the Part 2 of this tutorial.
Do you have any Questions? You can reach me on Twitter @jattorize. I’m also on GitHub with the username jattoabdul.
See something wrong in this post? Fork this tutorial’s source on GitHub and submit a pull request.
You can find Part 2 of this tutorial here
Originally posted on The Andela Way .