
Create Tinder Swipe Questionnaire with ionc5 Gestures
In this tutorial I will be walking you through how to create a tinder swipe questionnaire with ionic5 gestures.
In February 11, 2020 Ionic announced the release of a new version - Ionic5, and one of the top feature that was introduced is the Gestures. This is better than having to install hammerjs.
Let's start by creating a new blank ionic5 project by running the command below:
ionic start ion-tinder-swipe
Since we are going to have more than one question, we will start by creating some dummy questions. So in the home.page.ts file let add the following code.
questions = [
    {
      'id': 1,
      'question': "Do you have more than one source of income?"
    },
    {
      'id': 2,
      'question': "Do you have a car?"
    },
    {
      'id': 3,
      'question': "Do you pay rent?"
    },
    {
      'id': 4,
      'question': "Do you have more than one kid?"
    },
    {
      'id': 5,
      'question': "Do you know ionicframework?"
    }

  ]
The next thing is to create those cards based on the questions in the html page of our app.
Modify the code in home.html file by adding the following code within the ion-content.
<ion-card *ngFor="let question of questions; let index=index">
    <ion-card-header>
      <div class="progress"></div>
    </ion-card-header>
    <ion-card-content>
      <div class="inner-wrap">
        <p>
          Question {{question.id}} of {{questions.length}}
        </p>
        <h2>
          {{question.question}}
        </h2>
      </div>
    </ion-card-content>
</ion-card>
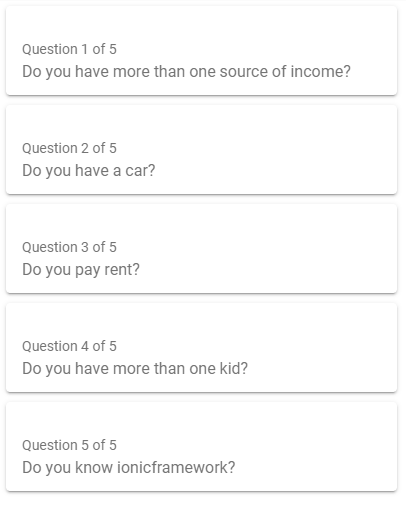
The result of the app should look like this:
|  |
|
|
|
Let modify our questions card so that they can be stacked on each other. Open the home.page.scss and paste the css below:
ion-content {
    --background: #eee;
    font-family: sans-serif;
    --padding-top: 50px;

    ion-card {
      height: 330px;
      width: 312px;
      margin: auto;
      position: absolute;
      border:solid 1px #c2a3ff;
      left: 0;
      right: 0;
      border-radius: 24px;
      box-shadow: -1px 1px 75px 39px rgba(141, 129, 208, 0.48) inset;
      -webkit-box-shadow: -1px 1px 75px 39px rgba(141, 129, 208, 0.48) inset;
      -moz-box-shadow: -1px 1px 75px 39px rgba(141, 129, 208, 0.48) inset;

      ion-card-header {
        .progress {
          height: 25px;
          border-radius: 2px;
          width: 52px;
          border-bottom: 5px solid #7733ff;
        }
      }

      ion-card-content {
        div.inner-wrap {
          display: flex;
          flex-direction: column ;
          justify-content: center;
          height: 200px;

          p{
            color: #7733ff;
          }

          h2{
            color:#111 !important;
            font-size: 19px;
          }
        }
      }
    }
  }
Now our cards are stacked on top of each other like this:
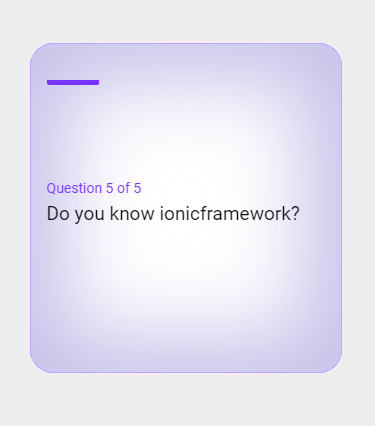
We need to show some part of the cards behind the first card so that people can know that we have more than one card and also fix the question 5 of 5 to be question 1 of 5.
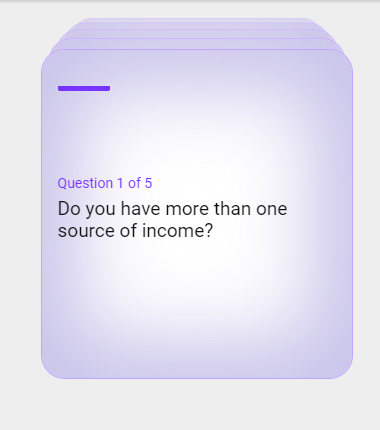
To achieve this, we are going to add some style attribute namely transform and opacity to the ion-card component in our app like so:
With this in place, our app should now look like this:
We are now set to implement the swipe effect by using ionic gestures.
In the home.page.ts file import GestureController, ElementRef, ViewChildren etc like so:
import { Component, ElementRef, AfterViewInit, ViewChildren, QueryList } from '@angular/core';
import { GestureController, IonCard, Platform } from '@ionic/angular';
The next thing is to make sure that our app home page implements AfterViewInit because we are going to be implementing the login after all views has been initialized.
We need to be able to make reference to the ionic-card component in our app's html, so we will be using the viewchildren so that we can query the list of cards in our app like so:
@ViewChildren(IonCard, { read: ElementRef }) tinderCards: QueryList<ElementRef>;
Let's create the method to set up our gesture. Copy and paste the following code:
etGesture(cards) {

    for (let c = 0; c < cards.length; c++) {

      const card = cards[c];

      const gesture = this.getstureCtrl.create({
        el: card.nativeElement,
        gestureName: 'swipe',
        onStart: ev => {

        },
        onMove: ev => {
          card.nativeElement.style.transform = `translateX(${ev.deltaX}px) rotate(${ev.deltaX / 10}deg)`;
        },
        onEnd: ev => {
          card.nativeElement.style.transition = '.5s ease-out';
          if (ev.deltaX > this.platform.width() / 2.25) {

            card.nativeElement.style.transform = `translateX(${this.platform.width() * 3}px) rotate(${ev.startX / 2}deg)`

          } else if (ev.deltaX < -this.platform.width() / 2.25) {
            card.nativeElement.style.transform = `translateX(-${this.platform.width() * 3}px) rotate(${ev.startX / 2}deg)`

          } else {
            card.nativeElement.style.transform = '';
          }

        }
      });

      gesture.enable(true);

    }

  }
We can now call this function within our ngAfterViewInit like so:
ngAfterViewInit() {
    const tinderCardArray = this.tinderCards.toArray();
    this.setGesture(tinderCardArray);
  }
The full code in the home.page.ts should now look like so:
import { Component, ElementRef, AfterViewInit, ViewChildren, QueryList } from '@angular/core';
import { GestureController, IonCard, Platform } from '@ionic/angular';

@Component({
  selector: 'app-home',
  templateUrl: 'home.page.html',
  styleUrls: ['home.page.scss'],
})


export class HomePage implements AfterViewInit {

  questions = [
    {
      'id': 1,
      'question': "Do you have more than one source of income?"
    },
    {
      'id': 2,
      'question': "Do you have a car?"
    },
    {
      'id': 3,
      'question': "Do you pay rent?"
    },
    {
      'id': 4,
      'question': "Do you have more than one kid?"
    },
    {
      'id': 5,
      'question': "Do you know ionicframework?"
    }

  ]

  @ViewChildren(IonCard, { read: ElementRef }) tinderCards: QueryList<ElementRef>;
  constructor(private getstureCtrl: GestureController, private platform: Platform) {

  }


  ngAfterViewInit() {
    const tinderCardArray = this.tinderCards.toArray();
    this.setGesture(tinderCardArray);
  }


  setGesture(cards) {

    for (let c = 0; c < cards.length; c++) {

      const card = cards[c];

      const gesture = this.getstureCtrl.create({
        el: card.nativeElement,
        gestureName: 'swipe',
        onStart: ev => {

        },
        onMove: ev => {
          card.nativeElement.style.transform = `translateX(${ev.deltaX}px) rotate(${ev.deltaX / 10}deg)`;
        },
        onEnd: ev => {
          card.nativeElement.style.transition = '.5s ease-out';
          if (ev.deltaX > this.platform.width() / 2.25) {

            card.nativeElement.style.transform = `translateX(${this.platform.width() * 3}px) rotate(${ev.startX / 2}deg)`

          } else if (ev.deltaX < -this.platform.width() / 2.25) {
            card.nativeElement.style.transform = `translateX(-${this.platform.width() * 3}px) rotate(${ev.startX / 2}deg)`

          } else {
            card.nativeElement.style.transform = '';
          }

        }
      });

      gesture.enable(true);

    }

  }


}
The full source code can be downloaded from my blog
We now have a fully functioning swipe questionnaire. Hope this helps.