
Retrofit + Otto = Networking made easy on Android
A 67.1% Improvement in Performance
So you want to build an Android app but are stuck on client side API, not sure on how to proceed with handling requests and responses from an API?
There is no single best way to handle this problem as Android is not a server side framework like Node.JS or Ruby on Rails there isn’t an established policy around implementing RESTful client side code for an Android Application.
First off we’ll need to figure out which API to test. I picked the Forecast.io api which is simple and easy to setup. Go to this url here, and you’ll see a screen like so:
https://developer.forecast.io/register

Register for an account and you’ll be proceeding to a page giving you your API Key. You’ll be given a mock url with mock latitude and longitude coordinates, go ahead and click on it to view the JSON response you’ll be working with. You’ll see something like this:
{
  latitude: 37.8267,
    longitude: -122.423,
    timezone: “America/Los_Angeles”,
    offset: -7,
    currently: {
    	time: 1435372205,
        summary: “Partly Cloudy”,
        icon: “partly-cloudy-day”,
        nearestStormDistance: 0,
        precipIntensity: 0,
        precipProbability: 0,
        temperature: 60.79,
        apparentTemperature: 60.79,
        dewPoint: 54.52,
        humidity: 0.8,
        windSpeed: 12.5,
        windBearing: 251,
        visibility: 8.6,
        cloudCover: 0.5,
        pressure: 1012.62,
        ozone: 303.25
    },
    ...
}
We will want to get the summary key in that nested JSON object called “currently”.
The Wrong Way
(you’ll appreciate The Right Way more)
Next up we’ll need to create a project so open up Android Studio and create a project called WeatherApp. Inside your MainActivity.java class create the following variables (make sure to insert your own API Key for API_KEY):
private static final String TAG = MainActivity.class.getSimpleName();
private static final String BASE_URL = "https://api.forecast.io/forecast/";
private static final String API_KEY = " *******************************";
private static final double LATITUDE = 37.8267;
private static final double LONGITUDE = -122.423;
private TextView mSummary;
private Button mGetButton;
The API_URL is the url we’ll need to hit to make requests, and the API_KEY is the key presented to you after you register. Inside activity_main.xml create the following button and textview:
<RelativeLayout
  xmlns:android="http://schemas.android.com/apk/res/android" 						xmlns:tools="http://schemas.android.com/tools" 						 			android:layout_width="match_parent"
    android:layout_height="match_parent" tools:context=".MainActivity">

    <TextView
    	android:id="@+id/summary"
        android:layout_marginTop="72dp"
        android:layout_centerHorizontal="true"
        android:textSize="24sp"
        android:layout_width="wrap_content"
        android:layout_height="wrap_content"/>

    <Button
    	android:id="@+id/weatherButton"
        android:text="@string/get_weather"
        android:layout_centerInParent="true"
        android:layout_width="100dp"
        android:layout_height="100dp"/>

</RelativeLayout>
You should see something like this:

If you do not see this or it is giving you compilation errors, try switching the android version in the preview tab. Moving forward we hook up our view and attach a listener
@Override
protected void onCreate(Bundle savedInstanceState) {
  super.onCreate(savedInstanceState);
    setContentView(R.layout.activity_main);
    mSummary = (TextView) findViewById(R.id.summary);
    mGetButton = (Button) findViewById(R.id.weatherButton);
    mGetButton.setOnClickListener(new View.OnClickListener() {
    	@Override public void onClick(View v) {
        	new WorkerTask().execute();
        }
    });
}
We’ll want to create an AsyncTask class to handle the networking in a worker thread, so create the following inside MainActivity.java:
private class WorkerTask extends AsyncTask<Void, Void, String> {

    @Override protected void onPreExecute() {
    	super.onPreExecute();
    }

    @Override protected String doInBackground(Void... params) {
    	return null;
    }

    @Override protected void onPostExecute(String s) {
    	super.onPostExecute(s);
    }
}
Let’s use a class called HttpURLConnection to send a GET request to the Forecast.io api (make sure you have the android.permission.INTERNET listed in your manifest). This can be accomplished with the following code:
@Override
protected String doInBackground(Void... params) {

    try {
    	URL url = new URL(ForecastClient.API_URL + "/" + Double.toString(LATITUDE) + "," + Double.toString(LONGITUDE));
    	HttpURLConnection urlConnection = (HttpURLConnection) url.openConnection(); urlConnection.setRequestMethod("GET");
   		urlConnection.connect();

    	int status = urlConnection.getResponseCode();
    	switch (status) {
          case 200:
            	BufferedReader br = new BufferedReader(new InputStreamReader(urlConnection.getInputStream()));
                StringBuilder sb = new StringBuilder();
                String line;
                while ((line = br.readLine()) != null) {
                    sb.append(line + "\n");
                }
                return sb.toString();
    	}
    } catch (Exception e) {
    	e.printStackTrace();
    }

    return null;
}
Add the following log statements under onPostExecute():
    @Override
    protected void onPostExecute(String s) {
    	super.onPostExecute(s); Log.d(TAG, s);
    }
Great! Now you should be receiving a response like so:

We’ll want to convert the JSON string into a POJO object using JSONObject. We can accomplish this by using the following code, notice that I am grabbing the currently nested JSON object and then grabbing the value of the key “summary” (take a look at the JSON response I posted above):
    @Override
    protected void onPostExecute(String s) {
    	super.onPostExecute(s);
        try {
            JSONObject weatherJSON = new JSONObject(s);
            JSONObject currentlyJSON = weatherJSON.getJSONObject("currenlty");
            mSummary.setText(currentlyJSON.getString("summary"));
        } catch (JSONException e) {
            e.printStackTrace();
        }
    }
Now your app should update the TextView accordingly:

Great!! We have our app sending requests to an API service, and we are able to get data back and update our UI!!
We should be done right?
Not so. Imagine attaching all those try catch statements, and writing all those Asynctasks to handle multiple calls to an API for a scalable application! That would be a headache! Also obtaining the values from a POJO object would be a nightmare given enough complexity. Most of our classes (Activities, etc.) that do network requests would be bloated out of proportion.
The Right Way
We are going to utilize Retrofit , Gson , and Otto to handle networking, json serialization/deserialization, and asynchronous events.
Disclaimer: Gson has been shown to be slower in serialization/deserialization compared to rolling your own custom library. Although Gson is a pleasure to use, I recommend rolling your own. For the purposes of this tutorial we are going to use Gson to save time.
First let’s go grab the dependencies for the third party libraries:
compile 'com.squareup.retrofit:retrofit:1.9.0'
compile 'com.squareup:otto:1.3.8'
compile 'com.squareup.okhttp:okhttp:2.4.0'
compile 'com.google.code.gson:gson:2.3'
You will want to add these dependencies to your build.gradle file under the app folder (or mobile if you have a wear module as well).
Great now we can get started! Let’s setup our network client, create a package called api, and under that create a class called ForecastClient.java. Like so:

Inside our ForecastClient class, we’ll implement Retrofit! Retrofit uses a class called RestAdapter to handle networking, it is basically an interface to a REST api. It utilizes the Factory or Builder pattern to create your adapter to handle networking. There are built in methods already defined for CRUD operations. You can use a special client (although you’re not bound to this client) called OkClient with OkHttpClient to handle timeouts, download sizes, and other troublesome network calls automatically. A really great tool! The RestAdaper utilizes the .create(Class<T> class) method to instantiate interfaces, this creates an api service. More on this later.
We will implement the Singleton pattern in our client so that there is only ever one Adapter for our networking calls:
public class ForecastClient {

  private static final String BASE_URL = "https://api.forecast.io/forecast/";
    private static final String API_KEY = " *************************";
    public static final String API_URL = BASE_URL + API_KEY;

    private static ForecastClient mForecastClient;
    private static RestAdapter mRestAdapter;

    public static ForecastClient getClient() {
    	if (mForecastClient == null)
        	mForecastClient = new ForecastClient();
        return mForecastClient;
    }

    private ForecastClient() {
    	mRestAdapter = new RestAdapter.Builder()
                        .setEndpoint(API_URL)
                        .setClient(new OkClient(new OkHttpClient()))
                        .setLogLevel(RestAdapter.LogLevel.FULL)
                        .build();
    }

}
The .Builder is a nested inner class inside the RestAdapter and has the methods .setEndpoint, .setClient, and .build. SetEndpoint as you might guess creates an api Url object from a string. SetClient sets your client, there are different types of clients that the RestAdapter can support but for now we will simply use OkHttp. The build method returns a new RestAdapter. With our singleton method getClient we are only ever creating one client. I am also glossing over other features like setting a requestInterceptor if the api involves OAuth.
Now let’s shift towards creating our Otto bus. We create a package called bus and inside it we create a class called BusProvider.java:

The details of this class will look like so:
public final class BusProvider {

    private static final Bus BUS = new Bus(ThreadEnforcer.ANY);

    	public static Bus getInstance() {
            return BUS;
        }

    	private BusProvider() { }

}
We want to prohibit inheritance of this class for security reasons, therefore we add the final keyword. Otto normally dispatches events on the main thread of an application, and normally if you want that behavior we would set the ThreadEnforcer to .MAIN, however sometimes we might post events in a background thread, for this reason we set ThreadEnforcer to ANY. Notice also that we have a singleton pattern here, would it make sense to have multiple buses?
Now we want to create a manager class let’s call it ForecastManager.java this will be our central hub for receiving and sending events between controllers and background network activity. Let’s create another package called manager and add that class in, like so:
Let’s go over the details of this class:
public class ForecastManager {

    private Context mContext;
    private Bus mBus;
    private ForecastClient sForecastClient;

    public ForecastManager(Context context, Bus bus) {
    	this.mContext = context;
        this.mBus = bus;
        sForecastClient = ForecastClient.getClient();
    }

}
We are passing in context to the constructor of his class. This is in case we might need to get system services, or shared preferences or anything related to context. This is extremely useful. We have a reference variable to our client class, and we have a reference variable to our Otto bus.
Great!! But how do we use this class??? We’ll need to create a custom application class and register our bus and manager class there! Go ahead and create a package called application and inside it create a class called ForecastApplication.java like so:

Let’s go over the details of this custom application class (do not forget to set android:name”” in your manifest file under <application> to your custom application class).
public class ForecastApplication extends Application {

    private ForecastManager mForecastManager;
    private Bus mBus = BusProvider.getInstance();

    @Override
    public void onCreate() {
    	mForecastManager = new ForecastManager(this, mBus);
        mBus.register(mForecastManager);
        mBus.register(this);
    }

}
We are creating a new ForecastManager class, as well as grabbing our Bus object from the BusProvider.java class we defined earlier. This all happens on application startup, and only once! Awesome! Next up we pass in the application context and the bus to the manager, and register the manager to the bus. The bus object has Map and Set objects in it to key in classes that you register with the bus. This can mean you can register Services, Activities, IntentServices, etc. to the bus. The bus then tracks these classes for any events that are being sent or received. Very very handy.
Great we have registered our Manager and our Bus to the application, but where’s the sexy code to handle the api calls?! Now this is where Retrofit really shines. To handle the network calls we’ll need to create our POJO objects first, let’s build some model classes with Gson!!
Take a look at the JSON response from the Forecast.io api, we’ll need to build models to fit that data. Specifically we are only looking for the “currently” nested JSON Object first, we need this:

The beauty of Gson is that we don’t have to modify StringBuilder or JSONObjects to handle parsing of JSON requests or responses. We can simply create our model classes and add the annotation @SerializedName(“key_value”) to the top of the variable. Let me show you how this works.
Let’s create a models package inside our api package, you should see something like this (disregard the interfaces package for now, we’ll get to that!):

Now let’s make our Weather.java model class.
public class Weather {

    @SerializedName("currently")
    private Currently mCurrently;
    public Currently getCurrently() {
    	return mCurrently;
    }

}
@SerializedName(“currently”) takes the nested JSON object “currently” and converts it into an object. What’s the Currently object you ask? Currently represents our nested JSON object, we’ll need to create another model class for currently. Also notice I am leaving out a lot of the data from the JSON response. You CAN add variables for all those attributes if you desire, but for the purposes of this tutorial we are only going to need the summary key inside Currently. Let’s make our Currently.java class:
public class Currently {

    @SerializedName("time")
    private long mTime;
    public long getTime() {
    	return mTime;
    }

    @SerializedName("summary")
    private String mSummary;
    public String getSummary() {
    	return mSummary;
    }
}
The beauty here is that Gson automatically creates all the POJO objects for you, all you need to do is call the getter methods and you’re set!!! AWESOME!!!
Now that we have our model classes, we’ll need to implement callbacks to the RestAdapter to actually grab our JSON response. Retrofit needs interfaces to be passed into the RestAdapter’s .create(…) method. Let’s create that package called interfaces now, and add our weather interface:

Inside IWeather we write the following:
public interface IWeather {

    @GET("/{latitude},{longitude}")
    void getWeather(@Path("latitude") String latitude,
                    @Path("longitude") String longitude,
                    Callback<Weather> callback);

}
Can you visualize what is going on here? We are building a URL on top of our API_URL. We don’t need to set a request method we can simply use the annotation @GET(…), similarly Retrofit handles @POST(…) and other operations as well. The @Path annotation replaces the text inside the {..} brackets. We can simply just pass in our longitude, latitude, and a callback. What’s that callback doing you ask? Retrofit’s CallBack<T> interface uses generics to handle Response objects. Because we are using Gson those response objects are automatically serialized into POJOs with @SerializedName(…).
Now let’s write out our implementation for getWeather inside ForecastClient.java(you can implement these methods somewhere else to decouple things even more but for the purposes of this tutorial we’ll just implement it there):
public void getWeather(String latitude, String longitude, Callback<Weather> callback) {
      IWeather weather = mRestAdapter.create(IWeather.class);
      weather.getWeather(latitude, longitude, callback);
}
This method calls the .create(…) method from the RestAdapter class as mentioned earlier, and creates an api service for us. All we simply have to do now is call our interface method _.getWeather(…)_and pass in the parameters for our request. To actually implement this method and have it be used, we will call it from our client object in the manager class like so:
@Subscribe
public void onGetWeatherEvent(GetWeatherEvent getWeatherEvent) {

    String latitude = Double.toString(getWeatherEvent.getLatitude()).trim();
    String longitude = Double.toString(getWeatherEvent.getLongitude()).trim();
    Callback<Weather> callback = new Callback<Weather>() {
        @Override
        public void success(Weather weather, Response response) {
            // Handle Weather
        }

        @Override
        public void failure(RetrofitError error) {
            // Handle Failure
        }
    };
    sForecastClient.getWeather(latitude, longitude, callback);

}
Since our manager class is registered to the bus, the bus then subscribes to events that are posted on its thread. We utilize the following pattern.
bus.post(new Event());
Then in another class we’ll implement the following:
@Subscribe> public void onEvent(Event event) { // do something }
Otto is listening for that event under the @Subscribe annotation. You can see how this makes events (such as a user requesting information from an api) easy to handle! NICE!!
Also take note of the callback we are actually creating the Callback<T> here, and since it uses a Generic we can pass in Weather as the POJO object to be serialized if the response is successful.You can implement your own logic if the network request fails.
Now we need to actually call that event, to do so we need to register our MainActivity.java class with the bus so it can send and receive events from the bus. We implement it this way:
@Override
protected void onCreate(Bundle savedInstanceState) {
    super.onCreate(savedInstanceState);
    setContentView(R.layout.activity_main);
    mSummary = (TextView) findViewById(R.id.summary);
    mGetButton = (Button) findViewById(R.id.weatherButton);
    mGetButton.setOnClickListener(new View.OnClickListener() {
        @Override public void onClick(View v) {
        }
    });
}

@Override
public void onResume() {
    super.onResume();
    mBus.register(this);
}

@Override
public void onPause() {
    super.onPause();
    mBus.unregister(this);
}
We want to register the activity when the activity resumes, and unregister it when the activity pauses. Why would we do it this? Can you think of any issues that an app might run into if we didn’t run it this way?
Great we’re almost done, we simply need to send an event to our manager now! Let’s do that by posting an event to the bus inside the mGetButton’s click listener like so:
mGetButton.setOnClickListener(new View.OnClickListener() {
    @Override public void onClick(View v) {
        mBus.post(new GetWeatherEvent(LATITUDE, LONGITUDE));
    }
});
We simply pass in our Latitude and Longitude to a GetWeatherEvent class. Otto listens for this class subscribed on the manager and executes an API GET request to the Forecast.io api. Simple, and beautiful.
The GetWeatherEvent.java class looks like this:
public class GetWeatherEvent {

    private double mLatitude;
    private double mLongitude;

    public GetWeatherEvent(double latitude, double longitude) {
    	this.mLatitude = latitude;
        this.mLongitude = longitude;
    }

    public double getLatitude() {
    	return mLatitude;
    }

    public double getLongitude() {
    	return mLongitude;
    }

}
We reduced our bloated MainActivity.java to ~10 lines of extra code instead of ~40 lines. The bus will post an event to the manager, and then on a successful request we can send back an event to MainActivity.java like so:
@Subscribe
public void onGetWeatherEvent(GetWeatherEvent getWeatherEvent) {

    String latitude = Double.toString(getWeatherEvent.getLatitude()).trim();
    String longitude = Double.toString(getWeatherEvent.getLongitude()).trim();

    Callback<Weather> callback = new Callback<Weather>() {
    	@Override
        public void success(Weather weather, Response response) {
            mBus.post(new SendWeatherEvent(weather));
        }

    	@Override
        public void failure(RetrofitError error) {
        }
    };
    sForecastClient.getWeather(latitude, longitude, callback);
}
The SendWeatherEvent.java is a simple class with a constructor and a getter for a Weather object:
public class SendWeatherEvent {

    private Weather mWeather;

    public SendWeatherEvent(Weather weather) {
    	this.mWeather = weather;
    }

    public Weather getWeather() {
    	return mWeather;
    }

}
We can then subscribe to this event in our MainActivity.java class as well, and set the summary to the TextView! Like so:
@Subscribe
public void onSendWeatherEvent(SendWeatherEvent sendWeatherEvent) {
    Weather weather = sendWeatherEvent.getWeather();
    Currently currently = weather.getCurrently();
    mSummary.setText(currently.getSummary());
}
Beautiful and simple.
To get log output we can add the following to our RestAdapter object:
private ForecastClient() {
  mRestAdapter = new RestAdapter.Builder()
                        .setEndpoint(API_URL)
                        .setClient(new OkClient(new OkHttpClient()))
                        .setLogLevel(RestAdapter.LogLevel.FULL)
                        .build();
}
LogLevel can be set to .NONE, .BASIC, or .FULL to see what your adapter is requesting and receiving. You can see the entire JSON request in the Logcat, just as if you were doing a curl command!

The entire pattern looks like this:
User clicks button → MainActivity → GetWeatherEvent → Manager → Client → Manager → SendWeatherEvent → MainActivity → User sees summary
Here are the Benchmarks of Retrofit + Otto vs. AsyncTasks:
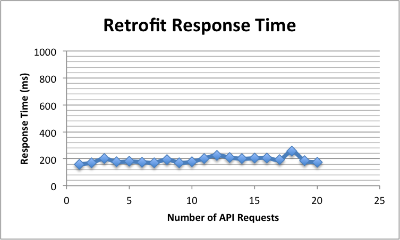


A 67.1% improvement over AsyncTask
That’s it! Hope you enjoy. It’s a real beauty to mix Otto + Retrofit. Using this pattern above, through my own research on Android I was able to reduce code complexity and increase readability and implementation. Another note, it would help to abstract out events so that you can reuse objects, since creating events can become cumbersome. Feel free to send an email to hkhan@datalofts.com for any questions. Happy API consuming!