
Vue — Going Serverless with Firebase
Welcome to the first part of the series about “Vue — Going Serverless with Firebase”. Some time ago not many people would have thought you could create a whole application without having your own server and back-end architecture. However, today it is a reality, and, as an example, we will use Firebase. This series will consist of a few articles during which we will set up the Vue project with Firebase and create authentication logic as well as blog functionality. You will be able to create an app where the user can register, log in and create blog posts.
By the end of this article, you will know how to set up the Vue project and configure Firebase. The next articles will cover:
- use of Vue Router to manage different pages and routing
- creation of reusable components
- registration of base components automatically
- usage of render function to create wrapper components
- how to create and authenticate users with Firebase
- how to use Vuex to store the state of the application
You can also find a repository for this project at https://github.com/DeraIeS/vue-firebase-serverless.
“Besides learning about how to use Vue with Firebase, you will also learn a few tips and tricks you can use in your projects.”
What is Vue.js?
Vue.js is an incredible JavaScript framework that skyrocketed in popularity in the last year. Beating React on GitHub stars, it is becoming the primary choice of many new and experienced developers, thanks to its ease of use and amazing features. Vue ecosystem includes quite a few tools starting with Vue CLI for project scaffolding, Vuex for state management, Vue Router for routing your pages, Vue Devtools for debugging and development, and others. Vue is a progressive framework that can be used with a build system to develop Single Page Applications but can also be easily used as a replacement of libraries like jQuery if you are only looking for adding a bit of interaction to your website. Vue doesn’t require any build tools to be used and can be easily included in a ‘<script>’ tag. It is lighter than jQuery and faster as it is using Shadow Dom and component tracking to only render components that have changed.
What is Firebase?
Firebase is a development platform for mobile and web applications. It consists of a few different features that complement each other. The initial offering of Firebase was a real-time database that provides an API that allows storing and syncing data across multiple clients. However, now it offers even more features, including a new Firestore database, cloud functions to extend and write your own API, as well as other functionality. Furthermore, Firebase has a pricing plan that includes a free package great for small to medium projects, but, if you have more visitors, Firebase and your pricing plan can be easily scaled to satisfy all your requirements.
Setting up the project
Make sure that you have Node.js and npm or Yarn installed on your machine. The first step is to create a project. For that, we need to install Vue CLI 3, which is a great tool to quickly scaffold a project. Vue CLI 3 has a lot to offer. It is not only a command line interface tool, but also comes with a graphical user interface for managing your project. I will not cover all the features of Vue CLI, but I recommend diving into the documentation, which you can find at https://cli.vuejs.org/. Open the terminal and run ‘npm install -g @vue/cli’ or ‘yarn global adds @vue/cli’. When the installation is completed, create a new project folder and go to it in a terminal.
“To ensure that installation was successful, type in ‘vue –version’ to see if Vue CLI is now available on your machine.”
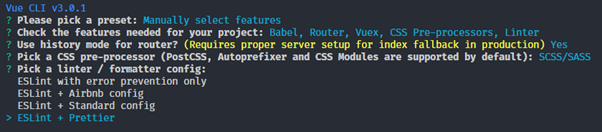
You can create a project by running a command ‘vue create vue-firebase-serverless’. Vue-firebase-serverless is just a name for the project, so you can name it however you want. The next step is to choose the plugins that we want for our project. Choose ‘manually select features’.

In this tutorial, we will need Babel, Router, and Vuex, but I will also add linter and CSS Pre-processors as Sass is quite useful for styling.

You can answer ‘Y’ for the history mode question, and, as I mentioned before, Sass will be used in this project.

For the linter and formatter, I decided to use ESLint + Prettier, as I am using these in my projects anyway, but you can go with your preferred choice.
After going through the rest of the questions, like when to lint and format the code as well as where you want to have config files, we must wait a moment for the tool to finish creating the project and installing all the dependencies.
“If you have any errors regarding any Sass package, make sure that you are not running the latest 10.x version of Node.”

When the project is finally created, just follow instructions and ‘cd’ into your project folder and start the server with ‘npm run serve’ command. If you open your browser and go to ‘localhost:8080’, you should be greeted with this screen.

If you would like to play with Vue CLI’s GUI, you can run ‘vue ui’ in your terminal.

Project structure after creation
That is the project structure after creation. You can delete ‘HelloWorld.vue’ in ‘components’ folder and remove any reference to it from ‘views/Home.vue’ file.

views/Home.vue
Firebase setup

We have our initial project set up. Now is the time to set up Firebase. Go to ‘www.firebase.google.com’ and click on ‘Get started’, logging in with your Google account. If you don’t have one, you will have to create one.
After logging in you should be redirected to the Welcome page, on which you can add your project.

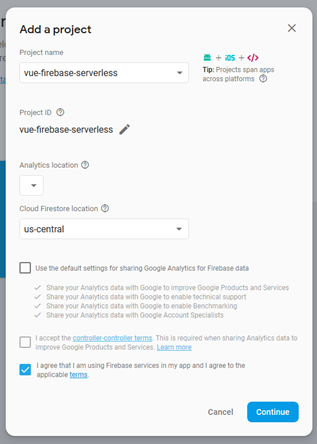
Click on ‘Add project’ and you will be presented with a modal in which you need to fill in details for your project and then just proceed by clicking on ‘Continue’.
When your Firebase project is created, continue further and you will be redirected to the Firebase dashboard.

Go to ‘Develop’, which you can find on the left side in the navigation panel, and then to ‘Authentication’ and ‘Sign-in method’. Click on the ‘Email/Password’ and enable it so that we can register a new account.

Enable user registration
We also need to create a database. Therefore, go to ‘Develop’ and then ‘Database’, and click on ‘Create database’.

You can enable the ‘test mode’, which will allow us to modify the database without being signed in.

After enabling locked or test mode, you should be presented with the ‘Database’ view. We will get back to it later. Now it is time to connect our project with Firebase.

Adding Firebase to our project
In this project, we will use the official Firebase package for client-side which you can find at ‘https://www.npmjs.com/package/firebase’. Open the terminal and run ‘npm install –save firebase’. After installation has finished, in ‘src’ folder create a file ‘firebase.js’. In this file, we will put our Firebase configuration. We will not need all the Firebase modules as, for instance, we will not be using messaging or standard real-time database module since we are using Firestore. Now get the config data from the Firebase website. Go to ‘Project Overview’ and click on the ‘</>’ button which will trigger a modal with the configuration.


We need to use this config in the ‘src/firebase.js’ file. Besides adding the config and initialising the app we also will initialise firestore and export it together with Firebase Storage which will be used for storing images. Your firebase.js file should look like this:

Firebase configuration
That’s all that we need to do for the ‘firebase.js’ file. We have successfully set up a Vue project using Vue CLI 3 along Firebase. In the next article, we will have a look at routing in a Vue.js application as well as how to create and automatically register reusable base components that can be used across your app.