
Instagram’s Pinch To Zoom/Pan Gesture Tutorial
********* This tutorial was created using Swift 3.0 **********
Instagram has a lot of magic to it and as one of the most popular apps out there today it has raised the bar on what is expected of other apps. As a user, we often overlook the subtleties of a great app and we have come to expect a certain standard. The pinch to zoom functionality on Instagram posts is one of those standards. This tutorial focuses on replicating that behaviour.
I am the head of product and engineering at Rep, an influencer marketplace where brands and influencers can collaborate on marketing campaigns. I decided to share how I built this functionality into our user profiles to zoom into photos. I’ve attached a clip of the finished results below but in order to cover it all in detail we will start from scratch and tackle it step by step.
Ok, now that we’ve seen the final product lets start coding. Fire up Xcode, press “Create new project” , then press “Single View Application”. I called my project “PinchToZoom” but feel free to name it whatever you like or to add this functionality into an already existing project. Set the project to iPhone devices and press next then create.
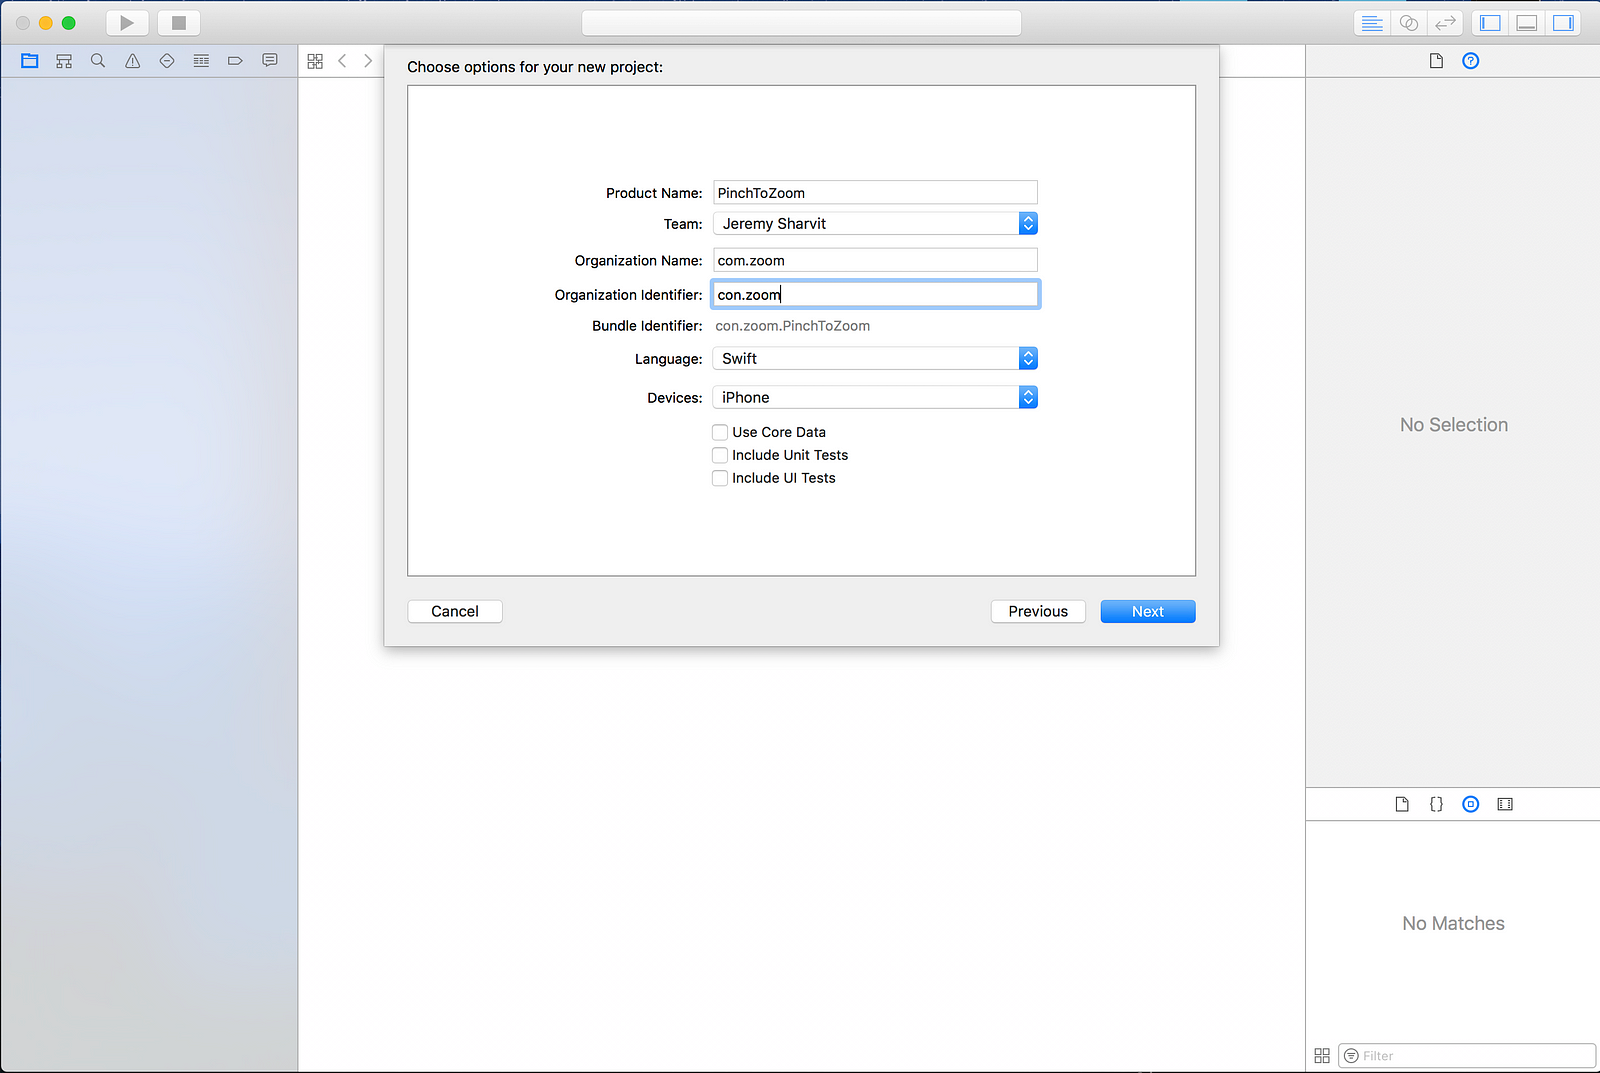
Create a new Xcode project called “PinchToZoom”
Remove the landscape left/right in the projects settings, leaving on “Portrait” selected.

Only Portrait mode selected
Ok, set up is complete. Lets start programming our UI. I like to do everything programmatically but if you are used to IB then feel free to do that too. Click on the “ViewController.swift” file and lets add a table view and datasource. We will use UITableViewCell as a placeholder before we create our custom cell with the image to zoom into. Heres the code right now.
// ViewController.swift

import UIKit

class ViewController: UIViewController {

var tableView:UITableView!

override func viewDidLoad() {

super.viewDidLoad()

// Do any additional setup after loading the view, typically from a nib.

view.backgroundColor = .orange

setUpTableView()

}

func setUpTableView() {

tableView = UITableView()

tableView.translatesAutoresizingMaskIntoConstraints = false

view.addSubview(tableView)

let const:[NSLayoutConstraint] = [

tableView.topAnchor.constraint(equalTo: topLayoutGuide.bottomAnchor),

tableView.leadingAnchor.constraint(equalTo: view.leadingAnchor),

tableView.trailingAnchor.constraint(equalTo: view.trailingAnchor),

tableView.bottomAnchor.constraint(equalTo: bottomLayoutGuide.topAnchor)

]

NSLayoutConstraint.activate(const)

tableView.register(UITableViewCell.self, forCellReuseIdentifier: "cell")

tableView.dataSource = self

}

}

extension ViewController:UITableViewDataSource {

func numberOfSections(in tableView: UITableView) -> Int {

return 1

}

func tableView(_ tableView: UITableView, numberOfRowsInSection section: Int) -> Int {

return 10

}

func tableView(_ tableView: UITableView, cellForRowAt indexPath: IndexPath) -> UITableViewCell {

let cell = tableView.dequeueReusableCell(withIdentifier: "cell", for: indexPath)

cell.textLabel?.text = "cell #\(indexPath.row)"

return cell

}

}
This is what is looks like when we run it:

Build and run to test everything is working
Ok great the table view is configured properly. Now we have to build out our custom cell and model object. To make it simple, the cell will include a photo and a caption.
First, lets create our model object, we’ll call it “ Post”. In Xcode click File -> New -> File, select “Swift File”, name is “Post” and click “Create”. Here is the post struct:
import Foundation

struct Post {

var imageUrl:String!

var caption:String!

}
Next lets create the custom cell, we’ll call it “PostCell”. In Xcode click File -> New -> File, select “Cocoa Touch Class”, name is “PostCell” and make it a subclass of “UITableViewCell” and then click “Create”. Like I said, I am not using interface files, but feel free to use XIB or IB if you prefer.
***** IMPORTANT ********
If you use IB or XIB please do not forget to set the image views isUserInteractionEnabled property to true! If you don’t then none of the gestures we add will be registered.
Here is the code to my custom cell. As you can see ill be creating an imageView that is square with the width and height equal to the size of the width of the screen. I will add a caption below the post.
import UIKit

class PostCell: UITableViewCell {

var postImage:UIImageView!

var caption:UILabel!

override init(style: UITableViewCellStyle, reuseIdentifier: String?) {

super.init(style: style, reuseIdentifier: reuseIdentifier)

self.backgroundColor = .clear

//Important!!!!!!

self.clipsToBounds = false

self.selectionStyle = .none

setUpView()

}

required init?(coder aDecoder: NSCoder) {

fatalError("init(coder:) has not been implemented")

}

func setUpView() {

postImage = UIImageView()

postImage.translatesAutoresizingMaskIntoConstraints = false

contentView.addSubview(postImage)

caption = UILabel()

caption.translatesAutoresizingMaskIntoConstraints = false

contentView.addSubview(caption)

let const:[NSLayoutConstraint] = [

postImage.topAnchor.constraint(equalTo: contentView.topAnchor),

postImage.leadingAnchor.constraint(equalTo: contentView.leadingAnchor),

postImage.trailingAnchor.constraint(equalTo: contentView.trailingAnchor),

postImage.heightAnchor.constraint(equalTo: contentView.widthAnchor),

caption.topAnchor.constraint(equalTo: postImage.bottomAnchor, constant: 8),

caption.leadingAnchor.constraint(equalTo: contentView.leadingAnchor, constant: 8),

caption.trailingAnchor.constraint(lessThanOrEqualTo: contentView.trailingAnchor),

caption.bottomAnchor.constraint(lessThanOrEqualTo: contentView.bottomAnchor,constant: -8)

]

NSLayoutConstraint.activate(const)

postImage.image = #imageLiteral(resourceName: "Rep")

postImage.contentMode = .scaleAspectFill

// ****** Important step:
// If user interaction is not enabled the gestures wont be recognized

postImage.isUserInteractionEnabled = true

caption.numberOfLines = 0

caption.font = UIFont.boldSystemFont(ofSize: 18)

}

}
I should note that I wont be downloading images from the internet. That is beyond the scope of this tutorial. I will be using the same static image and caption. I put the Rep app icon image into the asset folder and will just be using that for every cell. Ive updated the code in the “ViewController.swift” file to use the PostCell.swift table view cell and the Post.swift struct. Here is the updated code.
import UIKit

class ViewController: UIViewController {

var tableView:UITableView!

var posts:[Post] = []

override func viewDidLoad() {

super.viewDidLoad()

// Do any additional setup after loading the view, typically from a nib.

view.backgroundColor = .orange

//Create some fake posts.
for _ in 0...10 {

let post = Post(imageUrl: "exampleURL", caption: "This is supposed to be a long description like an instagram post caption with #hashtags and emojis 😘😊😅🙈")

posts.append(post)

}

setUpTableView()

}

func setUpTableView() {

tableView = UITableView()

tableView.translatesAutoresizingMaskIntoConstraints = false

view.addSubview(tableView)

let const:[NSLayoutConstraint] = [

tableView.topAnchor.constraint(equalTo: topLayoutGuide.bottomAnchor),

tableView.leadingAnchor.constraint(equalTo: view.leadingAnchor),

tableView.trailingAnchor.constraint(equalTo: view.trailingAnchor),

tableView.bottomAnchor.constraint(equalTo: bottomLayoutGuide.topAnchor)

]

NSLayoutConstraint.activate(const)

tableView.register(PostCell.self, forCellReuseIdentifier: "cell")
tableView.dataSource = self
tableView.estimatedRowHeight = 80.0
tableView.rowHeight = UITableViewAutomaticDimension
tableView.separatorColor = UIColor.clear
tableView.backgroundColor = UIColor.white

}

}

extension ViewController:UITableViewDataSource {

func numberOfSections(in tableView: UITableView) -> Int {

return 1

}

func tableView(_ tableView: UITableView, numberOfRowsInSection section: Int) -> Int {

return posts.count

}

func tableView(_ tableView: UITableView, cellForRowAt indexPath: IndexPath) -> UITableViewCell {

let cell = tableView.dequeueReusableCell(withIdentifier: "cell", for: indexPath) as! PostCell

cell.caption.text = posts[indexPath.row].caption
//comment out the post URL since i'm just using a static image
//cell.postImage.image = //URL networking code

return cell

}

}
Build and run and the app should look like this:

UI configuration is complete
Now that the UI is finally complete we can get to the meat of this tutorial. The Instagram functionality has 3 parts:
- Pinch to zoom, which scales the image
- Depending on where you pinch determines where the zooming will happen
- Pan the image but ONLY while zooming
Lets integrate these gestures one by one
1. Adding a Pinch to Zoom Gesture Recognizer
In the PostCell.swift lets add a pinch to zoom gesture recognizer to the cells imageview. Add this code below the call to “setUpView()”:
let pinch = UIPinchGestureRecognizer(target: self, action: #selector(self.pinch(sender:)))
self.postImageView.addGestureRecognizer(pinch)
Add the “ pinch ” function in the PostCell.swift file:
func pinch(sender:UIPinchGestureRecognizer) {

if sender.state == .began || sender.state == .changed {

let currentScale = self.postImage.frame.size.width / self.postImage.bounds.size.width

let newScale = currentScale*sender.scale

let transform = CGAffineTransform(scaleX: newScale, y: newScale)

self.postImage.transform = transform

sender.scale = 1

}

}
Build and run to test it out and you will notice that it works….but it has a some of issues.
- I can scale the image down and thats not what I want
- There should probably be a limit to how much I can zoom!
- The caption appears above the image
- The image does not scale down when the gesture ends!

Caption above image view, can scale image view down, image does not reset when gesture ends!
Lets fix these issues one by one. Numbers 1 & 2 above can be fixed by limiting the amount the image view can scale. Lets adjust the pinch function to solve this:
func pinch(sender:UIPinchGestureRecognizer) {

if sender.state == .began || sender.state == .changed {

let currentScale = self.postImage.frame.size.width / self.postImage.bounds.size.width

var newScale = currentScale*sender.scale

if newScale < 1 {

newScale = 1

}

if newScale > 6 {

newScale = 6

}

let transform = CGAffineTransform(scaleX: newScale, y: newScale)

self.postImage.transform = transform

sender.scale = 1

}

}
If the user tried to scale down the image (newScale < 1), we just set it to 1 to prevent it. If the user zooms in, I limit the scaling to 6 times to original size (you can put whatever value you want here, or none at all).
Number 3 is an easy fix. The reason the caption label shows up above the image is because of the layers zPosition. Lets give the caption a negative zPosition value so that the imageView will always be above it. Add this line of code as the last line in the “setUpView()” function.
caption.layer.zPosition = -1
To fix the 4th issue we need to reset the imageview to its original size when the pinch gesture has ended. Lets handle the “.ended” state of the gesture recognizer. Add an “else” clause to the pinch gesture and update the code to look like this:
func pinch(sender:UIPinchGestureRecognizer) {

if sender.state == .changed {

let currentScale = self.postImage.frame.size.width / self.postImage.bounds.size.width

var newScale = currentScale*sender.scale

if newScale < 1 {

newScale = 1

}

if newScale > 9 {

newScale = 9

}

let transform = CGAffineTransform(scaleX: newScale, y: newScale)

self.postImage.transform = transform

sender.scale = 1

} else if sender.state == .ended {

UIView.animate(withDuration: 0.3, animations: {

self.postImage.transform = CGAffineTransform.identity

})

}

}
We set the image views transform to its “identity” transform and wrap it in an animation block. So simple!
Build and run the app and all the issues above should be fixed!
2. Adjust pinch gesture to zoom into specific location of image
Wouldn’t it be nice to be able to zoom to a particular location of the photo instead of just scaling it up! That’s exactly how Instagram behaves. This is a subtle behaviour but it makes a huge difference. Lets adjust the pinch gesture function to take into account where the user is pinching! Replace the code inside the “.changed” and “.began” state block with this:
guard let view = sender.view else {return}

let pinchCenter = CGPoint(x: sender.location(in: view).x - view.bounds.midX,

y: sender.location(in: view).y - view.bounds.midY)

let transform = view.transform.translatedBy(x: pinchCenter.x, y: pinchCenter.y)

.scaledBy(x: sender.scale, y: sender.scale)

.translatedBy(x: -pinchCenter.x, y: -pinchCenter.y)

let currentScale = self.postImage.frame.size.width / self.postImage.bounds.size.width

var newScale = currentScale*sender.scale

if newScale < 1 {

newScale = 1

let transform = CGAffineTransform(scaleX: newScale, y: newScale)

self.postImage.transform = transform

sender.scale = 1

}else {

view.transform = transform

sender.scale = 1

}
Build and run, try pinching in different locations of the photo and you will see that the photo zooms into precisely where your fingers started to pinch! Awesome.
3. Adding a Pan Gesture Recognizer while zooming
This is where it starts to get tricky. We want to add a pan gesture recognizer but we ONLY want it to register while we are zooming. The way I did this is by introducing a variable isZooming in the “PostCell.swift” file. Add this line of code at the top of the file:
var isZooming = false
We set it to false by default. Now let’s separate the “.began” and “.changed” states of the pinch gesture function. On .began we will toggle the isZooming property to true but only if the user is scaling up. The “.changed” state remains the same. On .ended we will switch the isZooming property back to false in the animation completion block. Here is what the pinch function looks like now:
func pinch(sender:UIPinchGestureRecognizer) {

if sender.state == .began {

let currentScale = self.postImage.frame.size.width / self.postImage.bounds.size.width

let newScale = currentScale*sender.scale

if newScale > 1 {

self.isZooming = true

}

} else if sender.state == .changed {

guard let view = sender.view else {return}

let pinchCenter = CGPoint(x: sender.location(in: view).x - view.bounds.midX,

y: sender.location(in: view).y - view.bounds.midY)

let transform = view.transform.translatedBy(x: pinchCenter.x, y: pinchCenter.y)

.scaledBy(x: sender.scale, y: sender.scale)

.translatedBy(x: -pinchCenter.x, y: -pinchCenter.y)

let currentScale = self.postImage.frame.size.width / self.postImage.bounds.size.width

var newScale = currentScale*sender.scale

if newScale < 1 {

newScale = 1

let transform = CGAffineTransform(scaleX: newScale, y: newScale)

self.postImage.transform = transform

sender.scale = 1

}else {

view.transform = transform

sender.scale = 1

}

} else if sender.state == .ended {

UIView.animate(withDuration: 0.3, animations: {

self.postImage.transform = CGAffineTransform.identity

}, completion: { _ in

self.isZooming = false

})

}

}
Ok now that we have that property set up lets add the pan gesture recognizer to the post image view. When adding multiple gestures to the same view we need to override a UIGestureRecognizer delegate property shouldRecognizeSimultaneouslyWith otherGestureRecognizer: to account for the different types of touches. Heres what the gesture addition code should look like now. Replace the code under “setUpView()” with this:
let pinch = UIPinchGestureRecognizer(target: self, action: #selector(self.pinch(sender:)))
pinch.delegate = self
self.postImage.addGestureRecognizer(pinch)

let pan = UIPanGestureRecognizer(target: self, action: #selector(self.pan(sender:)))
pan.delegate = self
self.postImage.addGestureRecognizer(pan)
As you can see we’ve set both their delegates to “self”. Now add the delegate method anywhere in the file:
override func gestureRecognizer(_ gestureRecognizer: UIGestureRecognizer, shouldRecognizeSimultaneouslyWith otherGestureRecognizer: UIGestureRecognizer) -> Bool {

return true

}
You should be getting an error that the “pan(sender:)” function hasnt been implemented yet. Add this code anywhere in “PostCell.swift” to silence the error:
func pan(sender: UIPanGestureRecognizer) {

}
You can build and run to make sure everything still works. Now lets handle the pan logic.
In order to keep track of the starting point of the image we will introduce another property to the PostCell. Add this line below “var isZooming = false” at the top of the file:
var originalImageCenter:CGPoint?
Inside the pan gesture when the gesture state is “.began” we will set the originalImageCenter to the current center of the view, but only if isZooming is true:
func pan(sender: UIPanGestureRecognizer) {

if self.isZooming && sender.state == .began {

self.originalImageCenter = sender.view?.center

}
}
Now to handle the pan gestures “.changed” state we will need to translate the image by however much the user is panning.
func pan(sender: UIPanGestureRecognizer) {

if self.isZooming && sender.state == .began {

self.originalImageCenter = sender.view?.center

} else if self.isZooming && sender.state == .changed {

let translation = sender.translation(in: self)

if let view = sender.view {

view.center = CGPoint(x:view.center.x + translation.x,

y:view.center.y + translation.y)

}

sender.setTranslation(CGPoint.zero, in: self.postImage.superview)

}

}
Finally in order to reset the image when the user interaction is over we will add this code the “pinch” gesture’s .ended state. Not to be confused with pan. We will handle all the reset in the pinch(sender:) method:
func pinch(sender:UIPinchGestureRecognizer) {

if sender.state == .began {

let currentScale = self.postImage.frame.size.width / self.postImage.bounds.size.width

let newScale = currentScale*sender.scale

if newScale > 1 {

self.isZooming = true

}

} else if sender.state == .changed {

guard let view = sender.view else {return}

let pinchCenter = CGPoint(x: sender.location(in: view).x - view.bounds.midX,

y: sender.location(in: view).y - view.bounds.midY)

let transform = view.transform.translatedBy(x: pinchCenter.x, y: pinchCenter.y)

.scaledBy(x: sender.scale, y: sender.scale)

.translatedBy(x: -pinchCenter.x, y: -pinchCenter.y)

let currentScale = self.postImage.frame.size.width / self.postImage.bounds.size.width

var newScale = currentScale*sender.scale

if newScale < 1 {

newScale = 1

let transform = CGAffineTransform(scaleX: newScale, y: newScale)

self.postImage.transform = transform

sender.scale = 1

}else {

view.transform = transform

sender.scale = 1

}

} else if sender.state == .ended || sender.state == .failed || sender.state == .cancelled {

guard let center = self.originalImageCenter else {return}

UIView.animate(withDuration: 0.3, animations: {

self.postImage.transform = CGAffineTransform.identity

self.postImage.center = center

}, completion: { _ in

self.isZooming = false

})

}

}
I also added the .failed and .cancelled states to cover all our bases. Build and run.
This is what the final project should look like:
I hope this tutorial helps some people out! Here is a link to my github if you’d like to read through the source code.
Thanks for reading, show me some love with some shares or applause!