
Let’s Build a Video Chat App with JavaScript and WebRTC
Start writingPart 1 : Understanding WebRTC
This is the first tutorial in our WebRTC series. The aim of this series is to explain what WebRTC is and how we can use it in web apps.

In this part, we will understand the various concepts required to develop an app using WebRTC.
Tutorials in this Series
- Understanding WebRTC (this tutorial)
- [Implementing WebRTC in code] (https://dev.to/nilmadhabmondal/let-s-build-a-video-chat-app-with-javascript-and-webrtc-27l3)
Introduction
If you weren’t familiar with web video-conferencing platforms and apps before the Covid-19 pandemic, we bet you know all about them now and must have used one of them.
The ongoing COVID-19 situation has many more people working from home than ever before and companies using web conferencing as their primary means of communication between employees and clients.
And with much of the world on lockdown with social distancing measures enforced, even spending time with family and friends is now largely restricted to online video calls. From parties to business meetings, these video conferencing platforms are now commonplace for virtually everyone.
The aim of this tutorial series is to teach how to develop such a video-conferencing web application. Also, this series will definitely help all those developers who would like to learn how to build applications such as real-time advertising, multiplayer games, live broadcasting, e-learning, to name a few, where the action takes place in real time.
Fundamentals
Before we begin to develop such a web app, we need to understand how an e-conferencing application is different from a simple chatting web app.
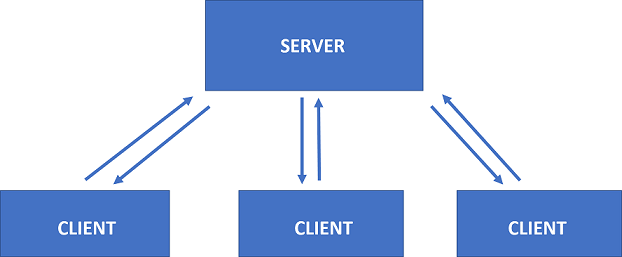
In a simple chatting web app, when two browsers need to send messages to each other, they typically need a server in between for coordination and passing the messages. But having a server in the middle results in a delay in communication between the browsers. This delay hardly affects the utility of the chatting app. Even if this delay is (say) 5 secs, we would still be able to use this chatting application.
However, in the case of a video conferencing application, this delay is significant. It will be extremely difficult to talk to someone using such an application. Imagine yourself talking to someone who receives your voice 5 secs later. You can realize how annoying it will be.
Hence, for video conferencing, we require Real-Time Communication between the browsers. Such communication is possible if we eliminate the server from between. This is why we will have to use WebRTC — an open-source framework providing web browsers and mobile applications with real-time communication via simple APIs.
WebRTC
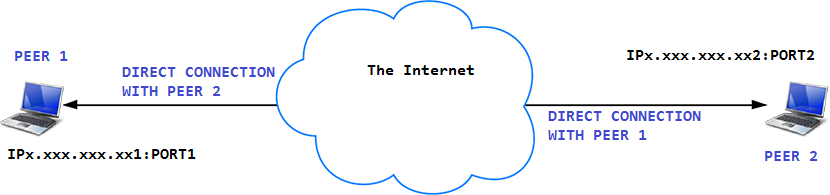
WebRTC stands for Web Real-Time Communication. It enables peer-to-peer communication without any server in between and allows the exchange of audio, video, and data between the connected peers. With WebRTC, the role of the server is limited to just helping the two peers discover each other and set up a direct connection.

To build an application (that requires peer-to-peer communication) from scratch without WebRTC, you would need a wealth of frameworks and libraries dealing with typical issues like
- data loss
- connection dropping
- NAT traversal
- Echo cancellation
- Bandwidth adaptivity
- Dynamic jitter buffering
- Automatic gain control
- Noise reduction and suppression
With WebRTC, all of this comes built-in into the browser out-of-the-box. WebRTC **automatically handles all of these concerns under the hood.**This technology doesn’t need any plugins or third-party software. It is open-sourced and its source code is freely available at http://www.webrtc.org/.
Though most of the major browsers (like Chrome, Firefox etc. ) have implemented WebRTC framework and have exposed WebRTC’s APIs for the developers, it is better to confirm that your browser version supports it. You can find the list of all the browsers supporting WebRTC here.
WebRTC APIs
WebRTC consists of several interrelated APIs and protocols which work together to achieve Real Time Communication. The most important APIs that we will use in this tutorial series are — click links to see demos
getUserMedia(): capture audio and video.MediaRecorder:record audio and video.RTCPeerConnection:stream audio and video between users.RTCDataChannel:stream data between users.
Signaling
Before the two peers can start communicating with each other, they need to know a lot of information about each other like —
- If there is any other peer available for communication.
- Network data, such as a peer’s IP address and port as seen by the outside world
- Session-control messages — used to open or close communication
- Error messages
- Media metadata, such as codecs, codec settings, bandwidth, and media types that will be sent by a peer
- Key data used to establish secure connections
Don’t worry if you do not understand what the above information represents. The important thing is to realize that a lot of information needs to be exchanged before a direct connection can be set-up. Such information can be termed as metadata.
Signaling refers to the mechanism which coordinates initial communication and enables sending of metadata between the peers (browsers). Hence, initially, the peers communicate with each other using the signaling mechanism — primarily, for discovering other peers and sharing the information needed to create a direct connection between them. Once the direct connection has been established, there is no role of signaling thereafter.
Remember — For signaling, we need a server.
Session Description Protocol:-
-
The signaling mechanism (methods, protocols, etc.) is not specified by WebRTC. We need to build it ourselves. (Although this seems to be a complicated task, believe us — it is not. In this series, we will use Socket.IO for signaling, but there are many alternatives).
-
WebRTC only requires the exchange of the media metadata mentioned above between peers as offers and answers. Offers and answers are communicated in Session Description Protocol (SDP) format which looks like the following:-
v=0 o=- 7614219274584779017 2 IN IP4 127.0.0.1 s=- t=0 0 a=group:BUNDLE audio video a=msid-semantic: WMS m=audio 1 RTP/SAVPF 111 103 104 0 8 107 106 105 13 126 c=IN IP4 0.0.0.0
... -
If you are wondering what each line means in the above format, don’t worry. WebRTC creates this automatically according to the audio/video device present on your laptop/PC.
So how does a WebRTC Application work?
Up till now, we have described what is WebRTC, what is Signalling and what are the various APIs can be used by the developers. Now, let’s discuss how all this works together. Once we know this, we can begin writing the code.
Before we discuss, you must understand what are IP Addresses and PORTS.
- Each device that is connected to the internet, is identified using an IP address.
- Port number identifies a specific process to which an Internet or other network message is to be forwarded when it arrives at the device. The port number is used so the data from the internet is directed to the correct location within the device.
So, each device that is connected to the internet, has an IP Address and many PORTs (typically 65,536).
RTCPeerConnection API and signaling: Offer, answer, and candidate
As we discussed before RTCPeerConnection API of WebRTC is used to stream audio and video between users. Hence, Signalling works together with RTCPeerConnection to establish a direct connection between the browsers.
To initialize this process RTCPeerConnection has two tasks:
- Ascertain local media conditions (audio and video), such as resolution and codec capabilities. This is the metadata used for the offer-and-answer and is sent via signaling.
- Get potential network addresses (known as candidates) (which consists of an IP Address and a PORT number) for the app’s host which must be also sent by signalling
Once this local data has been ascertained, it must be exchanged through a signaling mechanism with the remote peer.
Imagine Amy is trying to call Bernadette. Here’s the full offer/answer mechanism in all its detail: First let’s discuss how they will share information regarding media conditions.
- Amy creates an
RTCPeerConnectionobject. - Amy creates an offer (an SDP session description) with the
RTCPeerConnectioncreateOffer()method. - Amy calls
setLocalDescription()to set the created offer (Session Description) as the description of local media in the connection that will be created. - Amy stringifies the offer and uses a signaling mechanism to send it to Bernadette.
- Bernadette calls
setRemoteDescription()with Amy's offer, so that herRTCPeerConnectionknows about Amy's setup. - Bernadette calls
createAnswer()and the success callback function for this is passed a local session description—Bernadette's answer. - Bernadette sets her answer as the local description by calling
setLocalDescription(). - Bernadette then uses the signaling mechanism to send her stringified answer to Amy.
- Amy sets Bernadette’s answer as the remote session description using
setRemoteDescription().
Now Amy and Bernadette also need to exchange network information as well. The expression “finding candidates” refers to the process of finding network interfaces and ports (present on a peer and are available for establishing a direct connection with the other peer) using the ICE framework.
- Amy creates an
RTCPeerConnectionobject with anonicecandidatehandler. - The handler is called when network candidates become available.
- In the handler, Amy sends stringified candidate data to Bernadette through their signaling channel.
- When Bernadette gets a candidate message from Amy, she calls
addIceCandidate()to add the candidate to the remote peer description.
WebRTC supports ICE Candidate Trickling, which allows the caller to incrementally and automatically provide candidates to the callee after the initial offer, and for the callee to automatically begin acting on the call and set up a connection without waiting for all candidates to arrive. Don’t worry if you do not understand ICE Candidate Trickling. The important thing is WebRTC automatically creates ICE candidates (containing IP address) once a peer creates the offer. We only have to implement the methods that are required to receive and send these candidates via signaling.
Once the information regarding the media conditions and ice candidates are shared between the two peers, WebRTC automatically creates a direct connection between the peers.
After Signalling — Use ICE to cope with NATs and firewalls
So, it is natural that you would expect that every WebRTC Connection endpoint would have a unique IP address and PORT number that it could exchange with other peers in order to communicate directly.
But it is not so simple. There are two factors which can cause problems here. We must deal with those before we can use our web conferencing application.
Problem 1 — NAT
If you are familiar with Computer Networks, you would know what NAT is. If don’t know, do not worry. We will explain it here:
You already know what IP addresses are. It is an address that identifies a device connected on the internet. Logically, you would expect that each device (which is connected to the Internet) must have a UNIQUE IP Address. But this is not entirely true.
An IPv4 address is 32 bits long which implies that there are about 4 billion unique address (2³² = 4,294,967,296). At the end of 2018, there were about 22 billion devices connected to the internet. So, you must be wondering — if there are only 4 billion IP addresses, how can 22 billion devices be connected on the internet ? The answer to this is NAT.
The guys, who maintain the internet, came up with the following solution — They divided the whole IPv4 address range into two groups — public IP Addresses and private IP Addresses. Now, each public IP address can be assigned only to one device but the same is not true for private IP addresses. See the image below for more clarification.
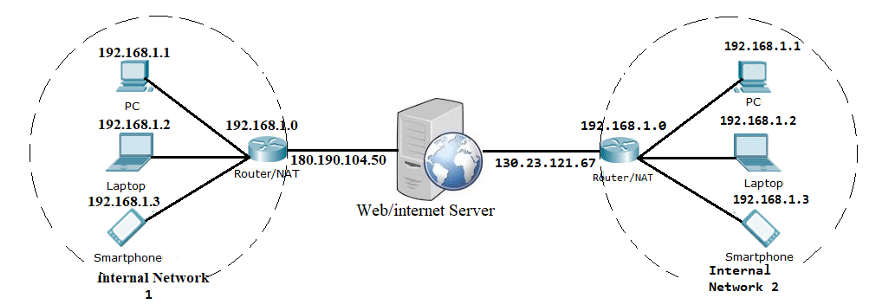
In the above picture, each router has two IP addresses — one Public IP Address (facing the server) and one Private IP Address (facing the Internal Network). So, if any device inside Internal Network 1 sends a request to the server, the server will see the request coming from the same IP Address i.e. 180.190.104.50
So this implies that each router maps one Public IP Address to multiple Private IP Addresses of the devices. This also implies that each device (laptop, PC, Smartphone) only knows its private IP Address and not the public IP Address of the router. ( Also, if you search on Google — my IP Address, Google will tell you the public IP Address of the router (you are connected to) because Google sees the Public IP Address of the router and not your Private IP Address.)
Hence, in a way, we can say that each device has two IP addresses — a Private IP address (assigned to the device) and the Public IP address (assigned to the router to which the device is connected to).
This can cause problem for WebRTC as the network ICE candidates (generated by the browser) contain the private IP address and not the public IP address of the device. Hence, we must find a way for the browser to know the Public IP Address so that it can create candidates containing the Public IP Address. The solution is a STUN (Session Traversal Utilities for NAT) server. When a device makes a request to the STUN server, the STUN server responds back with a message containing the public IP of the router to which the device is connected to. In this way, the STUN server helps the browser to generate candidates.
We will see how to integrate STUN with WebRTC later in the tutorial.
Problem 2 — Firewall
In reality, most devices live behind one or more layers of firewalls which are like antivirus softwares that blocks certain ports and protocols. A firewall and a NAT may in fact be implemented by the same device, such as a home WIFI router. Since WebRTC uses a number of non-standard Ports, some Firewalls do not allow a direct connection to be made between the two browsers.
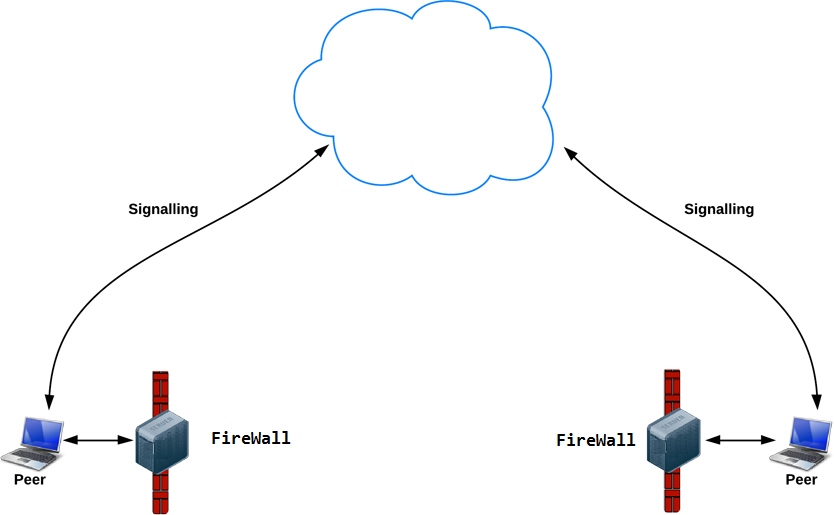
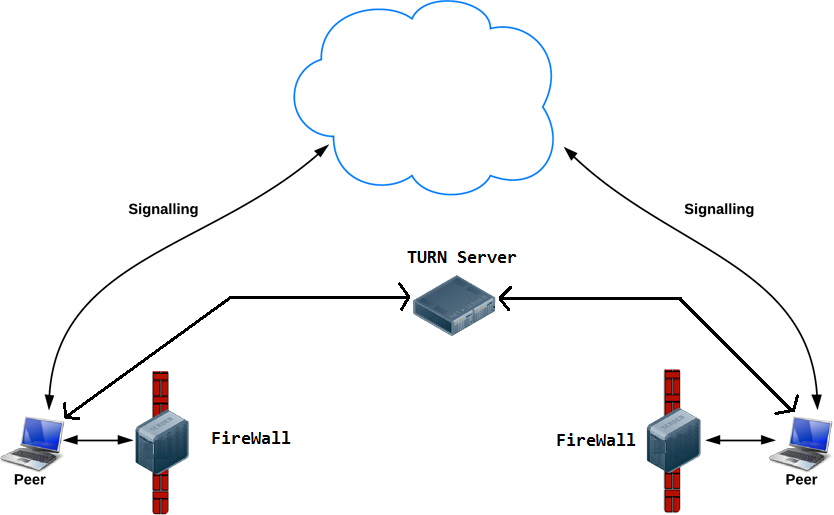
Hence, to solve this, we need a TURN (Traversal Using Relay NAT) server. TURN server basically acts a Relay Server i.e. the relay traffic directly between the two peers if direct (peer-to-peer) connection fails. Following image illustrates:-
Solution
As we discussed before, we need to use STUN and TURN servers while making a peer-to-peer connection using WebRTC. To integrate TURN and STUN with webrtc, we only have to pass a object containing the URLs of TURN and STUN servers to the RTCPeerConnection() as its argument. Following code illustrates:-
//Object containing TURN/STUN URLs.
var pcConfig = {
  'iceServers': [
  {
  	'urls': 'stun:stun.l.google.com:19302'
  },
  {
  	'urls': 'turn:192.158.29.39:3478?transport=udp',
  	'credential': 'JZEOEt2V3Qb0y27GRntt2u2PAYA=',
  	'username': '28224511:1379330808'
  },
  {
  	'urls': 'turn:192.158.29.39:3478?transport=tcp',
  	'credential': 'JZEOEt2V3Qb0y27GRntt2u2PAYA=',
  	'username': '28224511:1379330808'
  }
  ]
}........
//Passing the above object to RTCPeerConnection
RTCPeerConnection(pcConfig);
As illustrated above, we only have to pass the URLs. WebRTC manages everything else under the hood.
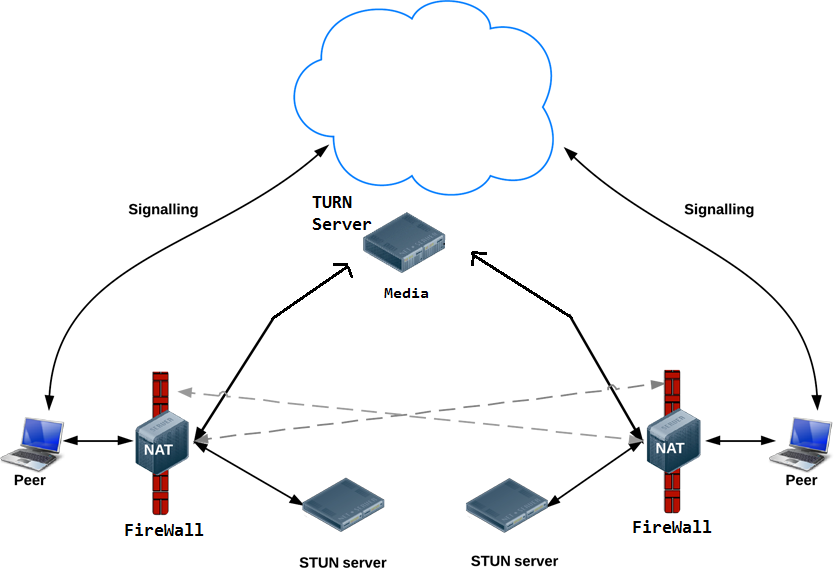
Following diagram illustrates all the connections made during a WebRTC call
Note:-
- Most of the times, a successful connection will be made using a STUN server only and without the need of a TURN server. Only for a few times, you will require a TURN server for a successful call.
- There are companies (like XirSys) that provide free TURN/STUN server.
Congratulations
You have made it to the end of this tutorial. You must now have a clear understanding of how WebRTC works.
Until now, we have only described the set of events that occur when one person (in our example, Amy) tries to call another person (in our example, Bernadette) using WebRTC. If you are wondering how to implement all this in code, stay tuned with us. We will write and explain the code that implements all these concepts in the next tutorial.
Sources
- WebRTC.org
- Wikipedia
- MDN Web Docs
- HTML5Rocks
here...