
How To Build A Simple Calculator Application With React.JS
This is my approach to building a calculator with react.js. You can see the final result here.
Here’s the source code at github — https://github.com/niinpatel/calculator-react
First we’ll run the create-react-app command on our directory to create a basic react boilerplate application. Then we’ll jump right on to building our components.
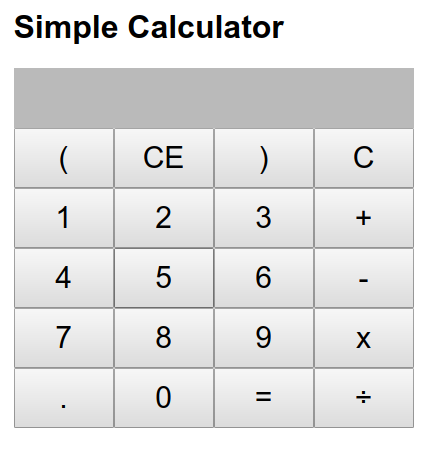
This calculator application will need two components. One is our Result component where we display the output, and the other is KeypadComponent where we need to display our keypad.
In the src folder, we’ll create a directory called components. This is where we will code our components. Go into that folder and create ResultComponent.js.
This is what the code would look like.
import React, {Component} from 'react';

class ResultComponent extends Component {


    render() {
        let {result} = this.props;
        return (
            <div className="result">
                <p>{result}</p>
            </div>
    )
        ;
    }
}


export default ResultComponent;
Our result component consists of just one <p> tag which displays content from props. Next, let’s build a keypad component. Our keypad is just a bunch of buttons which do something when clicked. This is the code for our KeypadComponent.js file.
import React, {Component} from 'react';

class KeyPadComponent extends Component {

    render() {
        return (
            <div className="button">
                <button name="(" onClick={e => this.props.onClick(e.target.name)}>(</button>
                <button name="CE" onClick={e => this.props.onClick(e.target.name)}>CE</button>
                <button name=")" onClick={e => this.props.onClick(e.target.name)}>)</button>
                <button name="C" onClick={e => this.props.onClick(e.target.name)}>C</button><br/>


                <button name="1" onClick={e => this.props.onClick(e.target.name)}>1</button>
                <button name="2" onClick={e => this.props.onClick(e.target.name)}>2</button>
                <button name="3" onClick={e => this.props.onClick(e.target.name)}>3</button>
                <button name="+" onClick={e => this.props.onClick(e.target.name)}>+</button><br/>


                <button name="4" onClick={e => this.props.onClick(e.target.name)}>4</button>
                <button name="5" onClick={e => this.props.onClick(e.target.name)}>5</button>
                <button name="6" onClick={e => this.props.onClick(e.target.name)}>6</button>
                <button name="-" onClick={e => this.props.onClick(e.target.name)}>-</button><br/>

                <button name="7" onClick={e => this.props.onClick(e.target.name)}>7</button>
                <button name="8" onClick={e => this.props.onClick(e.target.name)}>8</button>
                <button name="9" onClick={e => this.props.onClick(e.target.name)}>9</button>
                <button name="*" onClick={e => this.props.onClick(e.target.name)}>x</button><br/>


                <button name="." onClick={e => this.props.onClick(e.target.name)}>.</button>
                <button name="0" onClick={e => this.props.onClick(e.target.name)}>0</button>
                <button name="=" onClick={e => this.props.onClick(e.target.name)}>=</button>
                <button name="/" onClick={e => this.props.onClick(e.target.name)}>÷</button><br/>
            </div>
        );
    }
}


export default KeyPadComponent;
Since we need to send the click event to the parent ( with information about which button was clicked), we will call this.props.OnClick function on every button click and pass e.target.name as an argument.
We’ll define the logic of that function into our parent component, which is App.js.
In the App.js file, which is the parent of all our previous components and which renders all the main components, we will include all the child components first. We will also include “result” variable in this.state which is passed into our result component. This will allow us to manipulate our display.
import React, { Component } from 'react';
import './App.css';
import ResultComponent from './components/ResultComponent';
import KeyPadComponent from "./components/KeyPadComponent";

class App extends Component {
    constructor(){
        super();

        this.state = {
            result: ""
        }
    }

    render() {
        return (
            <div>
                <div className="calculator-body">
                    <h1>Simple Calculator</h1>
                    <ResultComponent result={this.state.result}/>
                    <KeyPadComponent onClick={this.onClick}/>
                </div>
            </div>
        );
    }
}

export default App;
Notice that I have passed this.onClick into Keypad component but I haven’t defined it yet. Before defining that function, we need to do a few things. We need to create functions for our basic calculator features. In this calculator, I’ll have three main features.
this.Calculate => Calculate the result of our expression, this is triggered, when “=” button is pressed.
this.Reset => Clear our output, this is trigered when “C” is pressed.
this.Backspace => Clear the last character that was pressed. triggered on “CE”.
Let’s create those functions first.
import React, { Component } from 'react';
import './App.css';
import ResultComponent from './components/ResultComponent';
import KeyPadComponent from "./components/KeyPadComponent";

class App extends Component {
    constructor(){
        super();

        this.state = {
            result: ""
        }
    }


    calculate = () => {
        try {
            this.setState({
                // eslint-disable-next-line
                result: (eval(this.state.result) || "" ) + ""
            })
        } catch (e) {
            this.setState({
                result: "error"
            })

        }
    };

    reset = () => {
        this.setState({
            result: ""
        })
    };

    backspace = () => {
        this.setState({
            result: this.state.result.slice(0, -1)
        })
    };

    render() {
        return (
            <div>
                <div className="calculator-body">
                    <h1>Simple Calculator</h1>
                    <ResultComponent result={this.state.result}/>
                    <KeyPadComponent onClick={this.onClick}/>
                </div>
            </div>
        );
    }
}

export default App;
Finally, we can create our onClick function and include it in our App.js file.
Let’s do this.
import React, { Component } from 'react';
import './App.css';
import ResultComponent from './components/ResultComponent';
import KeyPadComponent from "./components/KeyPadComponent";

class App extends Component {
    constructor(){
        super();

        this.state = {
            result: ""
        }
    }

    onClick = button => {

        if(button === "="){
            this.calculate()
        }

        else if(button === "C"){
            this.reset()
        }
        else if(button === "CE"){
            this.backspace()
        }

        else {
            this.setState({
                result: this.state.result + button
            })
        }
    };


    calculate = () => {
        try {
            this.setState({
                // eslint-disable-next-line
                result: (eval(this.state.result) || "" ) + ""
            })
        } catch (e) {
            this.setState({
                result: "error"
            })

        }
    };

    reset = () => {
        this.setState({
            result: ""
        })
    };

    backspace = () => {
        this.setState({
            result: this.state.result.slice(0, -1)
        })
    };

    render() {
        return (
            <div>
                <div className="calculator-body">
                    <h1>Simple Calculator</h1>
                    <ResultComponent result={this.state.result}/>
                    <KeyPadComponent onClick={this.onClick}/>
                </div>
            </div>
        );
    }
}

export default App;
The onclick function simple, reads the argument, which is name of the button clicked, and changes the state appropriately depending on the input that is passed.
Finally, you can add a little bit of CSS to make it look nicer.
With this we have completed our Calculator Application with React.JS.
Final code — https://github.com/niinpatel/calculator-react/
Live at — https://calculator-n.herokuapp.com
Oh my god, Drift Boss so cool!
You can also get the same result with the above shared code here at
https://parcelstrackings.com/jaipur-golden-tracking/
Here’s an alternative approach for creating a simple calculator application using React.JS:
Begin by setting up your development environment with Node.js and NPM.
Create a new React project named “calculator-app” by running the following command in your terminal:
Open the src folder and create two new files: Calculator.js and Display.js.
In Calculator.js, define the Calculator component:
This approach creates a basic calculator application with buttons for numbers, operators, and the ability to clear the display and perform calculations and visit us for more codes on fitness https://bungeefitnessnearme.com/