
A Practical Guide to Harlem in Vue 3
This article assumes you have a basic understanding of Vue and Vuex.
Starting out with any frontend framework or library, state management is always a topic you look on the web to learn, for Vue, the first recommended option you would find is Vuex — a library based on the flux pattern for state management. Harlem however, is an alternative to Vuex and claims to be an “unopinionated, lightweight, and extensible” state management library for Vue 3. Let’s see how.
Getting Started
It’s fairly easy to get up and running with Harlem. As per the documentation, you’d only need to install harlem/core :
yarn add @harlem/core
Next use the Harlem store in your entry file:
  // main.js
  ...
  import Harlem from '@harlem/core';
  ...

  createApp(App).use(Harlem).mount('#app')
We can jump right in and model a cart in our store. Using a default vue 3 app (generated using vue-cli), we can add a stores folder and create a cart module within this folder. This would look something like this:

State
In your frontend applications, your state tree should be the single source of truth, being read-only and providing a uniform interface to write to and read from it. This is the same concept with Harlem, once a store is created, the state tree is strictly read-only. We can create our state in Harlem by passing a base store object to the createStore function.
The
createStorefunction is used for creating new instances (think of an instance as a module) of stores that have their own getters, mutations etc.
const BASE_STATE = {
  cartName: 'Black Friday Cart',
  shop: [],
  items: []
};

export const { state } = createStore('cart', BASE_STATE, {})
The createStore function takes 3 arguments, first is the name of the store instance (module name), in our case “cart”, the second argument is the base state object, the third optional argument is the store options. This function returns an instance of the store object which in turn exposes its state, mutation, getter.
Store Options
The store option is passed as the third argument to the createStore function. With this argument, we can specify some interesting options like allowOverwrite, providers, or extensions. Let’s update the createStore function and modify one provider.
export const { state } = createStore('cart', BASE_STATE, {
  provider: {
    payload: value => ({ createdAt: new Date(), ...value })
  }
});
One of the providers Harlem allows is the payload — with this function, we can intercept and modify every payload before it is sent to a mutation. You can find other possible providers here:
I wouldn’t recommend doing something like this for every payload that is sent to a mutation (however, there might be use cases). Ideally, you would only want to modify the payload for specific kinds of mutations, and yes, Harlem lets you easily do this as well using the onBeforeMutation subscriber:
export const {
  onBeforeMutation
} = createStore('cart', BASE_STATE, {})

onBeforeMutation('addToCart', ({ mutation, payload, result }) => {
  // do something with payload
})
Mutation
How do we define a mutation?
The createStore function returns a store instance that exposes some useful functions, including the mutation function - – The mutation function is used to define a method for mutating a particular part of the state.
export const {
  ...
  mutation
} = createStore('cart', BASE_STATE, { });

export const addToCart = mutation('addToCart', (state, payload) => {

  state.items.push(payload)

  state.shop = state.shop.map(item => {
    if (item.id === payload.id) {
      item.isAvailable = false
    }
    return item
  })
})
We’ve defined a new mutation as addToCart, passing it a callback that receives a writable copy of the state and a payload and pushes it to the items array. We can define some more:
export const removeFromCart = mutation('removeFromCart', (state, payload) => {
  state.items = state.items.filter(x => x !== payload)
  state.shop = state.shop.map(item => {
    if (item.id === payload.id) {
      item.isAvailable = true
    }
    return item
  })
})

export const clearCart = mutation('clearCart', state => {
  state.items = []
  state.shop = state.shop.map(item => ({ ...item, isAvailable: true }))
})
And even more:
export const populateStore = mutation('populateCart', (state, payload) => {
  state.shop = payload;
})
Getters
Just like the mutation function, the getter function is exposed from the store instance, allowing us to import and define getters in the same way.
export const {
  ...
  getter
} = createStore('cart', BASE_STATE, { ... });

export const cartItems = getter('cartItems', state => {
  return state.items
});

export const availableItems = getter('availableItems', state => {
  return state.shop.filter(item => item.isAvailable);
})
Component Usage
Now that we have a simple Harlem store, here’s how we use it in our components. We can simply import those exported mutations, getters, and states within our components like so;
<script setup>
  ...
  import {
      state,
      addToCart,
      cartItems,
      clearCart,
      setCartName,
      availableItems,
      fetchStoreData,
  } from './stores/cart';
  ...
</script>
In the example above we have imported the state object, addToCart and populateStore mutation, cartItems and availableItems getter. It is important to note that the state is always readonly so we can access the value of cartName within our template by doing state.cartName but we cannot mutate the value by assigning state.cartName a new value:
state.cartName = 'New Cart Name'
// Set operation on key "cartName" failed: target is readonly.
// Proxy // {cartName: 'Black Friday Cart', items: Array(0)}
So by all means always maintain the flux pattern when dealing with stores — mutate the store only within a mutator function.
Within the template section of our component we can simply use the state value and getters directly, we can also use them within methods and computed properties:
<template>
  ...
    <h3>{{ state.cartName }} ({{ cartItems.length }})</h3>
  ...
</template>
Here we’re displaying the cart name and the number of items in the cart. We can go ahead and loop through the availableItems getter to display a list of available items in the store.
<div class="store">
  <div class="store__product"
    v-for="(item, index) in availableItems"
    :key="index"
  >
    <div class="store__product_image">
      <img width="200" :src="item.image" :alt="item.title">
    </div>
    <div class="store__product_content">
      <div class="store__product_description">
        {{ item.title }}
      </div>
      <div class="store__product_price">$ {{ item.price }}</div>
      <button class="atc" @click="add(item)">Add To Cart</button>
    </div>
  </div>
</div>
Notice we attached a method add(item) to the on-click listener of our “add to cart” button. Within this function, we can call the addToCart mutation we imported from our store and pass the item as the payload:
<script setup>
  ...
  const add = (item) => {
    addToCart(item)
  }
</script>
Two-way binding
Another interesting thing we can do with Harlem is bound any of our store property to our template with v-model. Let’s say, users are able to modify the cart name, we can add an input element and bind it to a variable that gets and sets the value of state.cartName :
<template>
  ...
  <input type="text" v-model="cartName">
  ...
</template>

<script setup>
  import { computed } from 'vue';

  import {
    ...
    state,
    setCartName
  } from './stores/cart';

  const cartName = computed({
    get: () => state.cartName,
    set: value => setCartName(value)
  })
</script>
Next, you’d only need to define and export a mutation setCartName within cart.js file:
export const setCartName = mutation('setCartName', (state, payload) => {
  state.cartName = payload
})
You should now have the store property correctly bound to the input field
Putting it all together
While you weren’t looking, I went ahead to add a bit of styling to this demo application and pulled some dummy data from FakeStore API.
import { onMounted } from 'vue';
import {
  ...
  populateStore
} from './stores/cart';

onMounted(() => {
  fetch('https://fakestoreapi.com/products')
    .then(res => res.json())
    .then(json => populateStore(json.map(
      ({ id, title, price, description, image }) => ({
        id,
        title,
        price,
        description,
        image,
        isAvailable: true
      })
    )))
})
When we run this application, we can see the increasing number of items in our cart when we click the Add To Cart button and the item becomes unavailable in the store.

This is all great but how do we inspect our Harlem store and make sure it behaves exactly how we expect it to? - Harlem Devtool Plugin + Vue Dev Tool.
Devtool
Vuex is supported by default on the Vue dev tool, this isn’t the case for Harlem (at the time of writing). We can however include support for Harlem by installing the Harlem Devtool Plugin to our project.
npm i @harlem/plugin-devtools

or using yarn

yarn add @harlem/plugin-devtools
Then within your main.js entry file you can include it the list of plugins for Harlem:
import devtoolsPlugin from '@harlem/plugin-devtools';

createApp(App)
  .use(Harlem, {
    plugins: [
      devtoolsPlugin({
        label: 'Harlem Store'
      })
    ]
  })
  .mount('#app')
You should now be able to see the Harlem option in Vue Dev tools. You can select this option to have a look at your store modules and how they interact with your components & data during development.
Let’s have another look at our marketplace with the devtool open.
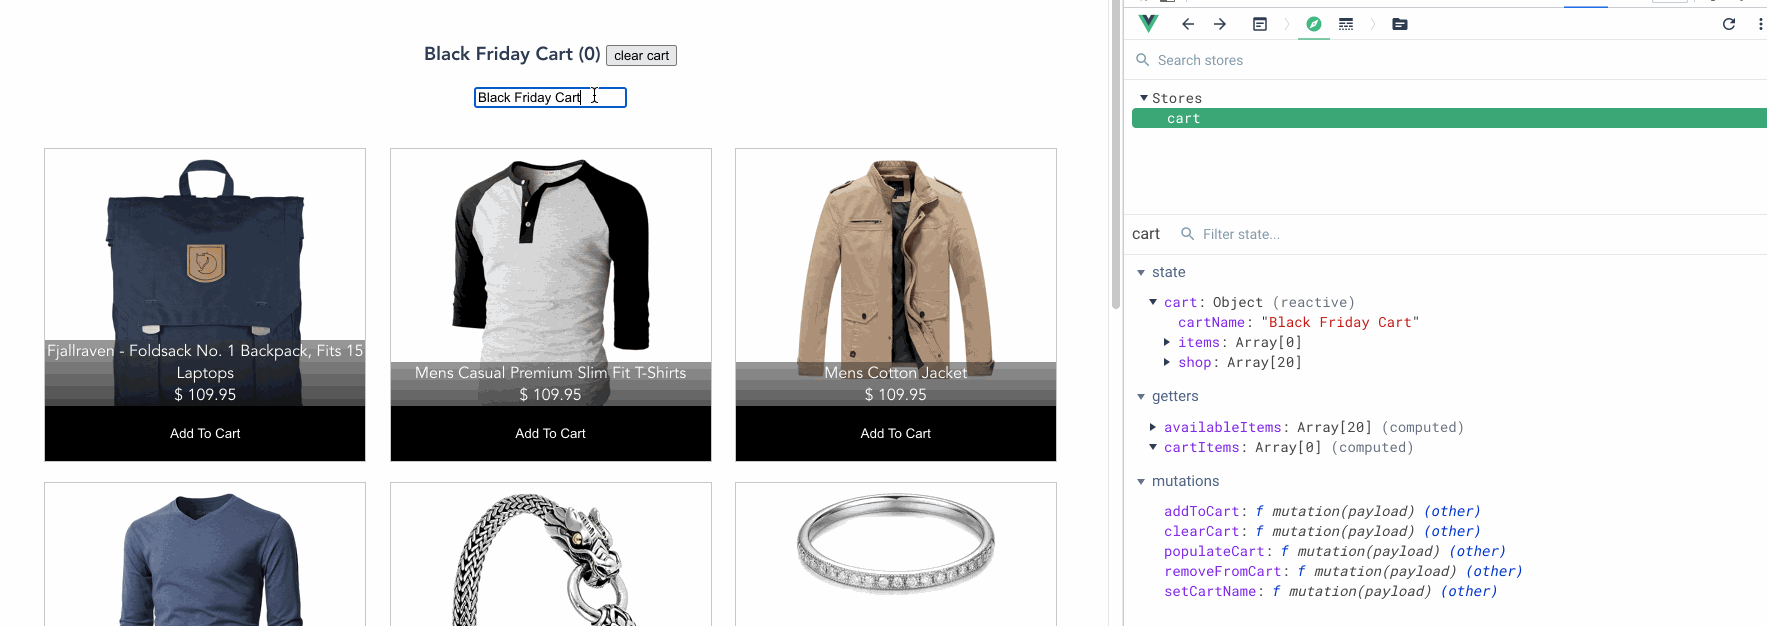
Actions
In Harlem, Actions aren’t included by default, as opposed to Vuex, this is mostly because Harlem preaches simplicity and lightweight-ness, and given the most basic store implementation, you would most likely not need actions. Generally, Actions are asynchronous methods that combine network requests with one (or more) state mutations.
To include actions in Harlem, we’d install the @harlem/extension-action library.
npm i @harlem/extension-action

or using yarn

yarn add @harlem/extension-action
Next, register this extension on the module you want to include actions in (in our case, the cart module). We can do this within the StoreOptions of the createStore function:
import { createStore } from '@harlem/core';
import actionExtension from '@harlem/extension-action';

export const {
  ...
  action
} = createStore('cart', BASE_STATE, {
  extensions: [ actionExtension() ]
});
Notice how we can now import the action function from the createStore function after including the extension. Here’s a list of other methods the action extension makes available.
Let’s make some changes. Using the action function we can now define a new action — fetchStoreData, to fetch data from the FakeStore API and call the populateStore mutation.
export const { action } = createStore(...)

export const fetchStoreData = action('fetchStoreData', async () => {
  const data = await fetch('https://fakestoreapi.com/products').then(res => res.json())
  const items = data.map(({ id, title, price, description, image }) => ({
    id,
    title,
    price,
    description,
    image,
    isAvailable: true
  }))
  populateStore(items)
})
We can now update our onMounted hook to call the fetchStoreData action.
import {
  ...
  fetchStoreData
} from './stores/cart';

onMounted(() => {
  fetchStoreData()
})
Store Persistence
Sometimes you want to hydrate your store with saved data from the browser’s storage. With Vuex we’re able to do this using libraries like vuex-persistedstate, we can achieve this same functionality in Harlem with the official storage extension — which adds the ability to sync store state to/from localStorage or sessionStorage.
Like every other Harlem extension, this is installed on demand.
yarn add @harlem/extension-storage
Next, import and add to your plugins list:
import storageExtension from '@harlem/extension-storage';
...

export const {
  ...
  startStorageSync,
  stopStorageSync,
  clearStorage
  ...
} = createStore('cart', BASE_STATE, {
  extensions:
    ...
    storageExtension({
      type: 'local',
      prefix: 'marketplace',
      sync: true,
      exclude: [],
      serialiser: state => JSON.stringify(state),
      parser: value => JSON.parse(value)
    })
  ]
});
You’d notice some of the configuration options we can set in the storageExtension. Read all about them here.
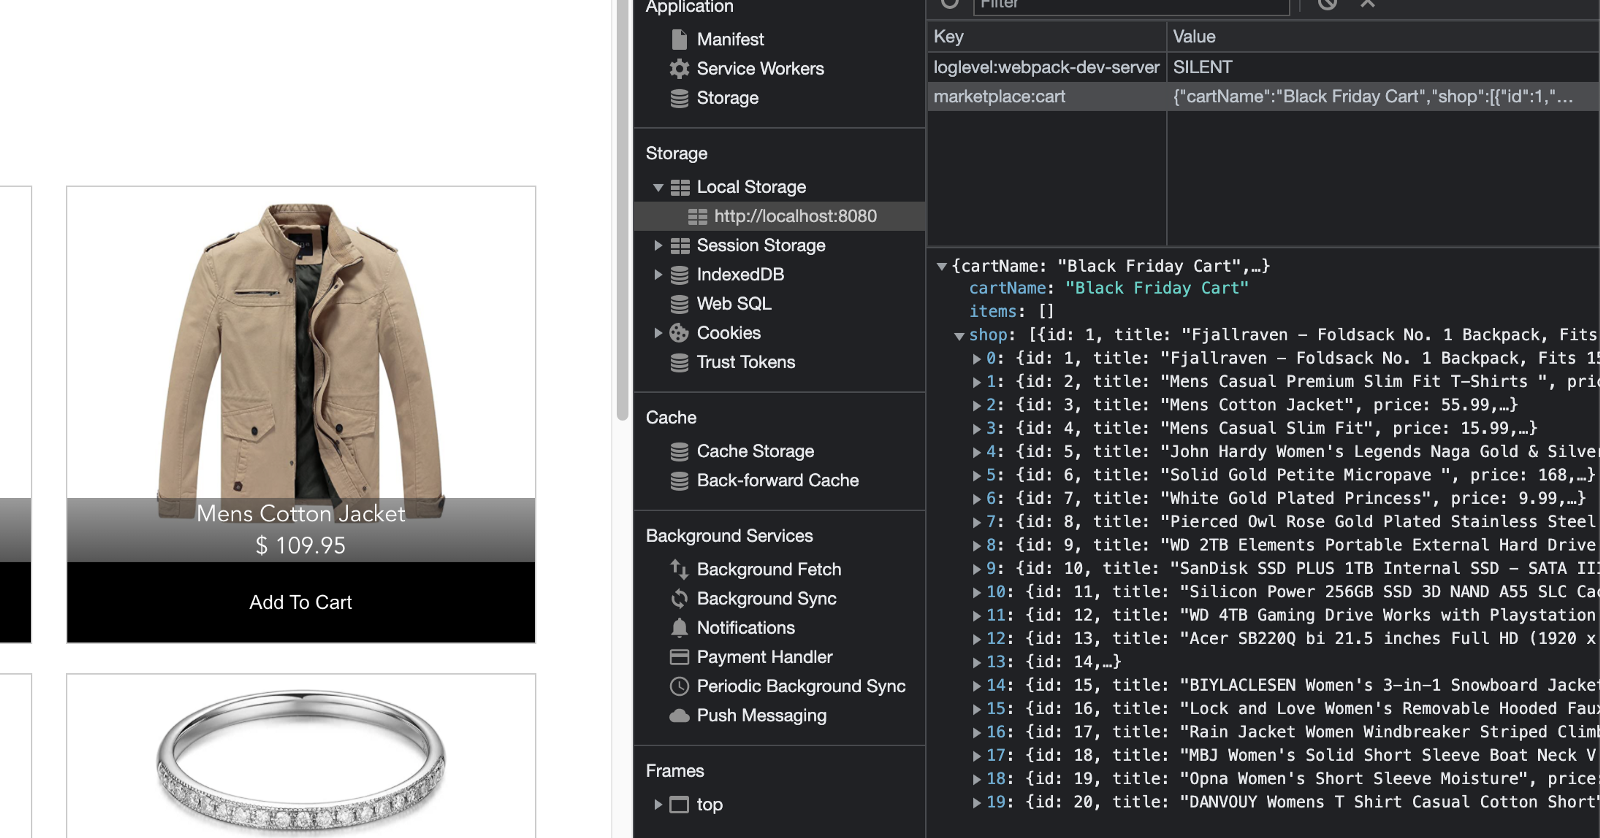
When we inspect our app, we should see the store object saved in the browser’s localStorage.
So far, I believe we’ve covered the major requirements for building a functional application with Harlem. To learn more possibilities with Harlem, feel free to check the official documentation.
Here’s a link to the source code for this example project:
https://github.com/MartinsOnuoha/vue-harlem-cart
And Here’s a link to the demo app deployed on Surge.
Cheers ☕️