
Mobile SDKs that are becoming essentials

Having the right tools is crucial for your product and its quality.
There are thousands of third-party SDKs that promise various functions and abilities. Some of them are good, some of them are great, but a few of them are slowly becoming essential tools and developers start to chose them by habit. Here’s some of those SDKs:
1. Twitter’s Fabric

Fabric finds his place in every app. It’s a free cross-platform bundle of kits that every developer needs to use. It consists the following kits:
- Crashlytics , a real time crash reports that tells you exactly where the app crashed and on what device.
- Answers , an analytics tool that analyzes and tracks your users’ behavior, app installs, events, active users and much more.
- Twitter , adds the functionalities of Twitter, like login, sharing, tweet embeds…
- Stripe , adding payments inside your app.
- AppSee , analyses user behaviour with videos of sessions, heatmaps and analytics.
- MoPub , mobile advertising SDK.
There are 6 more SDKs that give you different functionalities.
2. Alamofire (iOS) and Retrofit (Android)


Every awesome app communicates with a server somewhere. That’s what makes the app dynamical and fun. If you want to achieve that, these are the best tools out there.
Alamofire:
Installing Alamofire is a piece of cake. If you use Cocoapods, you just need to append this in your Podfile:
pod 'Alamofire', '~> 3.0'
That’s it! Making HTTP requests is so elegant, it should be considered art. Here’s a simple GET request:
import AlamofireAlamofire.request(.GET, "https://httpbin.org/get")
You can change the type of the request by changing the first argument .GET. If you want to add parameters you just need to define them and append them into the function, like so:
let parameters = [
    "foo": "bar",
    "baz": ["a", 1],
    "qux": [
        "x": 1,
        "y": 2,
        "z": 3
    ]
]
Alamofire.request(.POST, "https://httpbin.org/post", parameters: parameters)
// HTTP body: foo=bar&baz[]=a&baz[]=1&qux[x]=1&qux[y]=2&qux[z]=3
And you can get your server response like this:
Alamofire.request(.GET, "https://httpbin.org/get")
         .responseString { response in
             print("Response String: \(response.result.value)")
         }
         .responseJSON { response in
             print("Response JSON: \(response.result.value)")
         }
Notice this block has two response handlers. That’s called response chaining. It supports String, Data and JSON. You can use any of these three solely or even combine them, depending on what type of response you’re expecting from the server.
Bonus! Alamofire-SwiftyJSON
This is a library that unifies Alamofire and SwiftyJSON into one, but if you want you can use SwiftyJSON separately. You can install it by appending this into your Podfile:
pod 'Alamofire-SwiftyJSON'
This is an addition to the response types of Alamofire. Now instead of three choices, string, data and json, you can handle your server response using SwiftyJSON, like this:
Alamofire.request(.GET, "http://httpbin.org/get")
         .responseSwiftyJSON({ (request, response, json, error) in
                     println(json)
                     println(error)
                  })
So now since you have “json” object all filled up, you can access your data like this:
if let userName = json["user"]["name"].string {
  //Now you got your value
}
Retrofit:
It might look a bit more complicated than Alamofire in terms of implementation, but you’ll set it up in a no time. Here are the steps:
- Installing:
// Append this to your module's build.gradle file
compile 'com.squareup.retrofit2:retrofit:2.0.0-beta4'
- Defining:
// Create an interface where you'll define your API
public interface GitHubService {
  @GET("users/{user}/repos")
  Call<List<Repo>> listRepos(@Path("user") String user);
}
- Declaration:
Retrofit retrofit = new Retrofit.Builder()
    .baseUrl("https://api.github.com")
    .build();

GitHubService service = retrofit.create(GitHubService.class);
- Usage:
Call<List<Repo>> repos = service.listRepos("octocat");
So what happens here is Retrofit takes the base URL from the declaration, takes the path from the defining and appends it to the base url, and then gets the argument from the usage (“octocat”) and replaces it with the replacement block {user}, so at the end it’ll prepare a GET request to the url “https://api.github.com/users/octocat/repos”. In order to send the request and get the data, you need to perform this:
repos.enqueue(new Callback<List<Contributor>>() {
  @Override void onResponse(/* ... */) {
    // You have the data here
  }

  @Override void onFailure(Throwable t) {
    // Something happened, show error.
  }
});
3. Glide (Android)

Glide is an Android library for loading and caching images. It’s widely used and recommended by lots of developers.
Installation:
// Append to your module's build.gradle
compile 'com.github.bumptech.glide:glide:3.6.0'
Usage:
Glide.with(getContext())
        .load("http://www.*****.***/path/to/image/file.png")
        .asBitmap()
        .into(imageViewElement);
And that’s it! It does the caching for you, although it gives you options. It loads fast, you can download the image as bitmap and perform changes on it before setting it up, add a placeholder image while Glide is downloading the other and stuff like that.
4. Butterknife (Android)

Field and method binding has never been easier. Instead of doing this:
TextView tvUsername = (TextView) findViewById(R.id.tvUsername);
with Butterknife you can do this:
@Bind(R.id.tvUsername) TextView tvUsername;
It’s an awesome library that saves up on time and makes your code look cleaner. You can install by appending this to your module’s build.gradle:
compile 'com.jakewharton:butterknife:7.0.1'
In order your bindings to work, your onCreate method should look like this:
@Override
public void onCreate(Bundle savedInstanceState) {
    super.onCreate(savedInstanceState);
    setContentView(R.layout.some_activity);
    ButterKnife.bind(this);
    // Rest of your method
  }
5. Spring (iOS)

Spring is an animation library that takes away all the pain of animating stuff in iOS. It’s easily installable using Cocoapods:
pod 'Spring', :git => 'https://github.com/MengTo/Spring.git', :branch => 'swift2'
You can use it within the storyboard by assigning special classes to your UI elements like this:
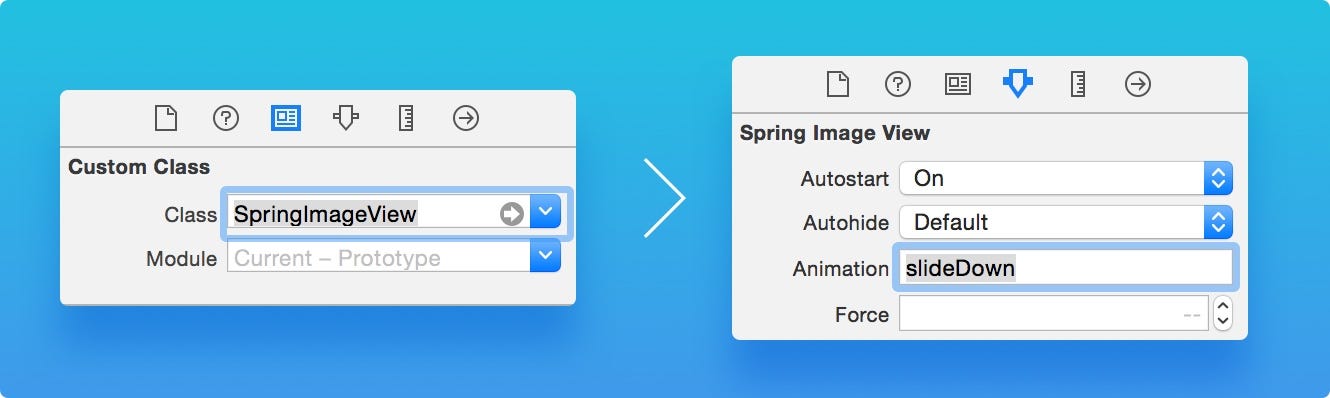
Or you can do it with code too:
layer.animation = "squeezeDown"
layer.animate()
It gives you a lot more options like chaining the animations, curving options, animation properties.
I guess that’s what I can come up at the moment. There are a lot more libraries that I use on different projects, but these are the ones that always get their place, regardless of the type of the project. If you guys have anything to add or a library to suggest, don’t hesitate to leave a comment. Thank you for reading!