
Create a Trello Clone using Angular, Node.js, Mongo, and Express
Table of contents
- I. Introduction
- II. Background
- III. Let’s build a Trello clone!
- IV. Let’s look at our final results
- V. Coding a Trello clone: Adding more features
I. Introduction
Simple to-do lists are great for keeping track of tasks you need to accomplish. But if you’re working with a team where tasks have sub-tasks that have sub-sub-tasks and more, that’s where you especially need a project management software. Project management apps, even simple ones like Trello, can break your project down into achievable steps and give your team a more manageable workflow.
II. Background
This tutorial shows how to write a Trello-like ticketing system from scratch to help you build a similar project management tool on your own. At every step, we will consider the minimal viable product requirements and implement them.
We will use Trello as an inspiration since it is very simple yet powerful. For the purpose of this tutorial, we will create a simple version of the app.
The stack we will use is the MEAN stack Mongo, Express, AngularJS, and Node.js. The MEAN stack has no particular advantage over other technologies so picking this technology is simply my personal taste. But here are some reasons why I prefer these technologies:
A. Node.js
- It has a great dependency mechanism. It is relative rather than global—both in file system and path. This means:
- You can have multiple versions of the same code in one project, which makes dependencies much more stable.
- You can easily pack your code “to go”.
- It is very easy to publish your code to use—micro library. This, in turn, means there’s a lot of code out there you can use for Node.js. It also means you can easily separate your code to small libraries.
- Combines with nvm (Node Version Manager), which means you can easily have multiple node version on your computer.
- It has a great stack of utilities for the development environment.
- nodemon and lite server auto refresh your process once code changes. This, in turn, accelerates your development process—remember there’s no compilation!
- Bower organizes your front-end dependencies (and I still like it even though npm can replace it
 ).
). - npm scripts is a very powerful way to add functionality to your development environment. I find it very useful to have Nodejs in any project never mind the language.
- It is light. I like the fact I can run Node.js on a micro machine in Amazon.
- It is asynchronous by nature. This makes it a very suitable technology for the web as web servers.
- Combines with Electron we can easily publish a native client to our app.
B. Express
Espress is a very straight forward library that helps organize your server’s code.
C. Mongo
Mongo plays very well with Node.js and its schema-less nature makes development very easy, especially when you start a project.
D. Angular
- It is a complete framework for the frontend. No need to integrate multiple libraries.
- I think it barely has any learning curve I never understood those who said otherwise.
- It separates HTML from JavaScript, which I like.
E. They are all JavaScript!
- JavaScript is awesome.
- It is a scripting language and so you see results right after writing the code.
- Its runs on engines written by the biggest companies and used by everyone using a browser.
- One language for all environments.
III. Let’s build a Trello clone!
Step 0: Getting started
To get things started, let’s use a scaffold project that includes a basic Angular setup and a backend.
Step 1: Managing tickets on a board
For the first step, let’s chose to assume
- a single board with lists and tickets
- no users, no collaboration
A. Create the “board” page
First, let’s set up a board view that allows users to add lists and tickets. For that, we will define a page in Angular:
// file : app.js
angular.module('demo', ['ngRoute']).config(function ($routeProvider) { console.log('configuring')
  $routeProvider

    .when('/board', {
      controller: 'BoardPageCtrl', templateUrl: '/app/views/board_page.html'
    });
  })
Then we will define the controller with some mock data we can display
// file : BoardPageCtrl.js

angular.module('demo').controller('BoardPageCtrl', function ($scope) { $scope.lists = [
    {
      name: 'list 1',
      tickets: [
        {title: 'task 1'},
        {title: 'task 2'}
      ]
    },
    {
      name: 'list 2',
      tickets: [
        {title: 'task 3'},
        {title: 'task 4'}
      ]
    }
  ]
})
As you can see, I chose a very naive data model with the following traits:
- I have an array of lists.
- Each list has a name and its tickets.
- Each ticket has a title.
While this model might change in the future, it is too early for me to consider anything more complex.When I think about the first functionality I would like to add which is CRUD (Create, Read, Update, Delete) for lists and tickets,
When I think about the first functionality, I would like to add something that’s known as CRUD (Create, Read, Update, Delete) for lists and tickets. I am convinced this model is sufficient, so let’s move on.
Time to add the view to display the lists and tickets.
For starters, we’d want to see everything is wired correctly. So I will start with a simple page:
<!-- file : /app/views/board_page.html -->
This is the board page
To verify everything is fine, simply run npmstart. Thanks to the awesome simple Node.js setup, the browser should open. But alas, the text does not appear. So let’s troubleshoot it.
B. Common mistakes so far
Problem 1: I did not define a default route
The board route specifies a /board page, but the browser opened on /index.html file. I can manually write /index.html#/board or simply add a default route. I prefer the latter and so we can write:
// file : app.js
...
.otherwise({redirectTo: '/board'})
Problem 2: I forgot to include a .js file
You can see the blue background color, but still no tickets. When you open the console and see an Error with the message Argument'BoardPageCtrl'is not a function, got undefined
Verify if the controller is spelled correctly on the route. It should be correct.
When you add a log print console.log('initializing controller') at the top of the page, you should see that the code is not invoked.
When modifying the angular module name to one that does not exist, an Error is not thrown. This leads to the conclusion that adding the JavaScript file in index.html has been forgotten. Add it.
Now everything works! So let’s move on…
C. Painting the tickets
Now that we made sure everything is wired correctly, we can move on to painting the tickets. I start the HTML by adding a div with ID matching the page’s name. This is a habit of mine as some of the CSS will be specific to this page.
<div id="board-page">
This is board page
</div>
Now I would like to display a list and enable changing its name.
<div ng-repeat="list in lists" class="list"> <input class="list-name" ngmodel="list.name"/> </div>
I chose a simple implementation of showing the name in an input. For now, it looks bad but provides the functionality we desire. We can fix the display issue when we reach the CSS part.
Next, we would like to paint the tickets for each list.
<div ng-repeat="list in lists" class="list">
<input class="ticket-title" ngmodel="ticket.title"/>
</div>
Last but not least, I want to add a button with the label Add Ticket.
<button class="add-ticket"> Add Ticket </button>
The final HTML looks like this:
<!-- file : /app/views/board_page.html -->
<div id="board-page">
<div ng-repeat="list in lists" class="list">
<input class="list-name" ng-model="list.name"/>
<div class="list-content">
<div ng-repeat="ticket in list.tickets" class="ticket">
<input class="ticket-title" ng-model="ticket.title"/>
</div>
</div>
<button class="add-ticket"> Add Ticket </button>
</div>
</div>
We have yet to finish the functionality as the Add Ticket button does nothing yet. But before we move on with the functionality, I would like things to look awesome.
D. Adding color and layout
So far, everything looks awful. So it’s time to add some style.
To keep the project organized, let’s create a file named _board_page.scss (notice the naming convention I keep) and I start it with the page’s ID.
#boardpage{
}
Let’s start by adding the board’s background color:
$BOARD_BACKGROUND_COLOR: #5BA4CF; background:$BOARD_BACKGROUND_COLOR;
Colors have the tendency to be reused. So I prefer to keep it in a variable. I think it is more readable, too.
Now, I want the background to not be all over the page. I could use width: 100% and height: 100%, but that has some other implications we want like to avoid. So instead, I prefer to use absolutepositioning. It will also resolve some scrolling issues down the road.
$BOARD_PAGE_PADDING:0px;
position:absolute;
top:$BOARD_PAGE_PADDING;
bottom:$BOARD_PAGE_PADDING;
left:$BOARD_PAGE_PADDING;
right:$BOARD_PAGE_PADDING;
Next, let’s make the lists horizontal—one next to the other.
.list{
display:inline-block;
}
Now, let’s display the title properly and add background to the lists with some spacing:
.list{
display:inline-block;
$LIST_BACKGROUND_COLOR: #D2D7E5;
background:$LIST_BACKGROUND_COLOR;
width:300px;
padding:10px;
&:not(:first-child){
margin-left:10px;
}
.list-name{
padding:10px;
border:none;
background:transparent;
}
}
Let’s also add padding on the #boardpage with padding:20px;
Note that I used margin-left to have spacing between the lists, but when I wanted spacing from the page, I added padding on the page.
I could have added margin-top on the lists and margin-left on the left-child to achieve the same thing.
The reason I chose to implement it this way is that if I ever added anything else on the page, I can rest assure it will be aligned with the lists properly. The alternative would force me to add the margins repeatedly to every element I will add in the future.
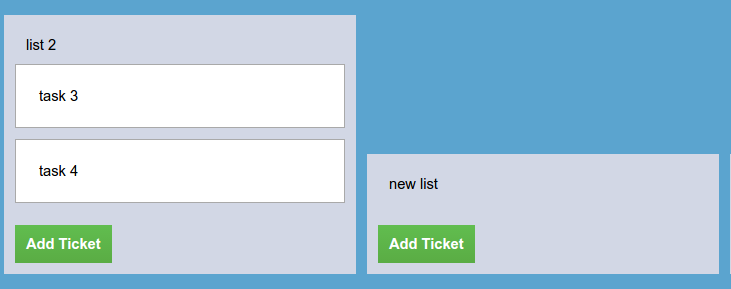
Saying that, this is what the app should look like at this point

Now let’s style the button
.add-ticket{
$ADD_TICKET_BACKGROUND_COLOR:linear-gradient(to bottom,#61BD4F 0,#5AAC44
background:$ADD_TICKET_BACKGROUND_COLOR;
color:white;
font-weight: bold;
border:none;
padding:10px;
}
.list-content {
margin-bottom:20px;
}
Let’s add some style to each ticket:
.ticket{
background:white;
&:not(:first-child) {
margin-top: 10px;
}
.ticket-title{
width:100%;
padding:20px;
}
}
I ignored the first child when I added the margin because I don’t like it when the distance between two elements in the page is a sum of two styles. In this case:
paddingon the list namemargin-topon the ticket
I also want to avoid the possibility that the distance between the title and the first ticket, and the distance between the tickets are somehow connected. We want to be able to change one without the other.
You might be wondering why am I being so meticulous with the style. The reason is that I find it much harder to detect style regressions than functionality regressions, mainly before the former is hard to test automatically. So paying attention to small details and acquiring good practices with CSS will save you a lot of time down the road.
This is the final scss file
#boardpage{
$BOARD_BACKGROUND_COLOR: #5BA4CF;
background:$BOARD_BACKGROUND_COLOR;
$BOARD_PAGE_PADDING:0px;
position:absolute;
top:$BOARD_PAGE_PADDING;
bottom:$BOARD_PAGE_PADDING;
left:$BOARD_PAGE_PADDING;
right:$BOARD_PAGE_PADDING;
padding:20px;
.list{
display:inline-block;
$LIST_BACKGROUND_COLOR: #D2D7E5;
background:$LIST_BACKGROUND_COLOR;
width:300px;
padding:10px;
.list-content {
margin-bottom:20px;
}
&:not(:first-child){
margin-left:10px;
}
.list-name{
padding:10px;
border:none;
background:transparent;
}
.add-ticket{
$ADD_TICKET_BACKGROUND_COLOR:lineargradient(to bottom,#61BD4F 0,#5AAC44
background:$ADD_TICKET_BACKGROUND_COLOR;
color:white;
font-weight: bold;
border:none;
padding:10px;
}
.ticket{
background:white;
&:not(:first-child) {
margin-top: 10px;
}
.ticket-title{
width:100%;
padding:20px;
}
}
}
}
So far, all the style is under the #boardpage and reusable components are not yet defined. This will be a refactoring we will do once we find ourselves copypasting… (Note: I like this approach because it keeps me very goal oriented. I am not thinking about infrastructure yet, but once I need it, a small refactoring will get me there.)
If you are not seeing the style changes, make sure you remembered to add an @import 'board_page'; statement to main.scss
Step 2: Adding list and ticket functionality
It’s time to enable adding tickets and lists. We already have a hook for adding a ticket on the Add Ticket button but we also need some action to add a list. For now, binding it to double-click on the board sounds nice.
<!-- board_page.html -->
<div id="board-page" ng-dblclick="addList()">
And in the controller, we will implement these functions:
// BoardPageCtrl.js

$scope.addList = function () {
  $scope.lists.push({name: 'new list', tickets: []})
}

$scope.addTicket = function (list) {
  list.tickets.push({})
}
Pretty simple, and it will do for now.
Step 3: Testing time
So playing with the new shiny app, I discovered some style issues. Let’s review and see how to resolve them.
A. Lists are not aligned at the top
When I create a new list, it is not aligned to the top. This can be easily fixed by telling all the lists to be aligned to the top. Simply add vertical-align:top; on .list
B. Lists exceed the page content
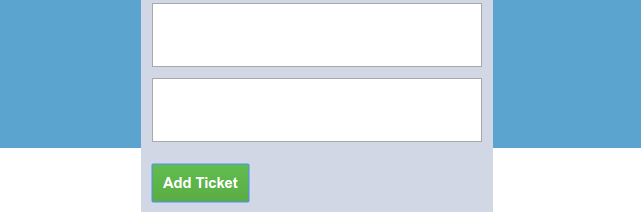
When I click ‘Add Ticket’ repeatedly, I see the lists spills over the content area.
To quickly fix this, add the following css
.list-content {
  max-height: 80%;
  overflow-y: auto;
  $SCROLL_OFFSET:5px;
  padding-right:$SCROLL_OFFSET;
  margin-right:$SCROLL_OFFSET;
}
Pay attention to the ugly max-height:80%. It is a very ugly solution. The distance between the bottom of the list to the end of the page will change according to screen height. Which means if the screen resolution is high, the list will end relatively high on the screen. If the screen is small, the bug will still reproduce. So why did I implement it this way?
Simply because the correct solution for this problem is cumbersome and requires very good css skills to get it right.
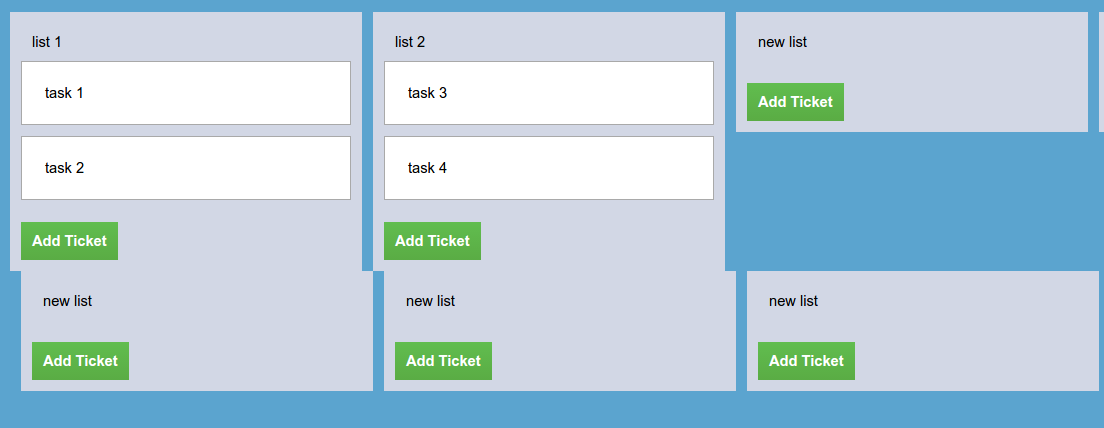
C. Generating many lists will overflow to the next line
When I try to add a lot of lists, I see this horrifying image
This is easily solved by adding white-space: nowrap on the board.
#boardpage{
  overflow-x:auto;
  white-space: nowrap;
}
Step 4: Adding some coolness — Drag & Drop
So far, we have some pretty fair results. But Trello is very famous for its drag & drop ease and it would be a shame not to have it.
Luckily, there’s a pretty nifty Angular library called angular-drag-and-drop-lists, so I quickly add it by running bower install -S angular -drag-and-droplists. I also add a module dependency and the relevant JavaScript file to index.html
// app.js

angular.module('demo', ['ngRoute', 'dndLists'])...
Following its instructions, let’s add some dnd attributes to the ticket div
<!-- board_page.html -->
<div ng-repeat="ticket in list.tickets" class="ticket"
dnd-draggable="ticket"
dnd-dragstart="list.tickets.splice($index, 1)"
dnd-effect-allowed="move">
<input class="ticket-title" ngmodel="ticket.title"/> </div>
</div>
And then I eagerly go to verify if it works—and it does! But it’s ugly… So add the following style:
li.dndPlaceholder {
  $PLACEHOLDER_COLOR:rgba(0,0,0,0.5);
  height:60px;
  list-style:none;
  background:$PLACEHOLDER_COLOR;
  margin-top:10px;
}
This is much better, but still, something is not smooth enough when we try to move a ticket to the bottom. The reason is that there is not enough space between the list body and the button, a quick solution is by adding:
.list-content{
  padding-bottom:60px;
}
When I play with it a bit more, I find that it’s still not smooth when I have a lot of tickets when scrolling the content. The functionality works, but there is some mild discomfort—for now, let’s let it be.
I will open an issue on angular-drag-and-drop-lists project and on mine, and add a reference between them.
A. Let’s look at how drag-and-drop is implemented
I would like to pause for a minute and investigate how this library works. It contains only 1 file of 500 lines—most of them are documentation. So it shouldn’t take long to understand how it works.
There are several cool things in this library that I took note of:
- The directive does not have an isolated scope. This calms me down as I know I cannot have two directives with isolated scopes on the same element. So no problem here
event.dataTransfer.setData("Text", angular.toJson(scope.$eval(attr.dndDraggable)));This line shows how this library translates the string—representing the draggable model to the actual model.
It evaluates the model from the scope usingscope.$eval. In our caseattr.dndDraggableis ticket.$parse(attr.dndDragstart)(scope, {event: event});invokes thestartcallback.
These are a couple of nice things to know you can do with angular. And if I combine this knowledge with drag and drop MDN documentation I can wrap my head around the entire implementation.
IV. Let’s look at our final results
All the code above gets us to some promising initial results:

As you can see, I was not joking when I said that Trello will be my inspiration. To recap all we’ve done so far:
- We wrote the first page for our Trello clone application
- We added style to the page
- We added the ability to add lists and tickets.
- We added the Drag and Drop ability.
V. Coding a Trello clone: Adding more features
Let’s build the app together, watch this recorded live coding session where you can add persistency and cross-device sync to the app to complete your Trello clone!

video : https://www.youtube.com/watch?v=ssXqKDS2dlw
https://github.com/guymograbi/jrello/tree/master
Github pls
Angular, Node.js, Mongo, and Express
MEAN