
Production ready Node.js REST API Setup using TypeScript, PostgreSQL and Redis.

A month ago I worked on a simple Search API. All It had to do is to grab some data from 3rd party services and our database, combine all it and return it to the client. It sounds like a good task for two days. But building a service requires much more than that. It includes caching, logging, handling all sort of errors, managing node instances, security, monitoring and it would be great to implement most of the patterns from Node.js Best Practices.
This tutorial assumes some familiarity with Node.js, Express. Also, you need very basic TypeScript knowledge. If you don’t have it — check TypeScript in 5 minutes first. Make sure you have the latest Node LTS version.
Although there are dozens of different Node.js settings, only a few of them cover PostgreSQL and use TypeScript at full capacity.
So, before diving into the code let’s define our tech stack:
- TypeScript with a strict mode. All types have to be explicitly specified.
- Express. The last version fully supports async/await, so no callback and no explicit promises in our routes/controllers.
- PostgreSQL. This time a relational database. Let’s see how easy it’s to use.
- TypeORM — powerful ORM written in TypeScript, supports migrations, Active Record, has an excellent query builder and much more.
- Winston — A logger for just about everything

- Redis. We will use this in-memory store for caching. It’s going to one extra line of code which makes a huge difference in performance.
- PM2 — process manager for node.js apps, it includes clustering, load balancing, simple terminal monitoring, and log management.
In the first part, we will focus on project structure and building our API, and adding node clustering. In the second part we will see how adding a lot of cool stuff on top of our service: caching, logging, using TypeORM. But this part is much more about code.
Here is the final code for this part.
Step 1. Initialize TypeScript Node.js project.

In late 2018 there are no excuses not to use TypeScript for Node, the setup is dead easy, so, let’s get started!
Let’s create a project folder and name our project search-api.
$ mkdir search-api
$ cd search-api
$ npm init -y
Next, install typescript along with tsc-watch for running our server every time source files have been changed.
$ npm i typescript tsc-watch
The solution with tsc-watch is elegant, it uses tsc -w under the hood, and once TS compiler has compiled all changes. It will restart our server.
Let’s change scripts section in package.json with this:
"scripts": {
   "dev": "tsc-watch --onSuccess \"node ./dist/server.js\""
}
Before we run it, we have to create a config for TypeScript compiler.
$ npx tsc --init --moduleResolution node --resolveJsonModule --target es6 --noImplicitAny --sourceMap --lib dom,es2017 --outDir dist
We use npx — an npm package runner for running locally, installed packages, tsc in our case. Now we have a tsconfig.json file in the project root directory.
By default, it watches all .ts files in the ./src folder and compiles it in ./dist folder. Also, ./node_modules will be excluded by default.
As a next step, we’ll create a server.ts file
$ mkdir src && touch ./src/server.ts
Let’s write a sum function and console.log it every second. Add this in the server.ts file.
const sum = (a: number, b: number) => a + b;
setInterval(() => console.log(sum(2, 3)), 1000);
Finally, everything is ready to run our command
$ npm run dev
It creates a ./dist folder where you can find a compiled server.js file. And in the terminal, you will see the new output every second. Try to change this code, and the result will be updated. This is all we need for using TS + Node together 😃.
As you can see we are not using nodemon here. The main reason is we don’t need it because ts-watch makes both compiling and restarting our server. Also using ts and nodemon together can be quite tricky. I’ll provide a link for each step of our setup, here is code for the step one.
Step 2. Create a project structure with Express.js.

One thing I see in many express/koa/Hapi tutorials is a long as hell a server.js file. And it includes all middleware/plugins and another boilerplate code inside. But this is not the only problem. We also need a place for configuring a database, logger, redisClient, swagger. And we have to decide where and how to put our route/controllers/models. In this case, we will follow Project Structure Practices from Node.js Best Practices.
Sound like quite a lot but is this that much? Let’s figure it out!
Run this command from root project directory:
$ mkdir ./src/config ./src/middleware ./src/services ./src/utils
The project structure will look like this:

We have a services folder which contains independent subparts of the app like users, products, orders and so on. It’s going to be a search subfolder in our case. But before we jump on it let’s create the express server with some classy middleware.
Let’s install the latest express version. And then packages for managing CORS, compression for responses and TS types for Node from the root of the project:
$ npm i express@5.0.0-alpha.7 [@types/express](http://twitter.com/types/express "Twitter profile for @types/express") cors [@types/cors](http://twitter.com/types/cors "Twitter profile for @types/cors") compression [@types/compression](http://twitter.com/types/compression "Twitter profile for @types/compression") [@types/node](http://twitter.com/types/node "Twitter profile for @types/node")
Note that we need the newest express because it supports async/await, but it’s still an alpha. An alternative would be to use @awaitjs/express module.
Let’s create a basic web server now:
Note, that this code looks like 100% JavaScript. But it’s all typed, and TS won’t compile if there are any errors. For example, try to call new express() instead of express() and see what happens 😋.
Now we need to add our middleware. But instead of putting all them here let’s put it under middleware folder.
$ touch ./src/middleware/common.ts ./src/middleware/index.ts
A common.ts file contains the middleware like cors, compression and, the setup for body parsing. Later we will add middleware for logging, security, caching and more. Paste it in ./middleware/common.ts:
Here, you can finally see some difference. All our middleware wrappers accept express router class_._
In ./middleware/index.ts we will import all of middleware for providing a single connection point for our server.ts. And we will put more stuff here in the future.
To apply our middleware, we will create a function which grabs this list of middleware and applies it on a router. But before we need an index.ts file in ./utils folder, so let’s create it.
$ touch ./src/utils/index.ts
The applyMiddleware helper accepts the list of middleware wrappers we define in ./middleware/index.ts and express.Router. Now everything is ready for using it in server.ts:
A nice thing about it is as we’re adding more and more middleware we don’t have to change this code. Only create its file under ./middleware and import it in ./middleware/index.ts. This is the most code intense part of the whole story, I just want to let you know ❤️

Now we need something similar for routing. Let’s add a basic routing for our search service.
$ mkdir ./src/services/search && touch ./src/services/search/routes.ts && touch ./src/services/index.ts
Open up ./services/search/routes.ts and paste it here:
In ./services/index.ts add it:
Now, we have to apply this declaratively specified route on our router, in ./utils/index.ts.
applyRoutes function is a place where we’re adding all our route to an express router instance created in server.ts. Now let’s open this file and change with a line:
import { applyMiddleware } from "./utils";
with this
import { applyMiddleware, applyRoutes } from "./utils";
import routes from "./services";
and add this call right after applyMiddleware(middleware, router):
applyMiddleware(middleware, router);
applyRoutes(routes, router);
Once it’s done, it allows us to quickly add new functionality under ./service directory, and all we have to do is to import their routes in ./service/index.ts.
The primary purpose of creating routes using configs is to isolate the routing framework (express in our case) as much as possible. And also provide a possibility to use koa or hapi.js without changing the whole structure and models/controllers code. Here is code for step two.
Great! Now let’s add error handling and more middleware.
Step 3. Error handling with Node.js and Express.

This step can be quite exhausting. We have to think carefully about each type of error. It includes client and server errors, sync and async, uncaught exceptions and unhandled promise rejections.
You can skip this part and go to Step 4. If you want to see something more exciting rather than an empty page with ‘hello world’. But having a robust error handling allows us to focus on solving our actual task and be sure it’s all aren’t going to fall apart miserably. Because we had no time to think enough about how to catch all these errors.
Our goal here is to implement the most critical parts of Error Handling Practices. What we have to think about:
- Catch uncaughtException and unhandledRejection.
- Distinguish client errors vs server errors.
- Catch both sync and async errors, and we don’t wanna to litter our controllers’ code with error handling. We want to throw an exception and make sure our dedicated middleware will handle it for us.
- Create a dedicated ErrorHandler class available for unit-testing.
Handling both uncaughtException and unhandledRejection is super important. If you face with any of these is pretty much game over for this node instance - now your app is in an undefined state. The best thing is to kill this instance and spawn a new one. Tools like forever or pm2 can do it for us. We’ll introduce pm2 in part 2. For now, let’s add handlers for uncaughtException and uncaughtException events.
Let’s update our ./server.ts file, add these lines after the import section.
process.on("uncaughtException", e => {
  console.log(e);
  process.exit(1);
});

process.on("unhandledRejection", e => {
  console.log(e);
  process.exit(1);
});
Later we will replace console.log with a logger instance.
Now you can think about handling client and server errors. First, let’s create errorHandlers middleware:
$ touch ./src/middleware/errorHandlers.ts
Now, let’s add it to our errorHandlers.ts:
We have three different error handlers for each use case:
- handle404Error the way you handle 404 in express. By adding a fallback middleware if nothing else was found.
- handleClientErrors catches client API errors like Bad request or Unauthorized.
- handleServerErrors a place where we handle “Internal Server Error”.
Some things to spot:
- We don’t handle 404 error in its middleware — we directly propagate it further for a dedicated client errors handler.
- Next in the chain — handleClientErrors. We’re interested only in 4xx HTTP errors and if it’s not a case we propagate it down the chain.
- Finally handleServerErrors — our last resort for handling errors, we must handle it here, or uncaughtException handler will be called, and this node process will be finished.

This is a workable example. But, we tied up together the express middleware for error handling and specific logic for each type of errors. This makes it pretty much impossible for unit-testing and replacing the error handling strategy. Let’s extract this logic from our middleware file. First, create a ErrorHandler.ts file:
$ touch ./src/utils/ErrorHandler.ts
And add the code below to our ./utils/ErrorHandler.ts:
and let’s update ./middleware/errorHandlers.ts:
Now, we have a dedicated object which encapsulates the whole logic HOW we manage it. In part 2 we will improve this code by adding logging.
Next thing — let’s create a couple of dedicated HTTP4xxError classes which we will use in controllers’ code.
First, create a httpErrors.ts file:
$ touch ./src/utils/httpErrors.ts
Paste this code in httpErrors.ts for HTTPClientError abstract class. It formats the message which can be digested by built-in Error object.
And, then code for HTTP400Error and HTTP404Error classes:
We can use it then like: throw new HTTP400Error() and error object will contain both statusCode and message. We cannot change a statusCode field. However we can pass another string as a message or an object. Which is very neat for libraries like class-validator which we will use later example:
throw new HTTP400Error({message: 'password is too short'})
Error handlers are quite a specific type of middleware . Usually, we inject middleware before handling user routes. But for error handling — after, when something bad has happened in our controller. Or if threw an exception and wanted to catch it by our error handlers middleware.
That said let’s update ./src/server.ts:
It was quite a lot and the hardest part to concentrate on. But now we can enjoy it and see how it’s easy to create a controller and handle errors automatically!
Step 4. Create a search service.

Alright. Now using the skeleton we’ve created let’s create a search API. It‘s dead simple:
- It provides an API endpoint like ?q=someplace
- It makes a request to OpenCage Geocoder, receives data and sends it back to users.
In step 5 of this part, we will do things like custom error checking and API documentation.
First, let’s create the following structure for our search service:

By running these set of commands
$ mkdir ./src/services/search/providers
$ touch ./src/services/search/providers/OpenCageDataProvider.ts
$ touch ./src/services/search/SearchController.ts
For now, we create only one provider — OpenCage Geocoder. But we can include many more and combine the result in SearchController. We will focus on it in part 2.
We will use request-promise module for requesting to opencagedata geocoder. It supports async/await syntax, so let’s install it:
$ npm i request request-promise @types/request-promise
Let’s write a function for getting data, open ./search/provider/OpenCageDataProvider.ts and paste it:
Here are a few points worth paying attention to:
- we’re using OPEN_CAGE_DATA_KEY environment variable, we don’t want to expose any credentials in our source code.
- We aren’t handling errors here with try/catch. We use our dedicated middleware for that.
For using environment variables install dotenv module:
$ npm i dotenv @types/dotenv
Now let’s create .env in a root directory file and add there this variable (or rename .env.example to .env in source code)
$ touch .env
and paste it here:
OPEN_CAGE_DATA_KEY=8c0892514e884f09af7c09a9b067b02b
./search/SearchController.ts is simply calling our provider, in part 2 we will combine add more providers and combine here the result.
Next, code for our ./search/route.ts:
We are making an endpoint available at http://localhost:3000/api/v1/search?q=Berlin. Next, our handler is very simple. We provide a string query to our controller, waiting for the result and send it to the user. This is very important — we don’t want to provide the request and response objects for the controller. It makes our code much harder to unit-test. And more important our controller turning into a god object. Which knows everything this both request and response objects.
Step 5. Add more cool stuff: custom error checking and apidocumentation with Swagger.

This is the last step of the first part. We will focus on:
- Handle a missing ?q parameter error
- Use swagger for documenting the endpoint
Instead of adding a check somewhere in our controller’s code we’ll create a unique middleware for that. Create a ./middleware/checks.ts file and add this code:
Here we’re only checking the existence of ‘q’ parameter and throwing an exception if it’s missing. Thanks to our error handling middleware, we will catch it there!
Let’s add this middleware in ./search/route.ts:
This approach scales quite well. We can chain things like checking authorization, add caching and many more.
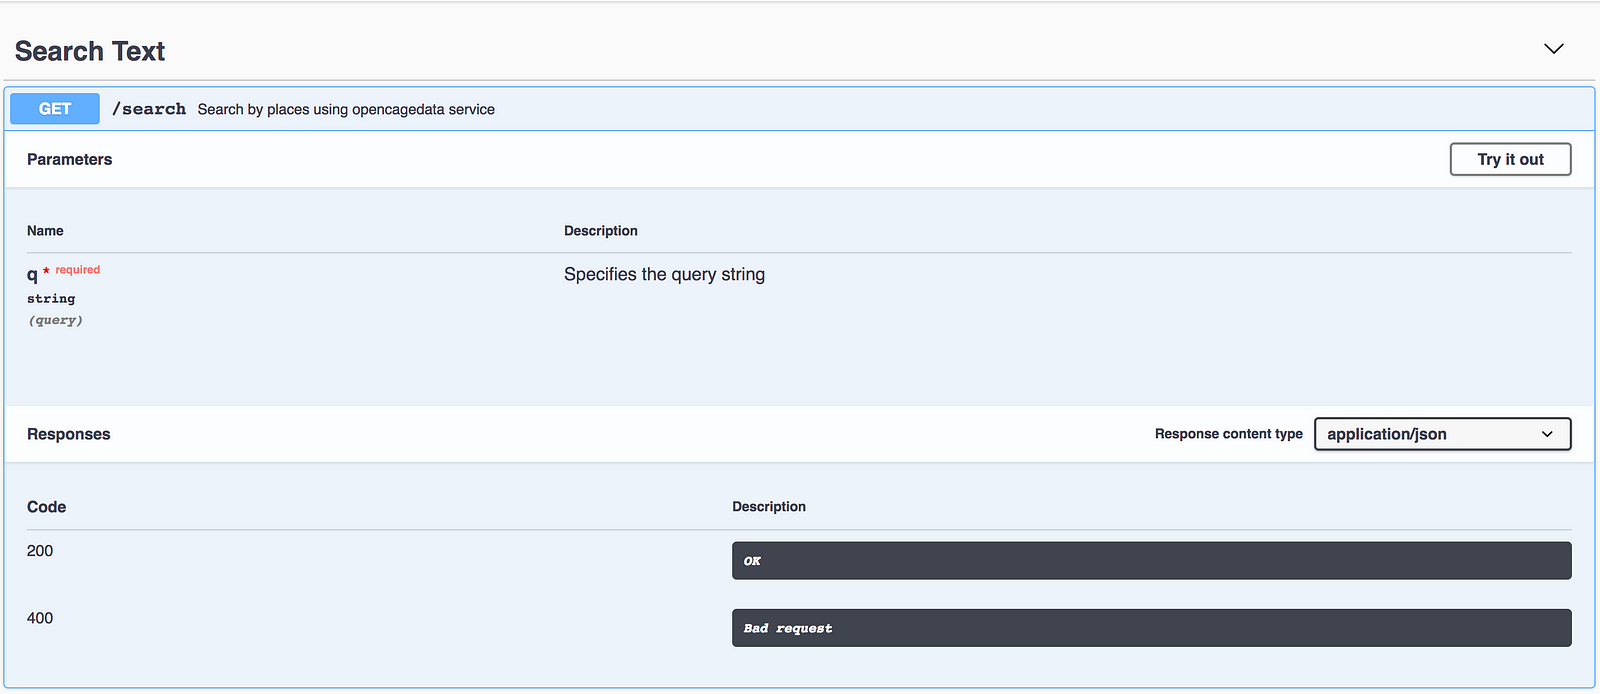
For now, we have an endpoint with a specific URL structure and error codes. Time to introduce swagger for documenting our API. This is how it’s going to look like:
We will use swagger-ui-express as middleware to provide documentation http://localhost:3000/api-docs, so let’s install this module:
$ npm i swagger-ui-express @types/swagger-ui-express
Then create a swagger.json file under ./src/config folder by running:
$ touch ./src/config/swagger.json
Now in swagger.json, we will document our endpoint:
And to make it work let’s create middleware for that, run:
$ touch ./src/middleware/apiDocs.ts
And add this code:
As the last step let’s import this middleware wrapper in ./middleware/index.ts:
This is it! Now it’s available here: http://localhost:3000/api-docs. Hit ‘try it out’ button, and you can play with it.
Let’s focus on things which block us to deploy it in production — lack of tests, clustering, and production configuration.
Step 6. Configure Unit-testing with Jest.

Let’s take a look at our current search service folder:
We’re going to create tests for each part of the service: our controller, route, and provider. Here you can find excellent instruction for using Jest with TypeScript. We will cover the basics of it.
First, let’s install it:
npm i jest @types/jest ts-jest -D
We’re installing ts-jest along with jest. It allows jest to transpile TypeScript on the fly. A flag ‘-D’ installs it as a dev dependency.
Second, add ‘jest’ section in package.json:
And finally, add ‘test’ command in scripts section, replace it with the next:
Note, we pass ‘ — coverage’ flag — it indicates that test coverage information should be collected and reported in the output.
Here is the final package.json with our changes.
Now we are ready for running jest:
$ npm run test
If we have done all the steps correctly, you will see ‘No tests found’ error. Which is great! Now we are ready for actually creating tests.
Step 7. Adding Unit-Tests.
We need tests for three different pieces of our service: routes, controller, and provider. Let’s start with the last one — the most low level here. Our provider is responsible for requesting to 3rd party service — opencagedata.com.
Unit-tests should be fast by definition which means we have to mock the real request with fake data. We want to test things we control and want to mock the rest we don’t.
Moreover, we have to think about proper error handling . What if the real service is not available and returns 503 error. Having test coverage, in this case, makes our lives more comfortable in the future.
Let’s get started.
First, let’s create a unit-test file for our: OpenCageDataProvider.
$ touch ./src/services/search/providers/OpenCageDataProvider.test.ts
We are going to test getPlaces function from OpenCageDataProvider module, copy the following code to the file we’ve just created:
Here, we first mock the whole request-promise module. And then we’re mocking an implementation of request function which is used inside our getPlaces function. If you feel shaky about the statement above this article is definitely will help!
In this example, we’re testing an empty query, and as well as the original service, it should return a valid JSON object as a string. An empty string is the only corner case here: with TypeScript, we don’t need tests for inputs like :
Provider.getPlaces(false)
Provider.getPlaces(0)
Provider.getPlaces({})
It simply won’t compile! This is just great — TypeScript helps us to cover our methods with MUCH less code. It feels so good.
But what if the real service is not available or the response is not a valid JSON string? Let’s add a test for checking this exception:
A lot of stuff is going on in only two lines:
-
Here again, we use mockImplementation. But this time it returns ‘Service Unavailable.’ string.
-
Secondly rejects helps us to test a thrown exception SyntaxError. This is an error which occurs when we provide an invalid argument for JSON.parse function.
-
And finally, we have to put await keyword before expect. Since this test is asynchronous and Jest has to wait till it finishes.
An exercise : try to create unit-tests for SearchController on your own. It’s not going to be that different from what we’ve created now.
Step 8. Next Level: Adding Integration Tests with Supertest.

Unit tests are important, but when it comes to developing API, we badly need tests for our API endpoints. I’m getting tired very quickly to check Postman every time I change something in the code.
We will use supertest as an integration test tool. There are a couple of benefits which makes it super appealing to use:
- It’s very easy to use, it can’t be any simpler than that.
- Works nicely with Jest.
Here goes!
First, let’s install supertest:
npm i supertest @types/supertest
Then, we’re creating routes.test.ts file:
$ touch ./src/services/search/routes.test.ts
Now, let’s add this code in routes.test.ts:
This is so simple! Let’s go throughout this code:
- Again, we mock request-promise, we don’t want to make a network request.
- We create an express router and apply all middleware, routes, and error handlers the same way we did it in our server.ts.
- We use request function from the supertest module. Note, we don’t create an HTTP server. We only provide an Express router and supertest creates it internally. Then makes a GET request with our data.
- We’ve got a response object which contains both data and a status code.
As you can see, creating integration tests for the API is not any complex than unit tests for our provider. But, this time we test the whole chain of middleware, routes, and error handlers!
As the last step, we can add integration tests for invalid queries:
add this code in routes.test.ts:
Also, the huge plus of supertest is readability — we can see what we pass and what the result is. Tests give us the confidence and now we can move on!
Step 9. Clustering our API with PM2

You might know, the Node.js event loop uses only one core of a processor to execute its code. Node.js has a cluster module to spawn child processes — worker processes. They all share the same port.
But instead of spawning processes directly with the cluster module we will use PM2 — Process Manager for Node.js. It has great features like a load balancing and auto-restarting node instances.
Installation
PM2 is a node package, let’s install it as a local dependency:
$ npm i pm2
Now we have to configure the PM2 .yaml process file:
- Specify how many instances we want to create.
- The script which will be executed to start an app
- Set the exec_mode to cluster, so PM2 know we want to load balance between each instance.
Let’s create a pm2.yaml file:
$ touch pm2.yaml
And paste the following code:
Finally, we have to add a command for running PM2 process file. Add the line below in the scripts section in our package.json:
"start": "npx pm2 start pm2.yaml"
Now the scripts section looks like this:
There a few more things we have to do before we can run our production-ready service:
- Compile .ts source files into the ./dist folder, so PM2 will be able to run our ./dist/server.js file.
- Specify NODE_ENV to production.
Actually, when we execute npm run dev, we already create the ./dist folder. But we‘re making it through the development process but what if our colleague wants only npm clone and run it?
The fastest way is to add an npm postinstall hook. It runs every time after npm install execution_._ All we have to do — run TypeScript compiler with our options, let’s add this hook in our package.json. Update the scripts section with it:
And last but not least, we have to force all our dependencies, to use production mode. For example, it will boost the express.js performance up to 3 times!
Let’s add this line to our .env file:
NODE_ENV=production
Now, for starting Node.js in production all we have to do is to run:
$ npm run start
That’s it!
If you have any questions or feedback, let me know in the comments down below or ping me on Twitter (@AlexDevBB). In part 2, we will cover caching with Redis, PostgreSQL, logging and more. Stay tuned!
If this was useful, please click the clap 👏 button down below a few times to show your support! ⬇⬇ 🙏🏼
Here are more articles I’ve written:
Thanks for reading ❤️