6 Ways to Supercharge the Android Emulator

The emulator is one of the most powerful tools in the Android developer’s arsenal. It gives you the ability to test your Android projects across more devices than you could ever realistically hope to get your hands on.
However, the emulator does have one massive flaw, which becomes glaringly obvious the first time you launch it. Better get comfortable, because the emulator takes a long time to load. A seriously long time.
Despite this drawback, the emulator is still the best way to test how your app translates across multiple hardware and software configurations—so there’s no getting away from the fact: sooner or later you’re going to have to boot up the emulator.
The emulator has improved in recent years, so it’s nowhere near as slow as it used to be, but testing on the emulator can still be a frustrating experience, particularly if you need to keep switching between multiple Android Virtual Devices (AVDs). The good news is, the emulator doesn’t have to leave you tearing your hair out. In this article, I’m going to share 6 tips and tricks for supercharging the Android SDK’s built-in emulator.
Note, since Android Studio is now the recommended development environment for Android, all of these tips are geared towards Android Studio, although some of them will be applicable to Eclipse users, too.
1. Make use of Android Studio’s ‘Instant Run’
The Android team have recently made some huge improvements to Android Studio, including the addition of Instant Run. If you’ve ever installed a work-in-progress project on an AVD, made some changes to that project, and then tried to push those changes to the AVD; no doubt you’ve been left tapping your foot while the AVD re-installs and re-launches your project from scratch. If that sounds familiar, then you’re going to love Instant Run.
The first time you hit ‘Run’ or ‘Debug’ with Instant Run enabled, Android Studio launches the emulator, loads your chosen AVD, and pushes your APK normally. However, the next time you make changes to your project, you’ll notice a small, yellow thunderbolt icon appears within the ‘Run’ and ‘Debug’ buttons.
 Instant Run icon
Click either of these buttons and Android Studio will push your updated code or resources to the instance of your app that’s already running in the AVD, without requiring a full reinstall.
Instant Run promises to make sitting around and waiting for the emulator to re-install your app a thing of the past. In the best case scenario, your app won’t even need to restart — your code changes will appear in the running instance of your app, as if by magic.
However, the way Instant Run applies your updates will vary depending on the nature of those updates; and some updates are easier to apply than others:
- Hot Swap: Instant Run can apply incremental code changes without having to relaunch your app or even restart the current Activity. Your app continues to run as normal and it simply loads the changes the next time the relevant method is called. This is the fastest type of swap.
- Warm Swap: This kind of swap is still very fast, but Instant Run will need to restart the Activity before the changes appear in your app. A warm swap is typically required for changes in resources.
- Cold Swap: This swap is a bit slower, as your app is restarted (although not re-installed). A cold swap is required for any structural changes such as adding or removing an annotation, instance field or static method signature, or changing your project’s list of implemented interfaces.
To use Instant Run, you need to install the Android Plugin for Gradle version 2.0.0 or higher. You also need to set your project’s minSdkVersion set to 15 or higher.
To get the best results out of Instant Run, you might want to try these additional tips and tricks:
- Only start and restart your app from Android Studio, and not from the target device. If you restart your app from the device, you won’t see any of the code changes you pushed since the last cold swap.
- Set your project’s minSDK to 21 or higher.
- Any changes to your project’s Manifest will trigger a full build and deploy cycle. So if your build process is set to update any part of the Manifest automatically, then you should disable this behavior.
- Some people have reported that Windows Defender Real-time Protect can cause Instant Run slowdowns. If you experience this, then try adding your project folder to Windows Defender’s list of exclusions.
Instant Run is enabled by default for projects that use version 2.0.0 or higher of the Gradle plugin. However, if Instant Run doesn’t seem to be enabled, you can enable it manually by:
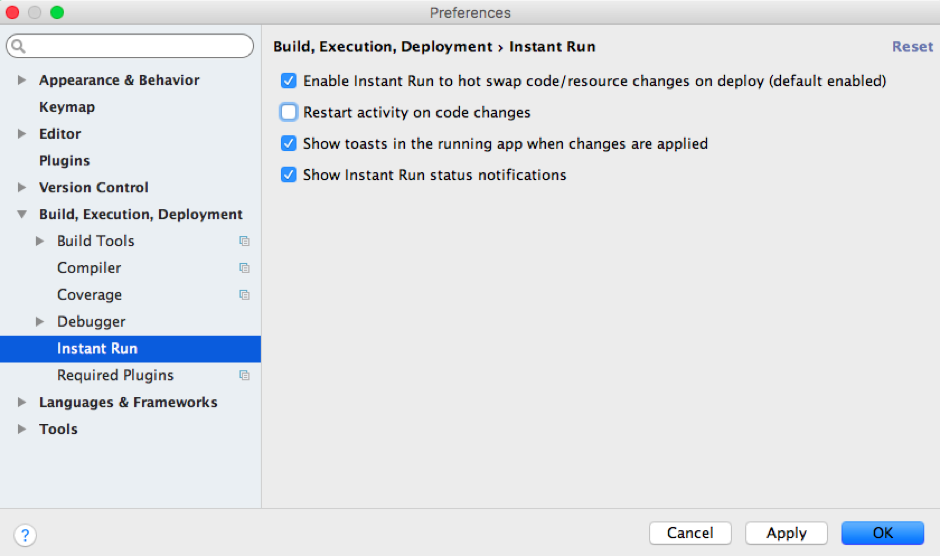
- Selecting ‘Android Studio’ from the toolbar, followed by ‘Preferences…’
- In the window that appears, select ‘Build, Execution, Deployment’ followed by ‘Instant Run.’
- Enable all of the options in this window, apart from ‘Restart activity on code changes.’
 Enable Instant Run
2. Install HAXM and Switch to x86
The Android emulator supports system images that emulate two different CPUs: ARM and Intel x86.
Using an x86 system image can speed up the emulator considerably, so this is the option you’ll typically want to opt for. If your IDE and SDK are up to date, then creating an x86 AVD is generally pretty straightforward. When you’re creating a new AVD, simply select the ‘x86 Images’ tab in the ‘System Image’ window, and then choose from one of the available x86 images.
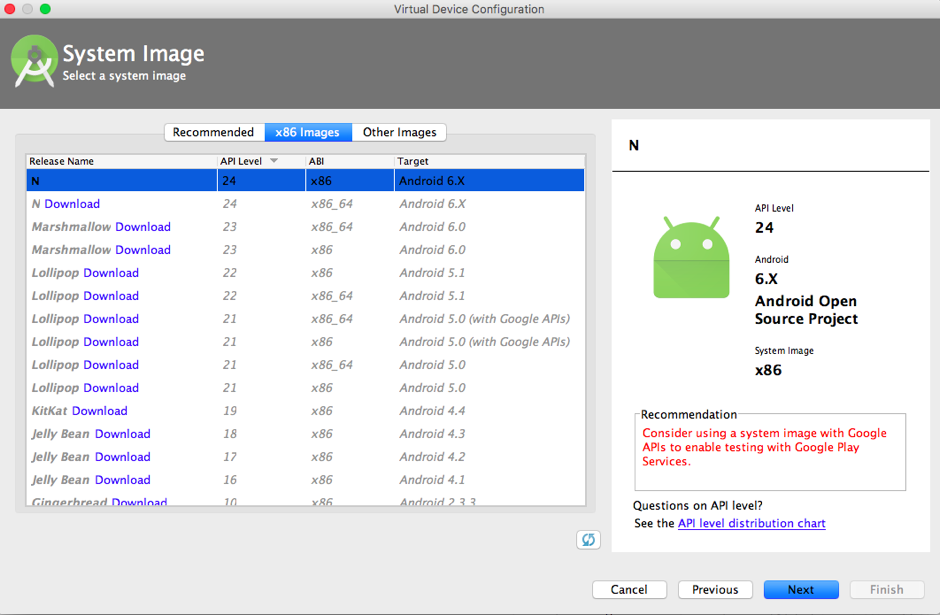 x86 images tab
To download additional x86 system images for different versions of the Android operating system, you just need to click the corresponding ‘Download’ link.
However, if you see an error message when you try to create an x86 AVD, or nothing appears in the ‘x86 Images’ tab, then you may not have the Intel Hardware Accelerated Execution Manager (HAXM) installed.
To install HAXM, launch the SDK Manager and make sure the ‘SDK Tools’ tab is selected. Scroll down and you’ll see an ‘Intel x86 Emulator Accelerator (HAXM Installer)’ option — download it.
 Download HAXM installer
Unlike most of the other items you download through the SDK Manager, the HAXM driver doesn’t install automatically. To install it manually:
- Open the Android SDK folder on your computer, and navigate to Android/sdk/extras/intel/Hardware_Accelerated_Execution_Manager.
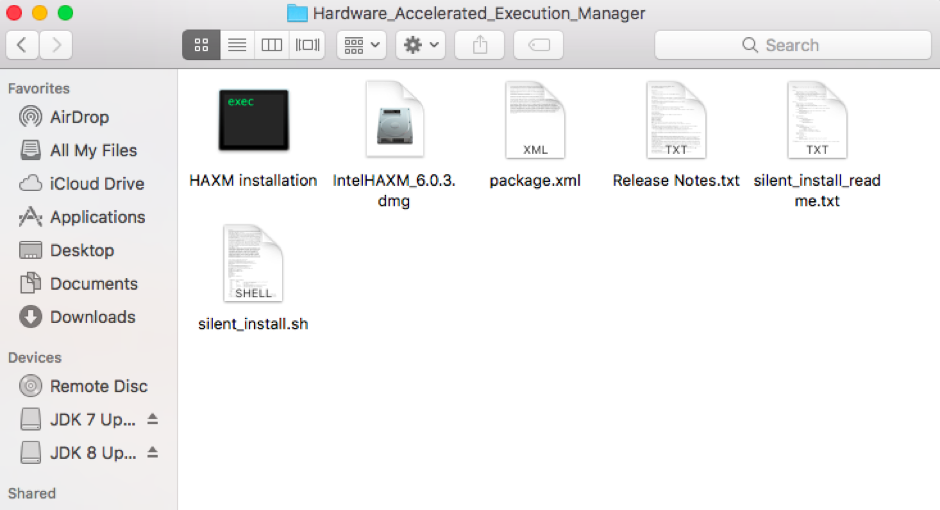 HAXM folder
- Double-click the IntelHAXM.dmg file.
- In the window that appears, double-click IntelHAXM.mpkg to start the installation. Follow the onscreen instructions to install.
- Once HAXM is installed, repeat the process of creating a new AVD – this time, you should be able to create an AVD with an x86 system image, or at least download an x86 image if none are currently available.
3.GPU Emulation
GPU emulation (sometimes referred to as GPU acceleration) is where the emulator utilises the host machine’s GPU to accelerate drawing options. This can make the emulator run much faster.
GPU Emulation is turned off by default, so you need to enable it whenever you launch an AVD. Although ‘Use Host GPU’ used to appear in the AVD Manager, this option isn’t currently available in Android Studio, but the good news is you can still enable GPU emulation if you launch an AVD from the command line.
To launch your AVD with GPU emulation enabled, create the AVD you want to use as normal. In this example, I’m going to create an imaginatively-named myemulator AVD.
Open your Mac’s Terminal (or Command Prompt, if you’re a Windows user) and then ‘change directory’ so the Terminal is pointing at Android SDK’s ‘Tools’ folder. My command looks like this:
cd /Users/jessicathornsby/Library/Android/sdk/tools
Next, launch the emulator you created (myemulator) with the -gpu on flag, for example:
./emulator @myemulator -gpu on
The AVD will launch with graphics acceleration enabled. Spend some time interacting with the AVD, and you should notice a speed improvement.
4. Virtual machine acceleration
Many modern CPUs provide extensions for running virtual machines (VMs) more efficiently.
You can use these extensions to run the Android emulator inside an accelerated virtual machine, which can improve the execution speed. To take advantage of these extensions, your computer’s CPU needs to support one of the following virtualisation extension technologies:
- Intel Virtualization Technology extensions (VT, VT-x, vmx).
- AMD Virtualization (AMD-V, SVM) extensions (Linux only).
If you’re unsure what virtualisation technologies your Mac supports, then open the Terminal and run the following command:
sysctl -a | grep machdep.cpu.features
Check the output for any of the Intel virtualisation extensions.
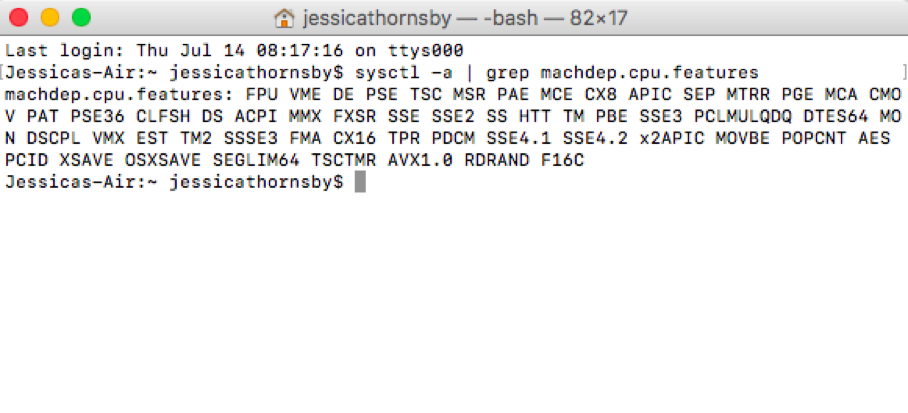 machdep output
If you’re on Linux, you can verify whether your CPU has support for Intel VT tech by running the following command:
# grep --color vmx /proc/cpuinfo
Even if your development machine supports these virtualisation extensions, they may be turned off by default, so if you encounter problems then you may need to check your computer’s documentation, in order to find out how to enable them.
You’ll also need to use an x86 system image, so if you don’t already have an appropriate AVD, then create an x86-based AVD configuration now. And that’s it — just launch and use your AVD as normal.
To stop using the virtualisation kernel driver at any point, make sure you’ve closed any x86 emulators and then run the following command in the Terminal window:
sudo /System/Library/Extensions/intelhaxm.kext/Contents/Resources/uninstall.sh
5. Disable the emulator’s boot animation
By default, the emulator displays a boot animation as it starts up. Although the emulator is only doing its job (emulating a real device), being forced to sit through a boot animation isn’t going to improve your Android project. You can shave precious seconds off the time it takes the emulator to load by disabling the boot animation.
Once again, this requires you to issue a few commands, so make sure your Terminal is pointing at the SDK’s ‘Tools’ folder. Then, launch the AVD you want to use, complete with the -no-boot-anim flag, for example:
./emulator @myemulator -no-boot-anim
It’s worth noting that this command alone won’t impact how fast the emulator runs once it’s finished booting, so you may want to use -no-boot-anim in combination with some of the other tricks we’ve discussed in this article.
6. Try an Alternative
If you try all of these techniques and are still feeling frustrated by the SDK’s built-in emulator, then why not try an alternative? There’s plenty of third-party Android emulators out there, but one of the most popular is Genymotion, which runs on all major platforms.
The basic Genymotion plan is free for personal use, although if you want to use the premium features, or need multiple user accounts then you’ll have to purchase a license.
Conclusion
In this article, we looked at 6 tricks for making Android emulator frustration a thing of the past. The best bit is, you can try many of these techniques alongside one another. For example, you might want to disable the boot animation to speed up the time it takes the emulator to boot, while also using an AVD that runs an x86 system image, so you can take advantage of HAXM and virtual machine acceleration.
If you have any tricks for speeding up the emulator that we haven’t covered in this article then please share them in the comments below!
Author’s Bio:

Jessica Thornsby is a technical writer based in Sheffield. She writes about Android, Eclipse, Java, and all things open source. She is the co-author of iWork: The Missing Manual, and the author of Android UI Design.