How to Submit a Plugin to the WordPress Plugin Directory

WordPress’s Plugin Directory is indeed one of the best places to host your brand new, free WordPress plugin. Rendering maximum exposure to your plugin, it is the WordPress repository which actually showcases all your hardwork and efforts. If you too are a plugin developer looking out for a suitable means of submitting your next plugin to the globally renowned WordPress Plugin Directory, then this is a tutorial which will help you out. Here, I’ve covered a detailed stepwise guideline on submission of a WordPress feature-packed plugin to the WordPress Plugin Directory.
Step 1
Start off by setting up the WordPress plugin file that you’ve just created
As per this step, get on with creation of a Zip archive of the plugin that you’ve created. Prior to that, don’t forget to add all the essential details like readme and image files into the Zip archive folder. Do note that readme is believed to be the most critical file among all the different files that are available for the WordPress plugin created by you. While there are multiple tools that allow you to create a custom readme.txt file for your WordPress plugin, GenerateWP Plugin readme generator is the one you can surely trust on.
Step 2
Verify the readme.txt file created above
Now that you’re done with creating a readme.txt file for the WordPress plugin, it’s time to validate it using a suitable tool. Just visit this URL: https://wordpress.org/plugins/about/validator/ and you’ll be able to validate the readme.txt file for your WordPress plugin.
Step 3
Adding the screen-shots for the WordPress plugin
As per this step, create a new folder called ‘assets’ and add the screen-shots for your plugin to this folder.
Step 4
Create a single zip archive of the above created ‘assets’ folder
Now, get on with creating a single zip archive of the ‘assets’ folder and upload the same to your web server or the dropbox folder. Do remember to add a link to your archive file .
Step 5
Create a free WordPress.org profile
Prior to getting ahead with addition of your WordPress plugin to the WordPress official plugin directory, you need to have a free WordPress.org profile. For this, simply go to this URL https://wordpress.org/support/register.phpfill in the details and finally head towards this URL https://wordpress.org/plugins/add/ for addition of WordPress plugin to the WordPress official repository. Have a look at the below screen-shot:
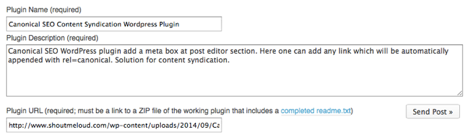
On entering details within the fields available in the above form, clicking on the ‘Send Post’ button will display a message similar to the one displayed within the above screen-shot:

As per the message displayed in the above screen-shot, you’ll be expected to wait for a few days before you receive an email(regarding the current review status of your plugin) from the WordPress team. There are situations wherein a plugin developer might receive a reply from the WordPress team after just about 72 hours. Here’s a sample email received by a WordPress plugin developer intending to submit his/her plugin to WordPress’ official plugin repository:
Your plugin hosting request has been approved.
Within one hour, you will have access to your SVN repository at
with your WordPress.org username and password (the same one you use on the forums).
Step 6
Use SVN Client for submitting the WordPress plugin
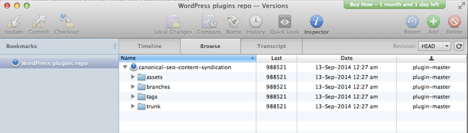
Now that you’ve received an email regarding the approval of your WordPress plugin to the plugin repository, it’s time to submit your plugin using the SVN client. For this, you can use the Versions app, if you’re using Mac. Just add the unique SVN link that you received in the email from the WordPress team, and use the WordPress username and password for logging into your plugin repository. Here is a screen-shot for this step:
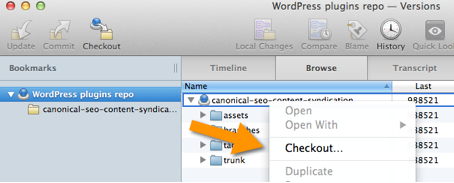
On the above screen, just right-click on the name of your WordPress plugin, followed by clicking on ‘Checkout’. You’ll be prompted to save the directory to your system. Clicking on ‘Save’ button would create a local folder of your repository and you’ll be allowed to make the desired changes into this local folder. After having done with making the alterations, you can click on ‘Update and commit’ to upload all the changes. Do remember that the changes in your plugin’s readme.txt file must also be updated so as to ensure that the readme.txt stable tag and version tag available within main WordPress plugin files remain the same. Have a look at the below screen-shot for a detailed understanding of this step:
Next, you need to copy all the images to the ‘assets’ folder in addition to copying the plugin files to the trunk folder placed on your desktop. Once all this is completed, just select the plugin files and click on ‘Add’ button available in Mac’s Versions app as shown in the below screen-shot:
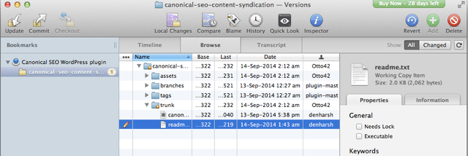
Finally, clicking on ‘Commit’ button will upload all the alterations into the WordPress official plugin repository. Have a look at below screen-shot:

You’ll be receiving an email when the plugin file gets added to the plugin repository along with your unique message.
That’s it for this tutorial!
Conclusion
So, if you’ve already created your very own WordPress plugin and are looking for a perfect means of submitting it to the official WordPress plugin directory, abiding by the steps covered in this post will definitely help you.
Author Biography:
 Jack Calder is a complete planner of how to make a blueprint of any website in the initial step. He is also responsible for converting Photoshop to WordPress with top quality role. Jack has shared here the guide on submitting a plugin in WordPress plugin repository.

