This Meteor tutorial will walk you through how to add a Twitter-based login system to your Meteor application, and it was originally posted at David Turnbell’s Meteor Tips blog .
Most web applications need an accounts system and, because of Meteor’s “smart packages,” adding an accounts system to your projects is easier than ever before. It’s one of the simplest things you can do with the framework.
In this tutorial, I’ll show you how to use the accounts-twitter package, which adds a Twitter-based login system to a project.
It’ll only take a few minutes.
Step #1: Install the Package
In a new Meteor project, run the following command:
meteor add accounts-twitter
This accounts-twitter package a “login provider” package, and these packages provide the foundation for an accounts system. There’s already a range of them available within Meteor, including:
- accounts-password
- accounts-facebook
- accounts-github
- accounts-google
- accounts-twitter
- accounts-weibo
The accounts-password packages creates a standalone login system with an email and password while the others connect to services like Facebook and Google. We’ll focus on Twitter for now but I’ll talk about the rest in other tutorials.
Step #2: Create the Interface
The previous command created the back-end for the accounts system but we need to create the front-end. This can be done with another command:
meteor add accounts-ui
After the package is installed, open the project’s default HTML file (or create one if it doesn’t exist), and paste the following between the body tags:
{{> loginButtons}}
Here, we’re including a “loginButtons” template. Where does this template come from? It’s part of the accounts-ui package we just added to the project and, because of it, we don’t have to create our own login form. (You could create your own login form if you wanted to though.)
Launch the local server and navigate to http://localhost:3000. You should see the following “Configure Twitter Login” button:
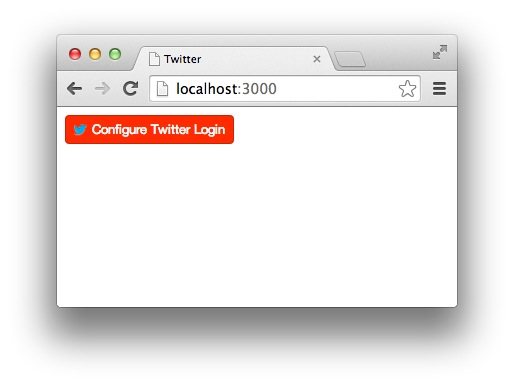
Had we installed the accounts-password package, our user login system would be ready to use. Since we’re working with Twitter though, there’s another step before our login system starts to function.
Step #3: Connect to Twitter
Click on the “Configure Twitter Login” button. A panel should appear with the following instructions:
- Visit https://dev.twitter.com/apps/new.
- Set Callback URL to: http://localhost:3000/_oauth/twitter?close.
- Select “Create your Twitter application”.
- On the Settings tab, enable “Allow this application to be used to Sign in with Twitter” and click “Update settings”.
- Switch to the API Keys tab.
These instructions are self-explanatory, so I won’t dive into each one, but once you’re done, you’ll receive an API key and an API secret. These are your application’s authentication details for Twitter’s API and they’ll look like this:
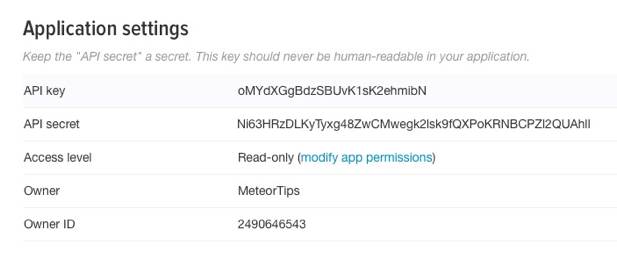
(You shouldn’t usually share your API secret like I’m doing here but, since I’ll delete this application when I’ve finished the tutorial, it doesn’t matter.)
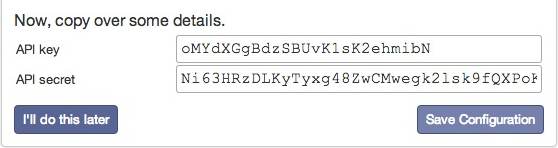
To complete the process, pop the key and the secret into the form field in your application, then click the “Save Configuration” button.
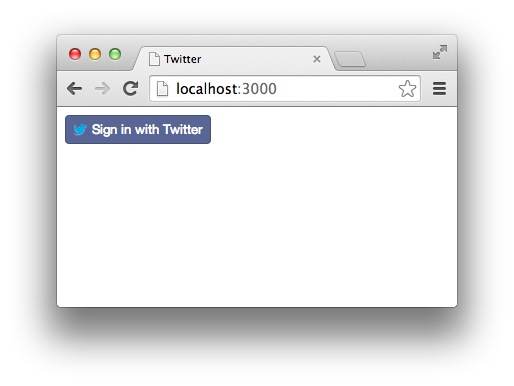
A fully functional “Sign in with Twitter” button will appear.
Step #4: Explore the Meteor.users Collection
After we add a login provider to an application, Meteor creates a collection called Meteor.users to hold the data of our users.
To confirm this, open the JavaScript Console and write:
Meteor.users
You can even use familiar MongoDB commands, like:
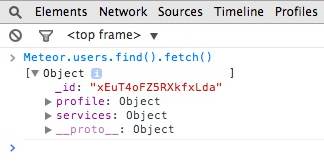
Meteor.users.find().fetch();
This returns an array of the users in the collection but, since no one has logged in yet, the array is empty. Now’s a good time, then, to sign in with your Twitter account.
Because of the accounts-ui package, the name attached to your Twitter will appear in the interface after you login, along with a “Sign Out” button:

You can now use the fetch function to see the first user in the collection:
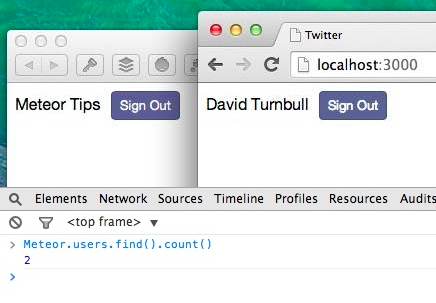
Or use the count function to retrieve the number of users in the collection:
Meteor.users.find().count();
Run this function once and notice that 1 is returned, then sign into a different Twitter account in a different browser and run the function again. You’ll see that 2 is returned since two users have logged in to our application, meaning there’s two documents in our collection.
Step #5: Display a List of Users
To take the previous step further, let’s display a list of all of the registered users within the interface. First, add a “list” template to the HTML file:
<template name="list">
</template>
Then include it between the body tags:
{{> list}}
Next, switch to the JavaScript file — if one doesn’t exist, then create it — and create a helper:
if(Meteor.isClient){
    Template.list.userInCollection = function(){
        // code goes here
    }
}
There shouldn’t be anything new here. We’re creating a “userInCollection” helper function and attaching it to the “list” template. We’re also using an isClient conditional since our helpers should only run on the client (since they’re inextricably linked to our templates and could therefore never run on the server).
Within the helper function, write:
return Meteor.users.find();
This is how we’ve used the find function in previous tutorials, only we’re attaching it to the Meteor.users collection that Meteor created for us.
Back in the HTML file, we can now reference the helper in an each block to iterate through the data that the helper returns:
<ul>
{{#each userInCollection}}
    <li>test</li>
{{/each}}
</ul>
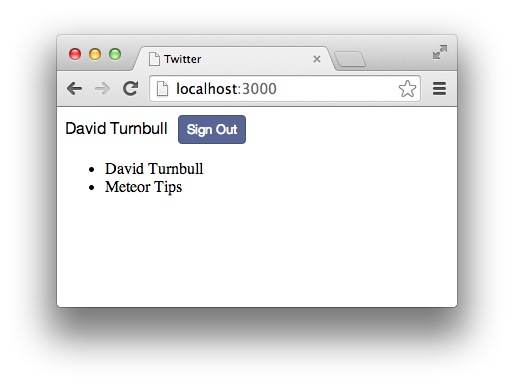
If there’s two users in the collection, the word “test” will appear twice in the list we’ve created.
The trick now is, how do we reference the fields in our collection? Have “username” or “name” fields automatically added to the collection? And, well, that’s basically what’s happened, but the field names aren’t so obvious. To see what I mean, let’s explore an individual user’s document.
Within the JavaScript Console, write:
Meteor.user();
This is the function we use to refer to the currently logged in user. If you type this into the Console without being logged in, it’ll return null. When you are logged in though, it returns the logged in user’s document:
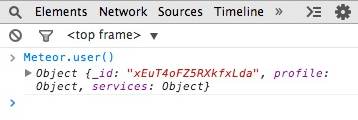
Here, we see three fields:
But start clicking on the downward-facing arrows and notice that more fields are nested within these fields:
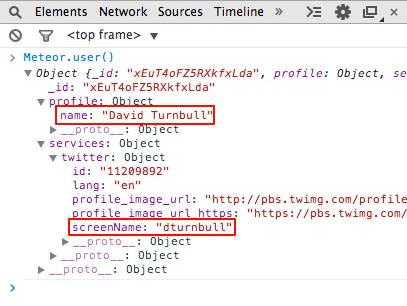
There’s the name field within the profile field, and also the screenName field within the twitter field (and that field is within the services field).
It’s a little bit messy but we can reference all of the fields we see here.
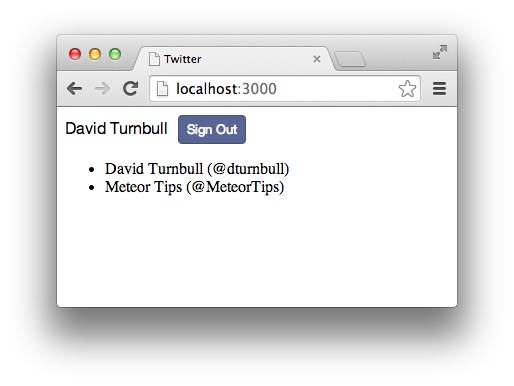
Back in the HTML file, remove the word “test” from the each block and replace it with the following:
{{profile.name}}
Here, we’re retrieving the name field, but since that field is nested within the profile field, we have to write out both field names using this dot notation.
The result should resemble:
To retrieve the screenName field, we have to go one level deeper:
{{services.twitter.screenName}}
But we could add this into our each block:
{{#each userInCollection}}
    <li>{{profile.name}} (@{{services.twitter.screenName}})</li>
{{/each}}
Then have our list look like:
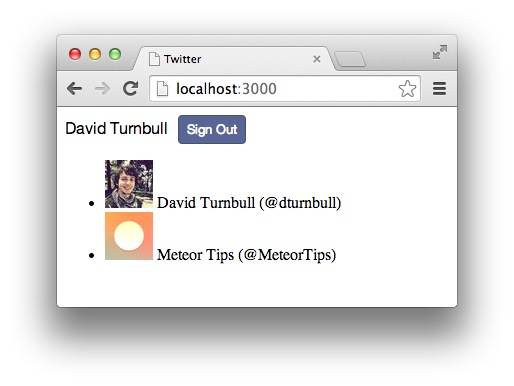
We also have access to the profile image URL of each user (via both HTTP and HTTPS), so let’s reference that from wherever we want within our each block:
<img src="{{services.twitter.profile_image_url}}">
Our application isn’t pretty but we’ve made a lot happen with little code.
Step #6: Check the Current User
It’s impossible to go into too much detail about accounts in a single tutorial since there’s so much to talk about. I do, however, want to cover one last feature you’ll use a lot: checking whether or not the current user is logged in.
We touched on this earlier when talking about the Meteor.user() function and you could write something like this in your JavaScript file:
if(Meteor.user()){
    // code only executes if user is logged in
}
Since the Meteor.user() function returns null if a user is not logged in, this is a fine way to check a user’s current status.
But there’s also an equivalent to use in our templates:
{{#if currentUser}}
{{/if}}
We can place these tags in our HTML files and anything we put between them will only appear if current user is logged in. We could also add an else clause to the mix for further logic:
{{#if currentUser}}
    You're logged in.
{{else}}
    You're not logged in.
{{/if}}
There’s a lot of times where these tags will come in handy but a common use-case is to stop random users from accessing a form they’re not meant to access. If we were making a blogging tool, for instance, we wouldn’t want just anyone being able to see the “New Post” form.
Conclusion
Like I said, I can’t cover everything about accounts in a single tutorial, but I do hope this tutorial has given you a fun introduction to using Twitter as a login system. I’ll write about the other login systems in the future but, based on what we’ve covered here, try messing around with them yourself since that will always be the best way to learn. Let these tutorials act as guidance, but don’t be scared to experiment. It’s alright to make mistakes.
 David Turnbull is the author of “Your First Meteor Application“, which is a free online book, and he is also the founder of Meteor Tips.

